


Creating a website with Divi is easy because Divi combines the theme and page builder, helping you design a complete website without relying on extra plugins.
To get started, prepare your domain, hosting, WordPress installation, Divi Theme, and brand assets. Then plan your website type, required pages, and basic structure before building.
After that, set up WordPress and Divi by updating the site identity, logo, favicon, language, timezone, and permalink structure.
Once the setup is ready, you can create your website in three ways:
- Use Divi AI to generate layout, content, and style from a simple text prompt.
- Import pages from Divi’s pre-designed Layout Packs and customize them.
- Build from scratch using Divi elements and a custom design system
In this guide, you will learn how to create a Divi website using all three methods, including setup, design, responsiveness, and final launch checks.
Requirements for Creating a Website with Divi
Before you start building, make sure the basic setup is ready. You will need a domain, hosting, WordPress installation, Divi Theme, website content, and brand assets.
Domain Name and Web Hosting

Choose a short domain name that is easy to remember and matches your website purpose. For hosting, choose a WordPress-friendly provider with SSL security, backups, reliable support, and good loading speed.
WordPress Installation
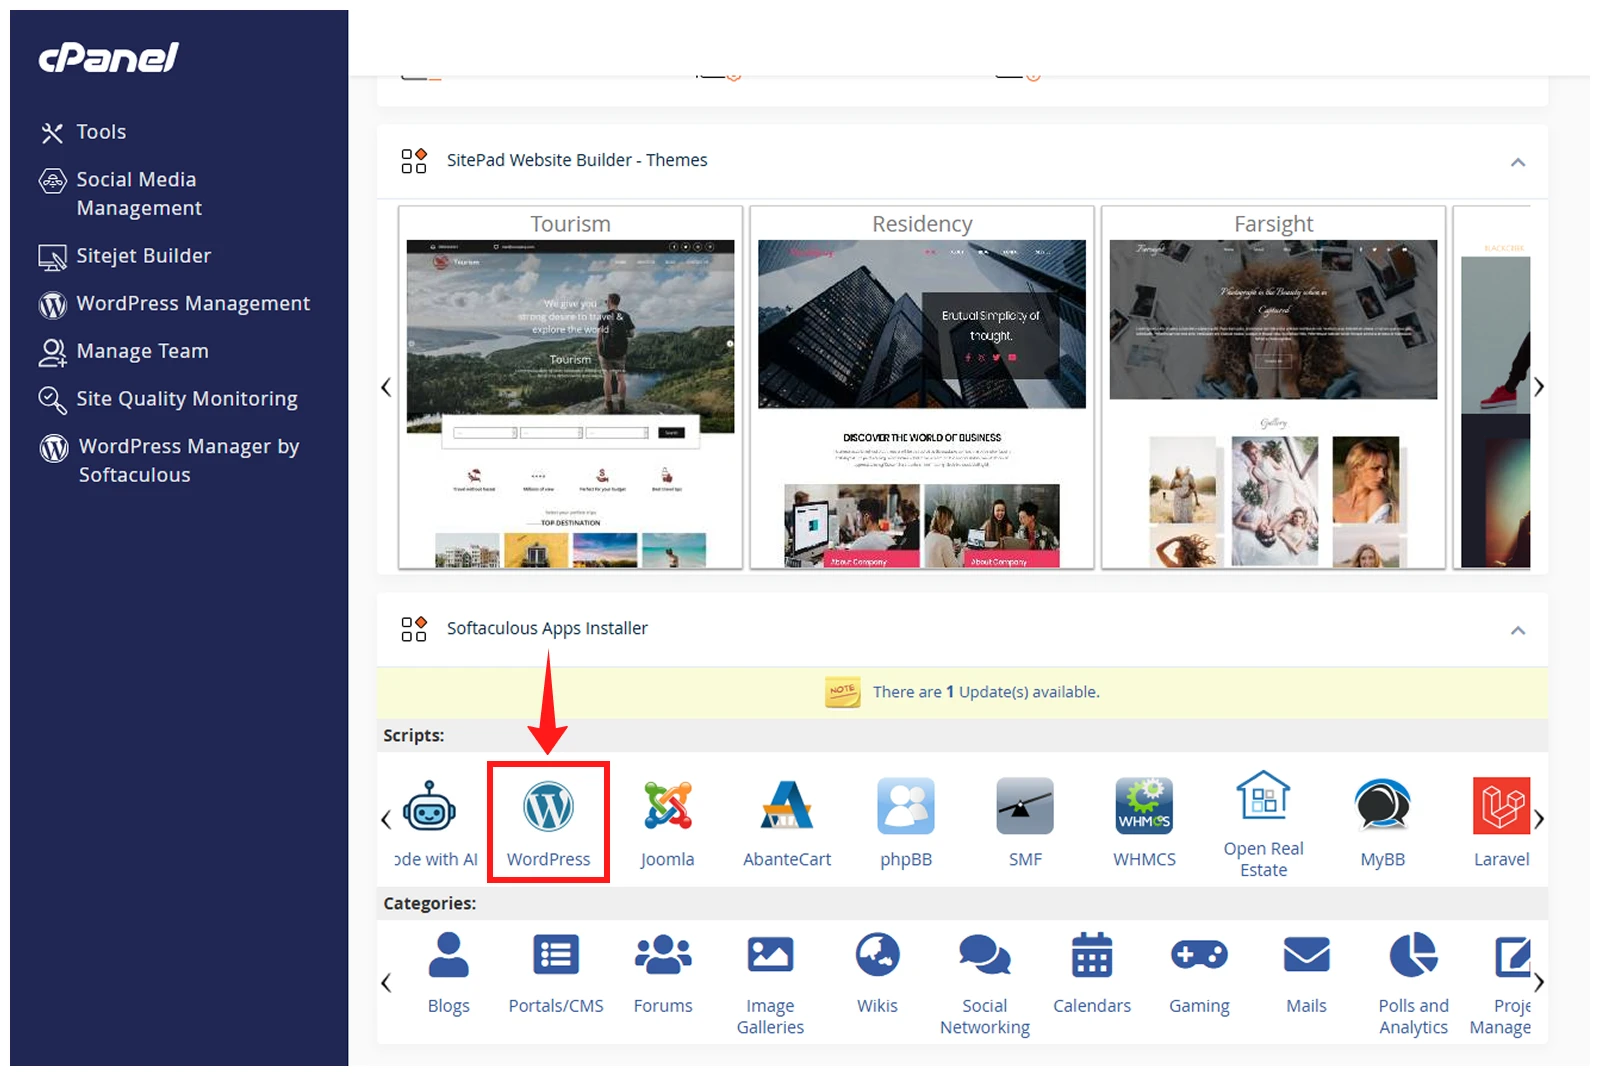
Since Divi is a WordPress theme, you need to install WordPress before adding the Divi Theme. Most hosting providers offer a simple one-click WordPress installation from the control panel. Using managed WordPress hosting can make the setup process even easier.
Install and Activate Divi Theme & Page Builder
Divi is a premium WordPress theme that comes with a built-in Visual Builder. (You can also use the Divi Visual Builder as a plugin with other WordPress themes.)
Download the Divi Theme or the Divi Builder Plugin as a ZIP file from your Elegant Themes account.
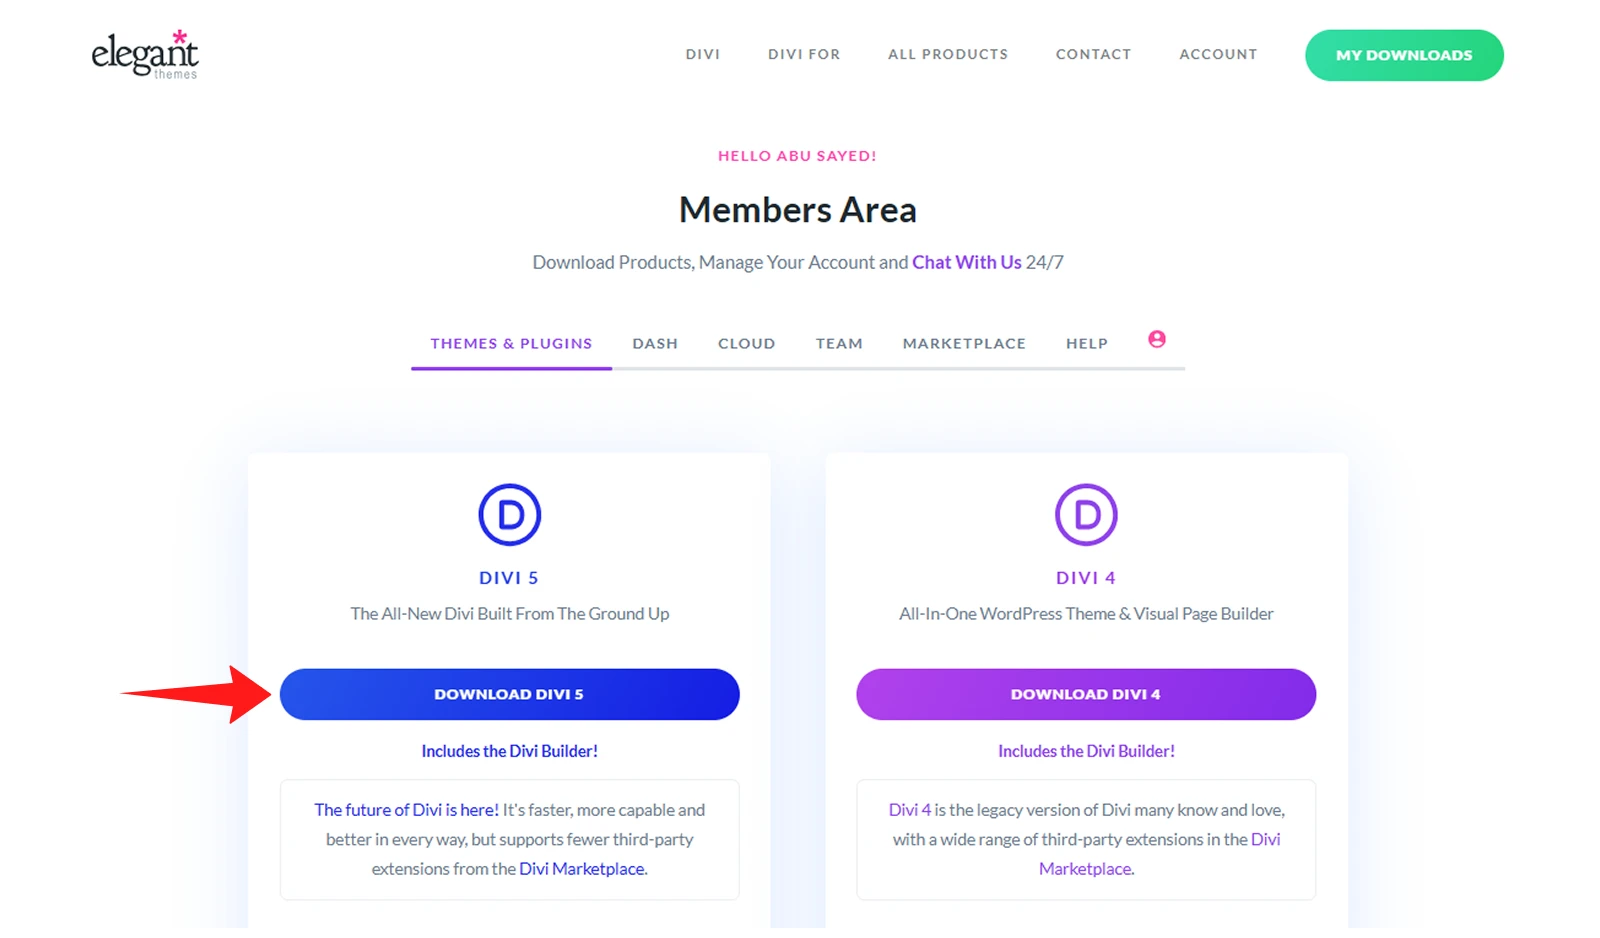
To install the Divi Theme, go to WordPress Dashboard > Appearance > Themes > Add New > Upload Theme, then upload the ZIP file, install, and activate it.
To install the Divi Visual Builder as a plugin, go to Plugins > Add Plugin > Upload Plugin, upload the ZIP file, install, and then activate it.
Website Content and Brand Assets
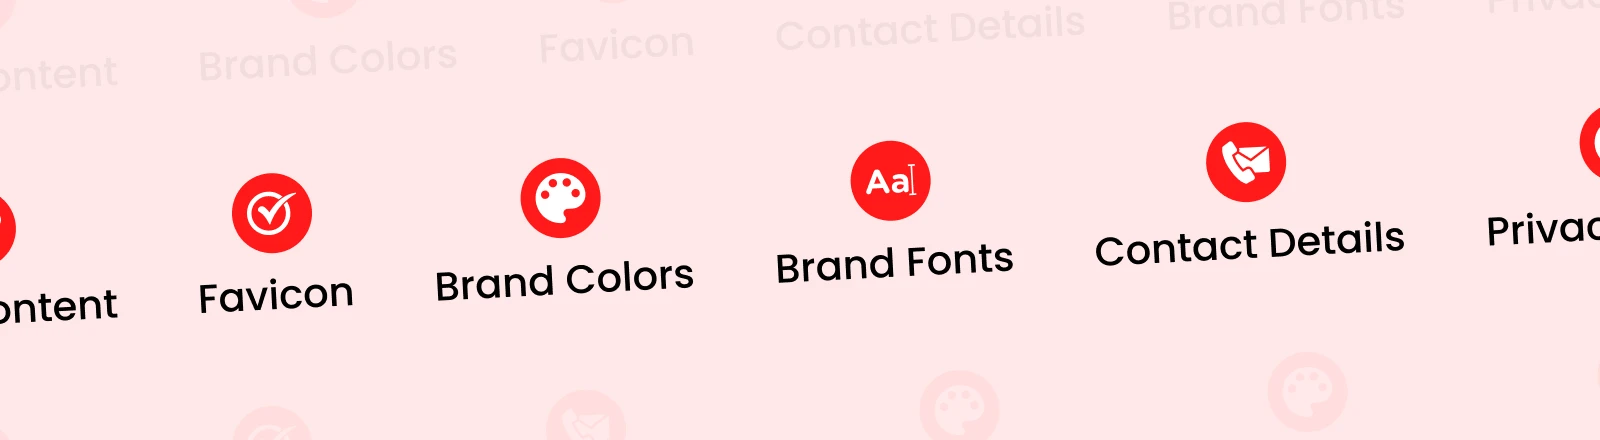
Prepare your logo, favicon, brand colors, fonts, images, contact details, page copy, and legal content such as a Privacy Policy. (You can update these later, but having them ready will make the website-building process smoother.)
Plan Your Website Before You Start Building
A clear plan helps you build faster and avoid unnecessary changes. Decide the website type you want to create before starting to create it.
Choose the Type of Website You Want to Build
Different website types require different pages, sections, and features. Common examples include local service businesses, agencies, portfolios, blogs, online stores, course or membership sites, and single-page websites.
For example, a business site may need services, testimonials, and a contact form, while an online store needs product pages, cart, checkout, and payment options.
Modern websites often include animations to create a more interactive experience.
Plan the Necessary Pages
After choosing your website type, list the pages you need to define your structure and navigation. Most sites include Home, About, Services or Products, Portfolio or Projects, Blog, Contact, and Privacy Policy.
Set Up WordPress & Divi Before Building
After installing and activating Divi, complete a few basic settings first. This includes site identity, logo, favicon, language, timezone, and other essential WordPress settings.
Complete the Site Identity
Start by adding the basic brand details of your website.
- Go to WordPress Dashboard > Settings > General and update things like title, tagline, timezone and more.
- Then click Save Changes.
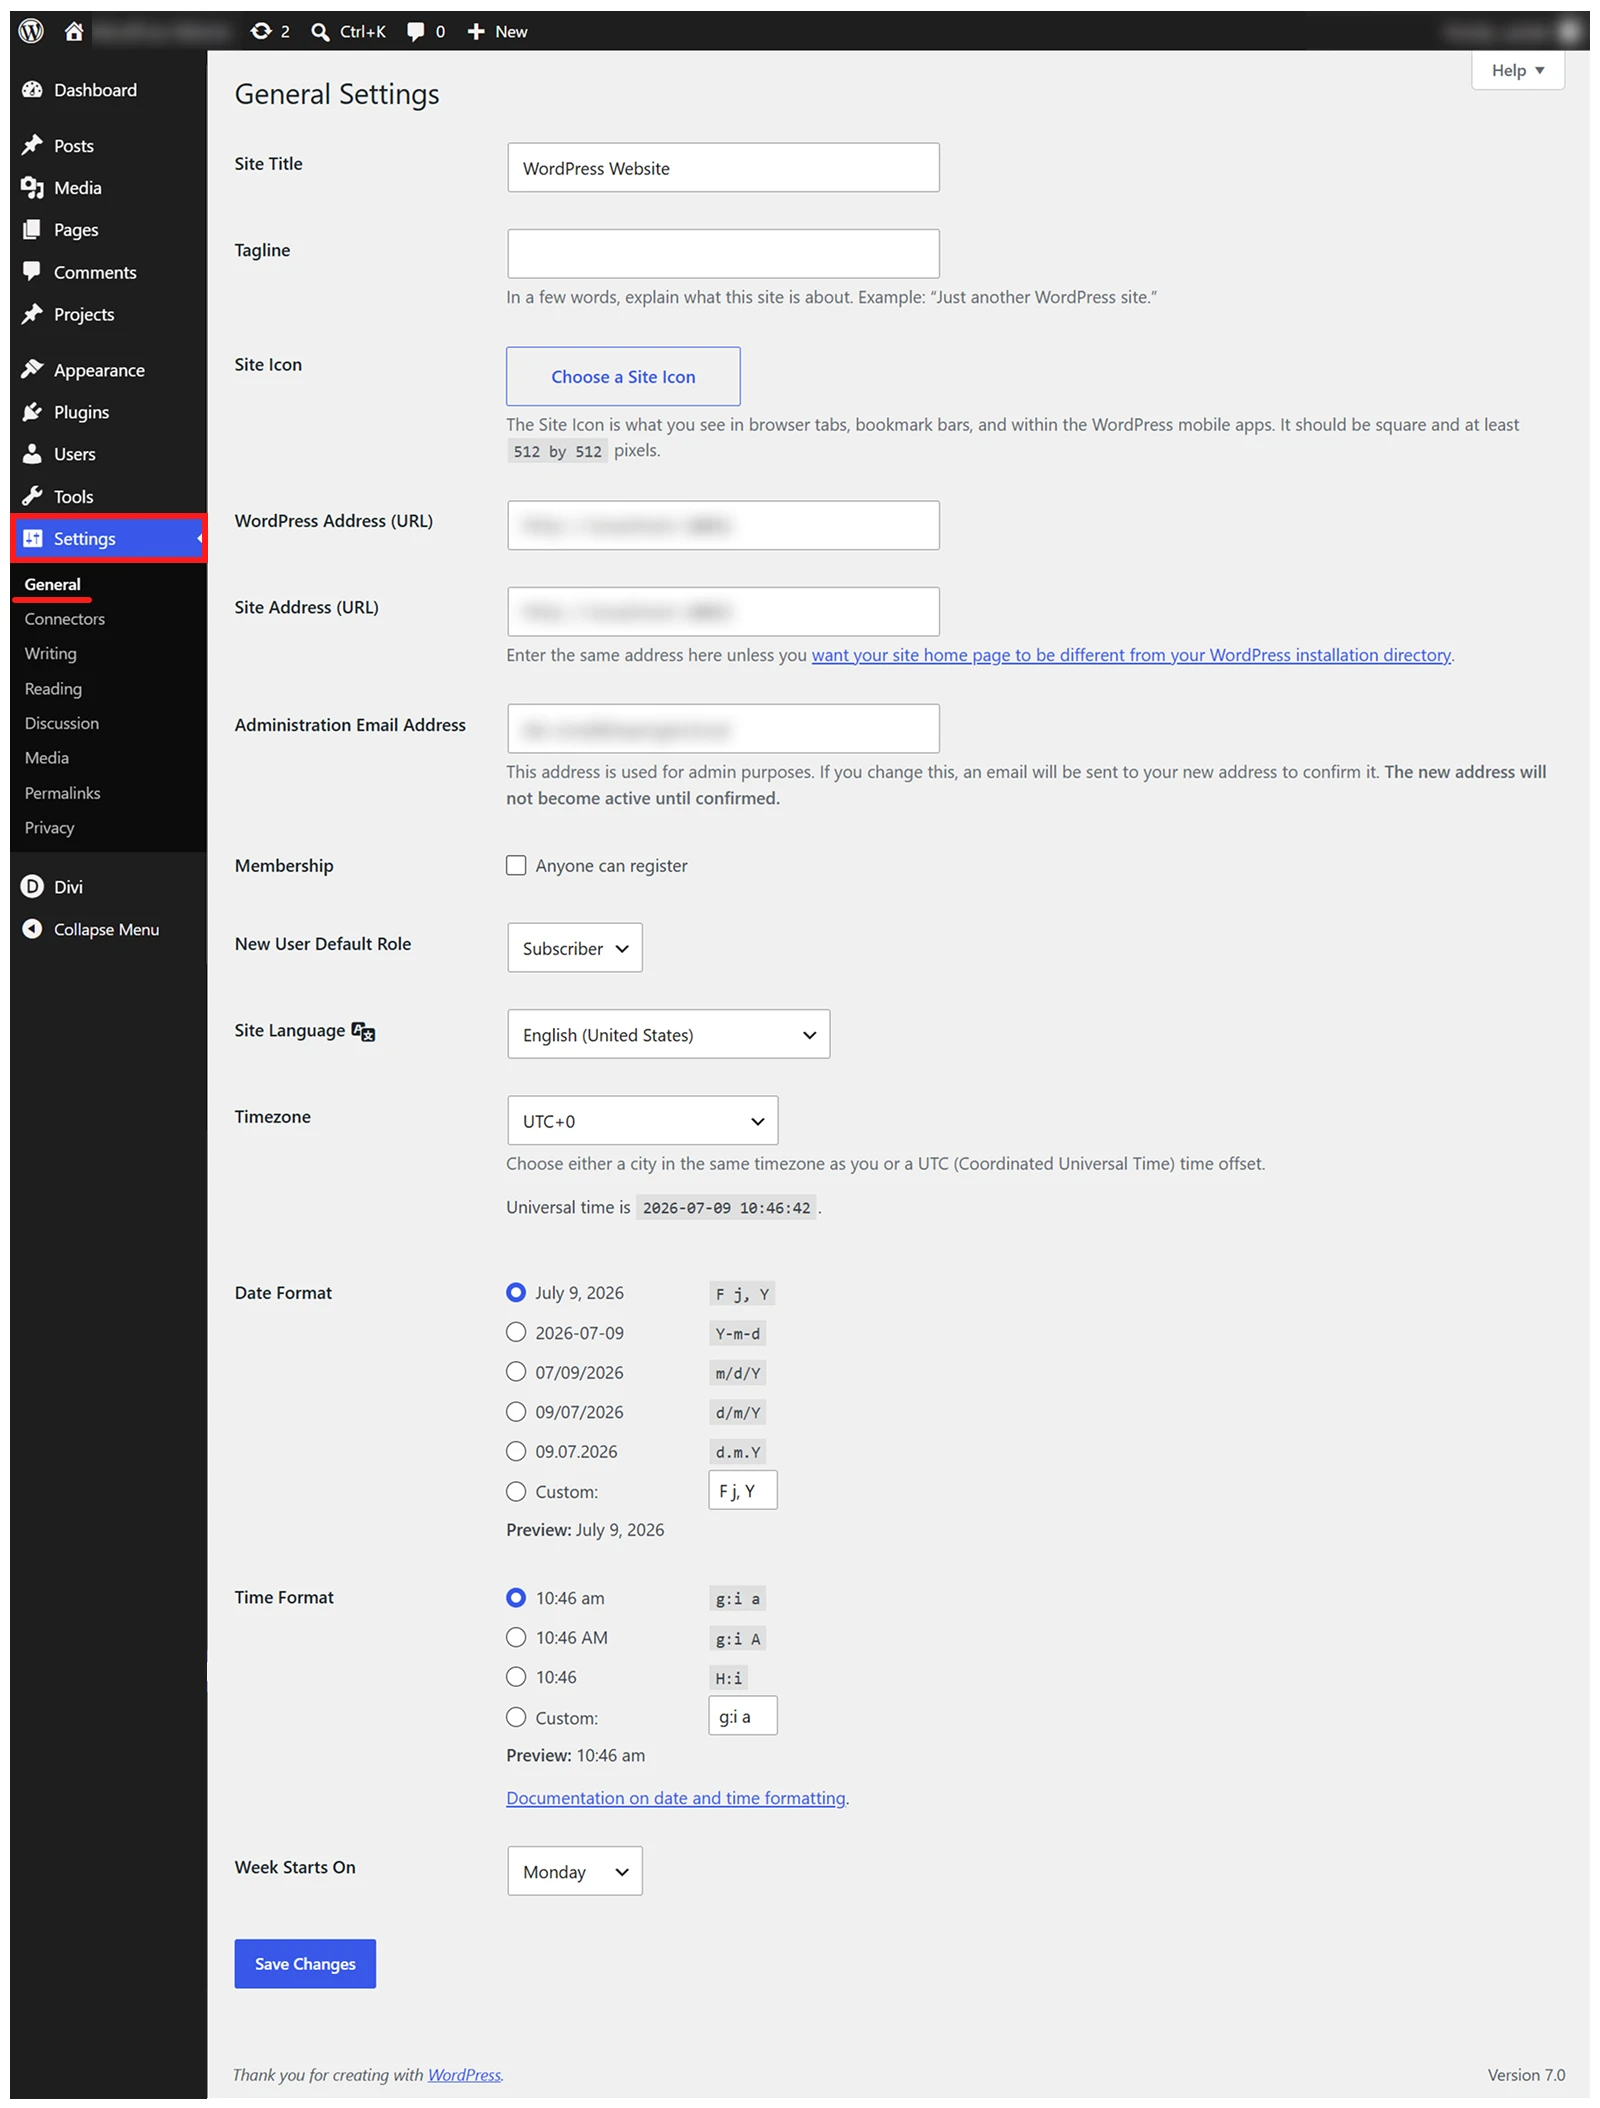
- Next, go to Divi > Theme Options > General and upload your logo. Save the changes. This logo will appear in your website header.
- To add the favicon, go to Appearance > Customize > General Settings > Site Identity and upload your site icon.
Tip: Use a square favicon (at least 512 x 512 pixels). For your logo, use a high-quality PNG or SVG with a transparent background, optimized for fast loading.
Set the Permalink Structure
Permalinks control how your page and post URLs appear. A clean URL structure is easier to read and better for SEO.
Go to WordPress Dashboard > Settings > Permalinks and select Post Name.
This changes the URL format to something cleaner, such as: yourwebsite.com/about
Then click Save Changes.
Start Creating the Website with Divi: Step-by-Step
Once your basic WordPress and Divi settings are ready, you can start building the website. There are three main ways to create a website with Divi:
- Use Divi AI
- Use Divi’s pre-designed Layout Packs
- Build from scratch
Let’s start with the fastest method.
Method 1: Create Your Divi Website Using Divi AI
Using Divi AI is the fastest way to create a website with Divi. You only need to describe your website with a simple text prompt, and Divi AI will generate the layout, text, and image content for you.
Follow these steps to create your website with Divi AI:
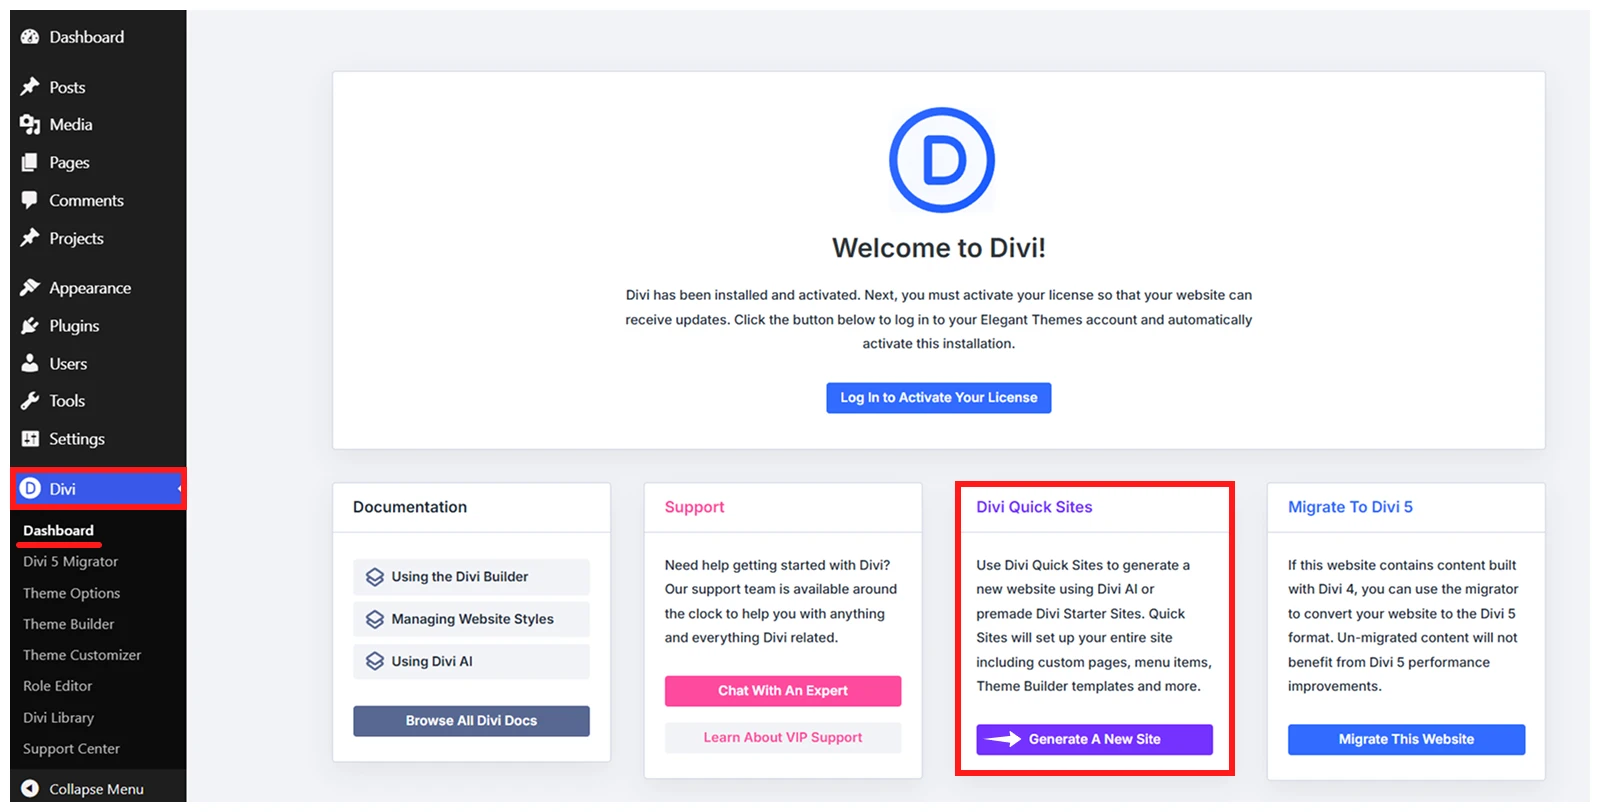
- Go to WordPress Dashboard > Divi > Dashboard
- Find Divi Quick Sites and click Generate A New Site.
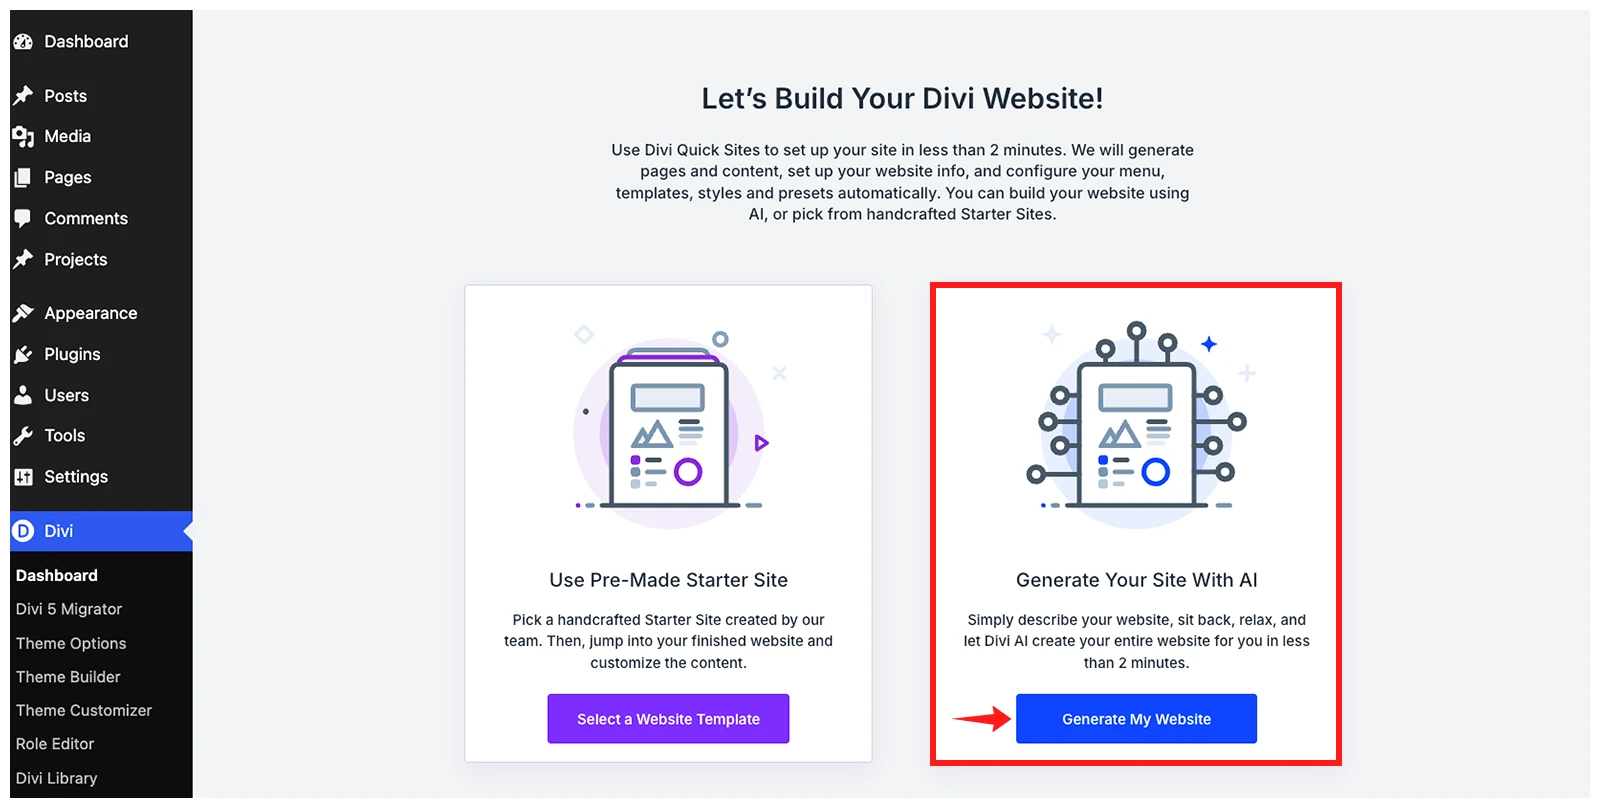
- Click Generate My Website
- Enter your Site Name and Slogan, then provide a clear Site Description with Page Plans outlining your website type, target audience, key pages, services, preferred style, and overall goal.
- Finally, choose whether you want to use stock images, generate AI images, or use placeholder images for your site.
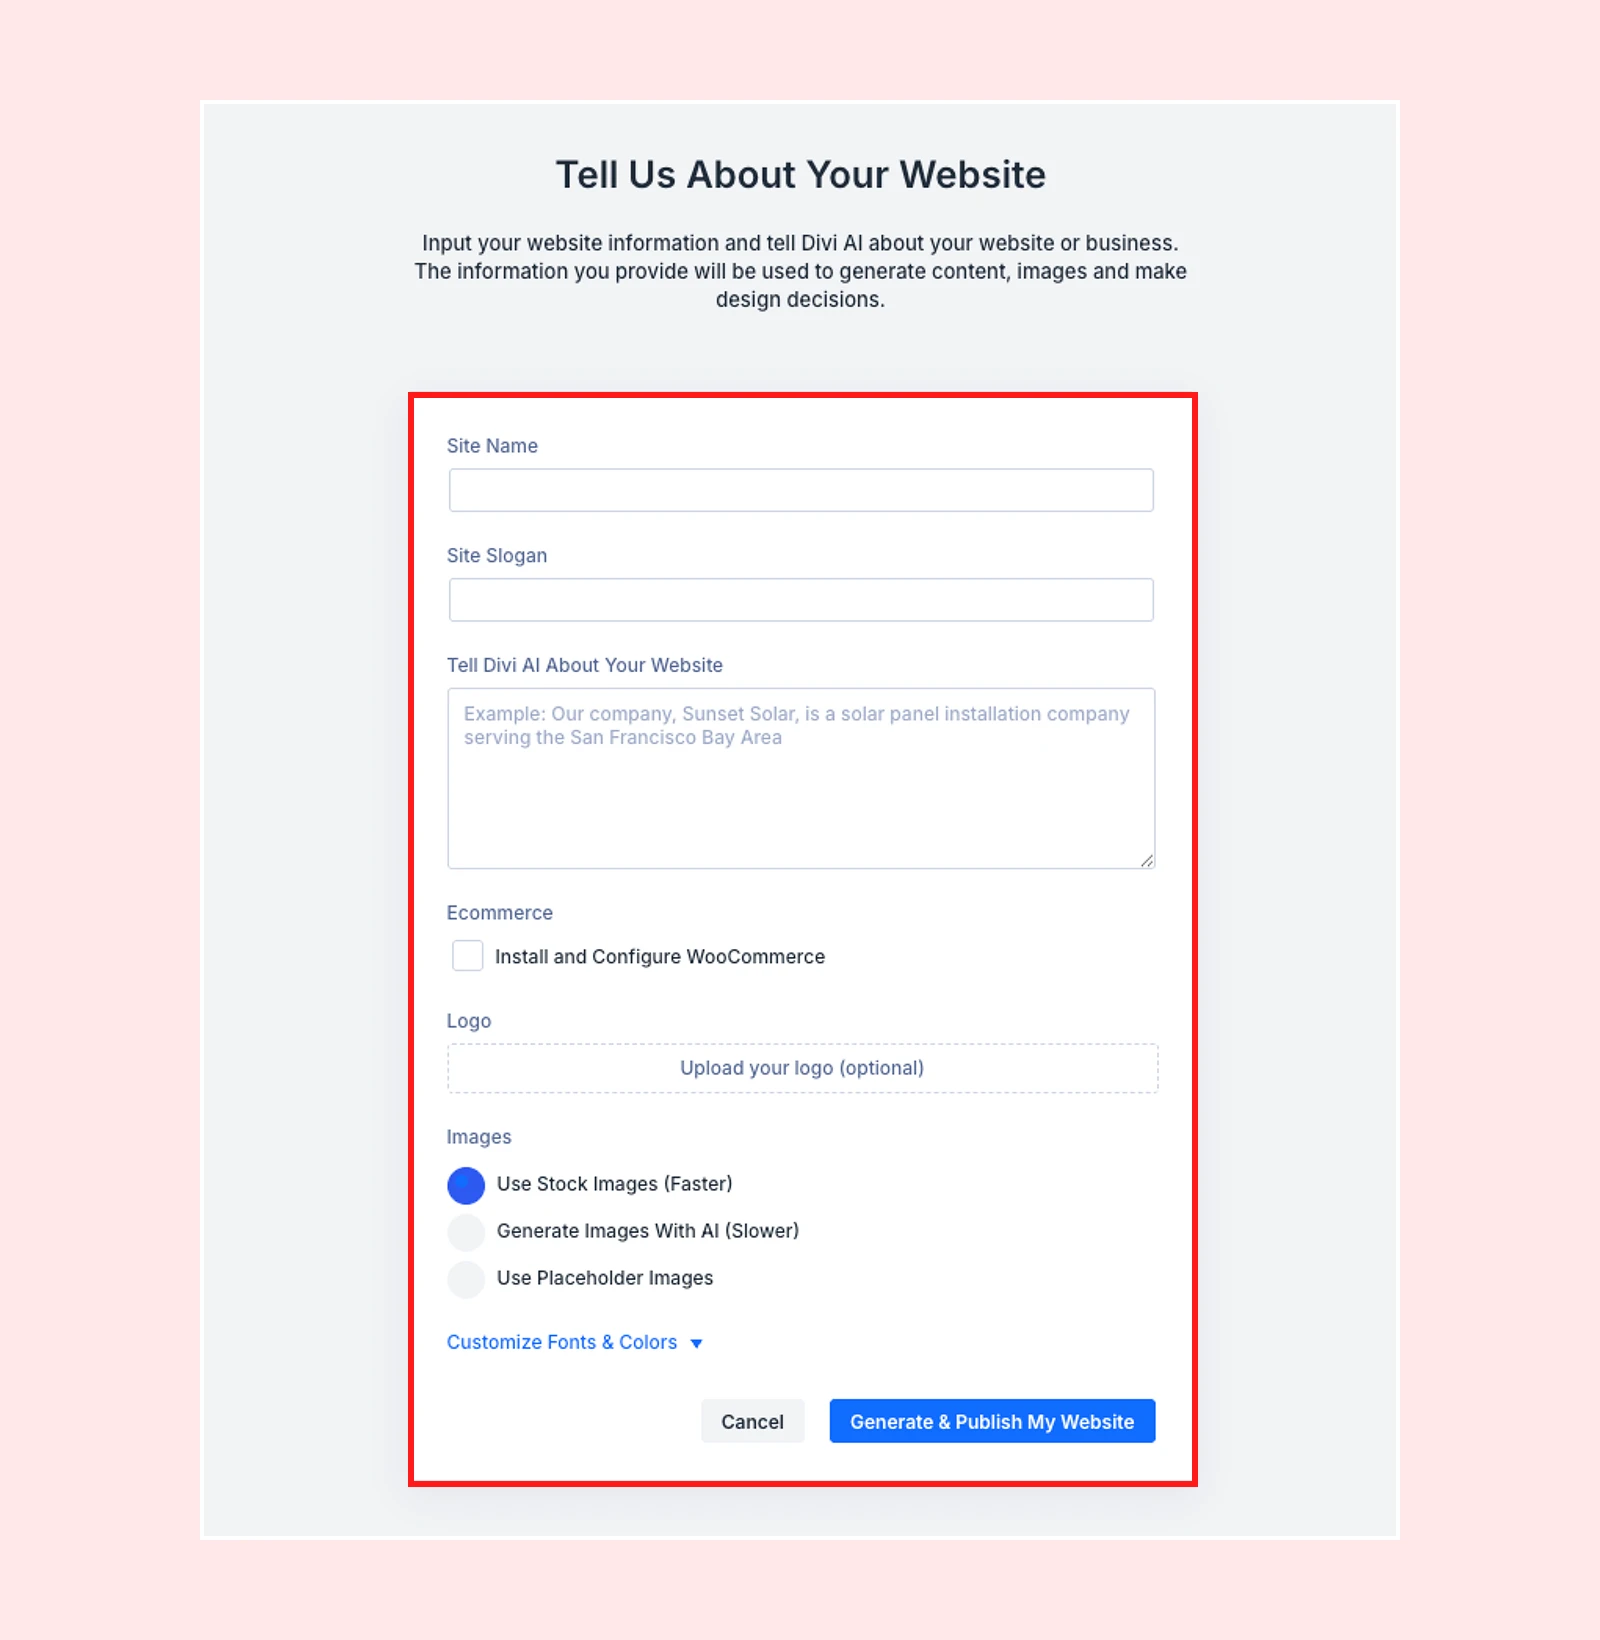
- After completing the setup, click Generate & Publish My Website.
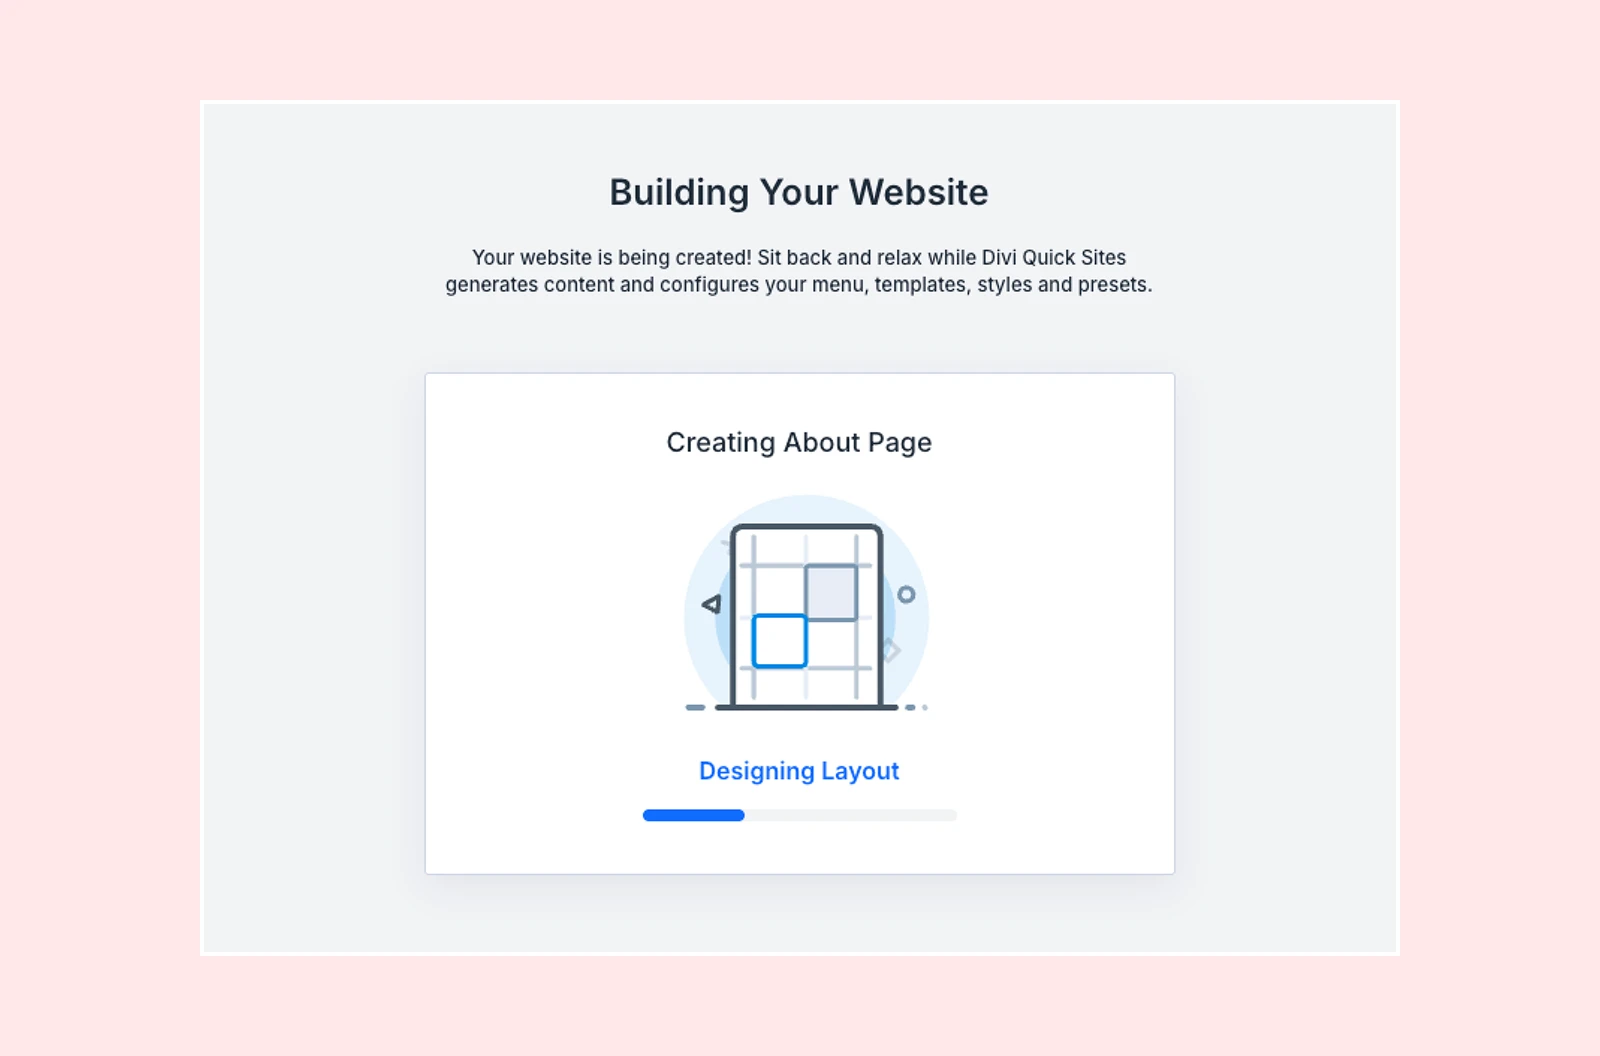
- Divi AI will generate the website based on your input.
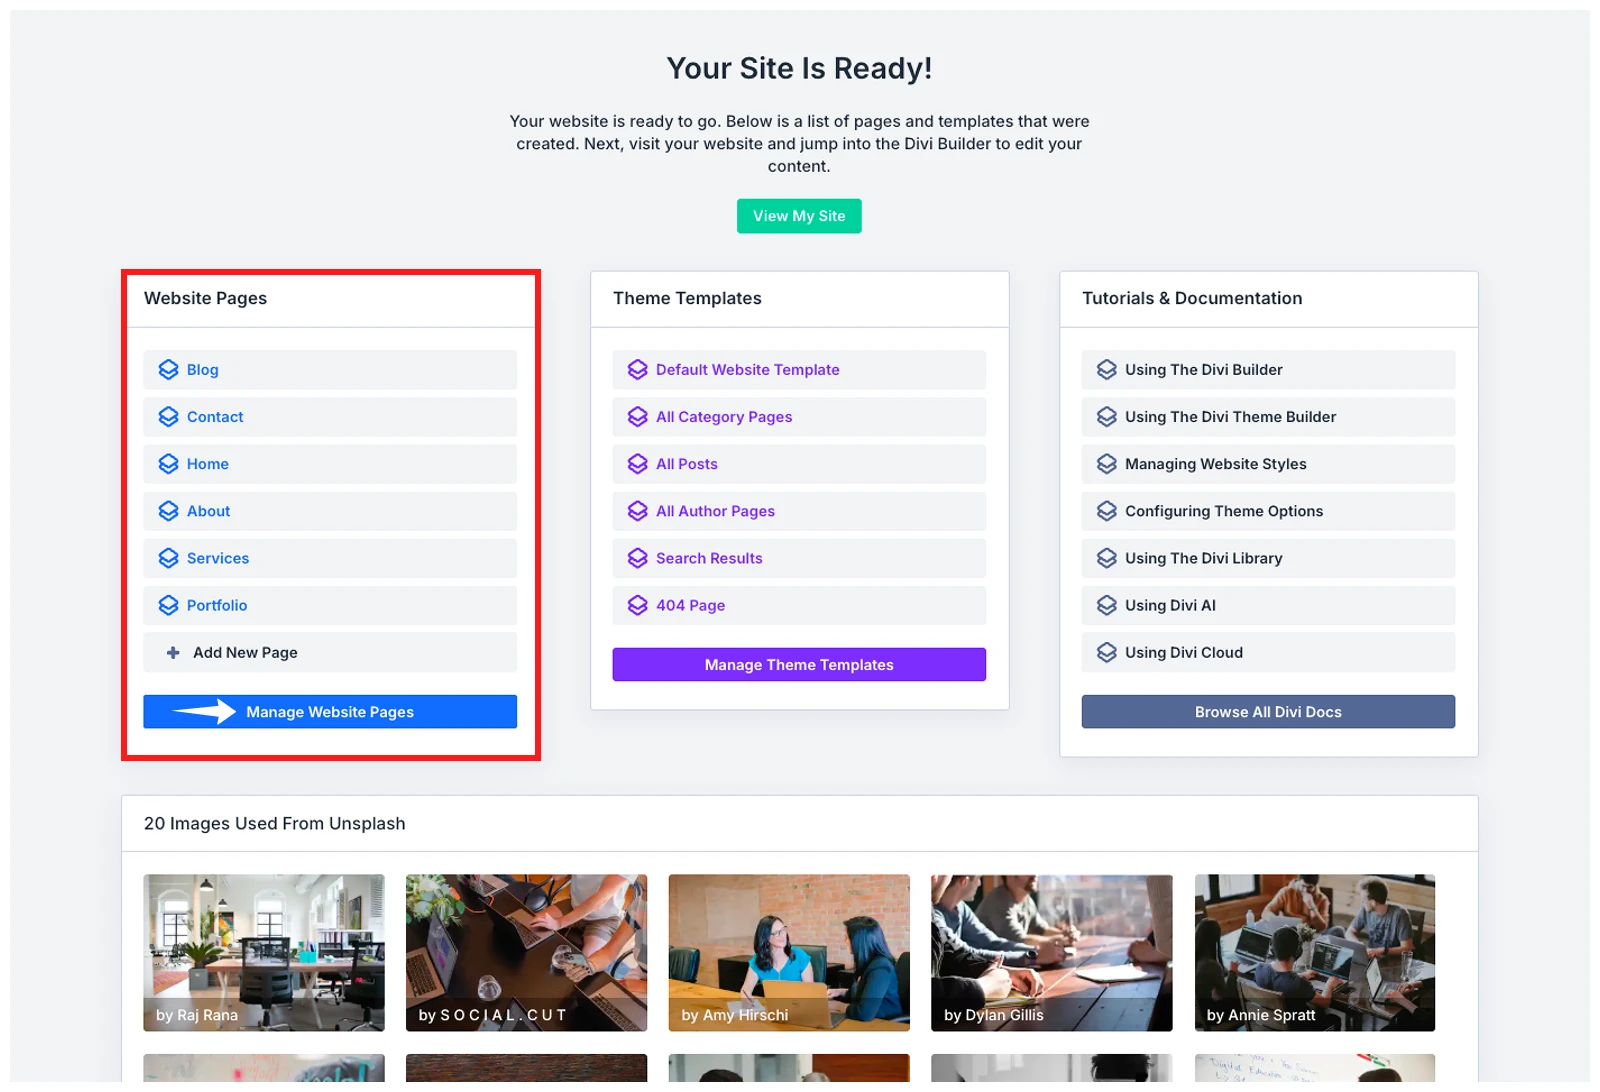
- After the site is created, click Manage Website Pages to see the pages Divi AI created for you.
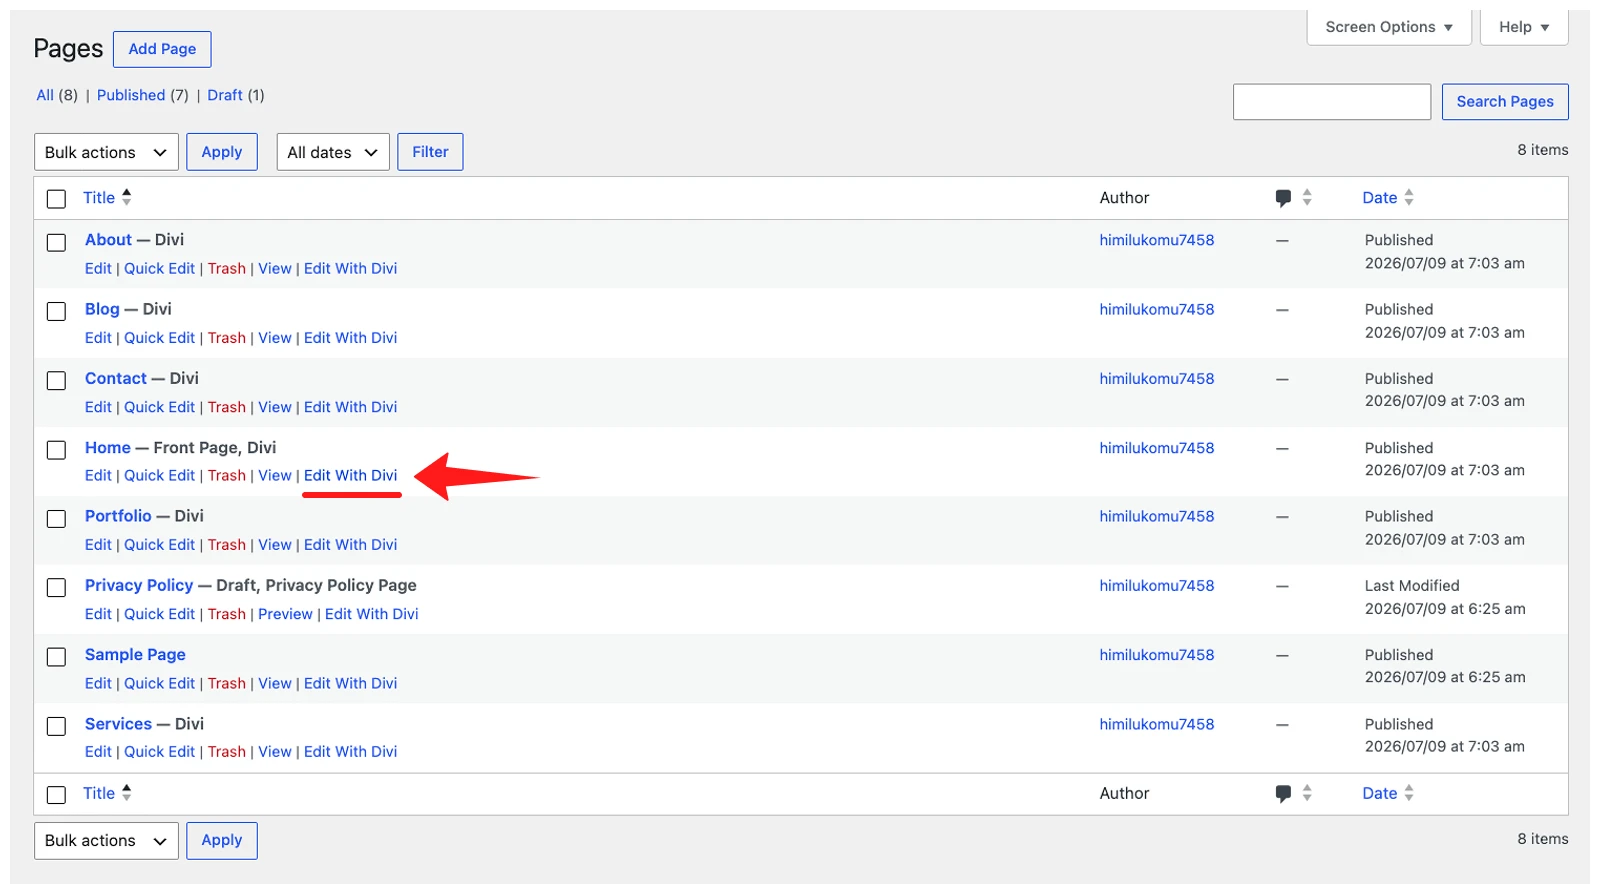
- To edit a page, click Edit with Divi and open it in the Divi Visual Builder.
- Then open the Layers panel from the left sidebar and select the module you want to modify. You can customize each section, row, column, or module using the Content, Design, and Advanced tabs.
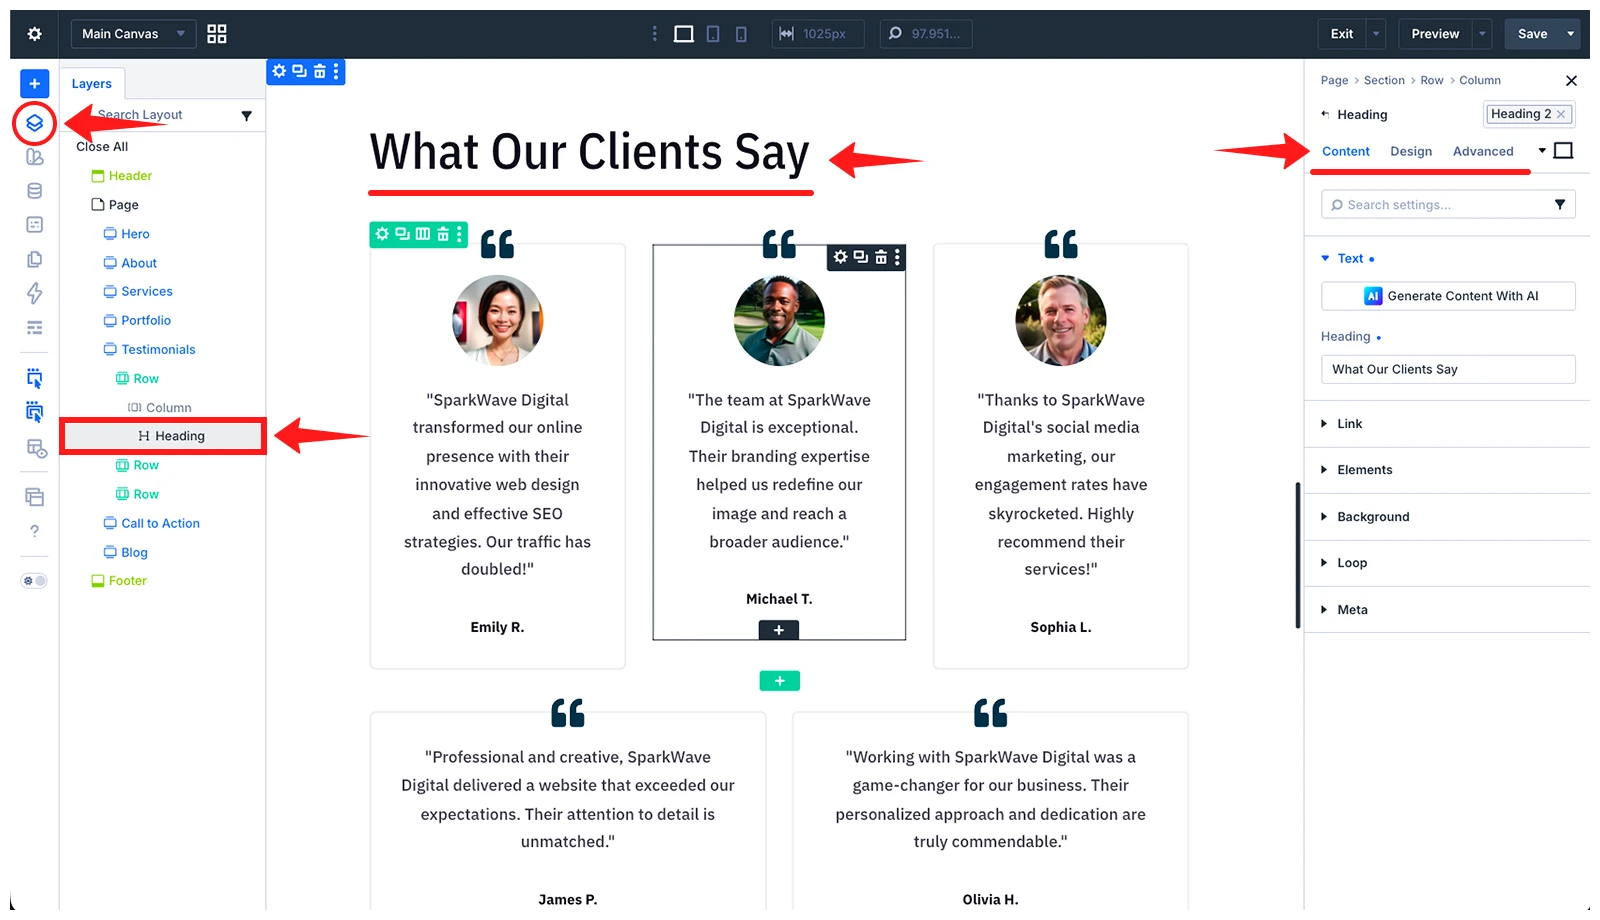
Make sure to replace or improve the AI-generated content with your final content. Update the headings, paragraphs, images, buttons, links, contact details, and any section that does not fully match your website goal.
Method 2: Create your Divi Website using Pre-Designed Layout Packs
Using Divi’s pre-designed Layout Packs is the easiest way to create web pages faster. Divi gives you 370+ full website Layout Packs and 2650+ section layouts, so you do not need to start every page from scratch.
Here is how to create a webpage using a pre-designed layout pack.
Step-1: Select a Layout Pack and Import a Page
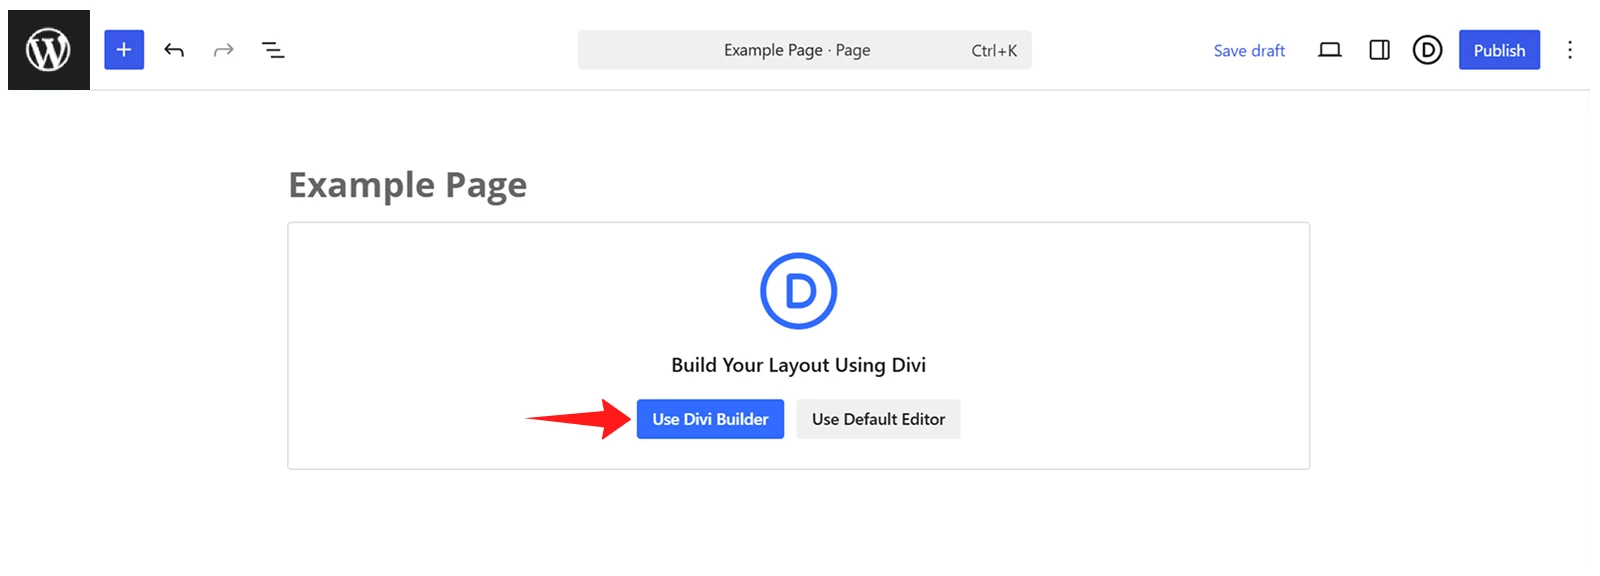
- Go to your WordPress Dashboard > Pages > Add Page
- Select Use Divi Builder to open the page in the Divi Visual Builder
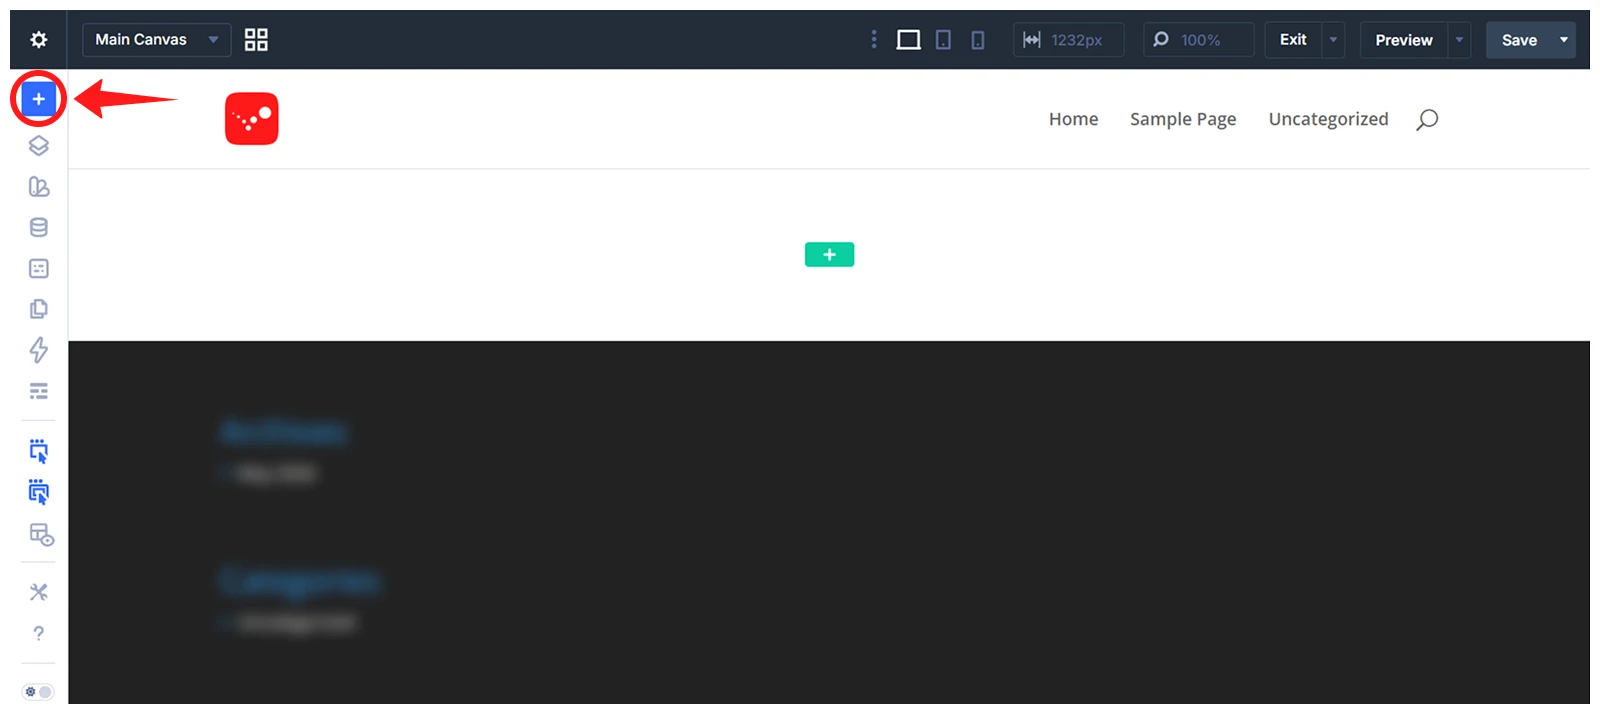
- Click the + icon (Add Layout) from the left sidebar to add a layout
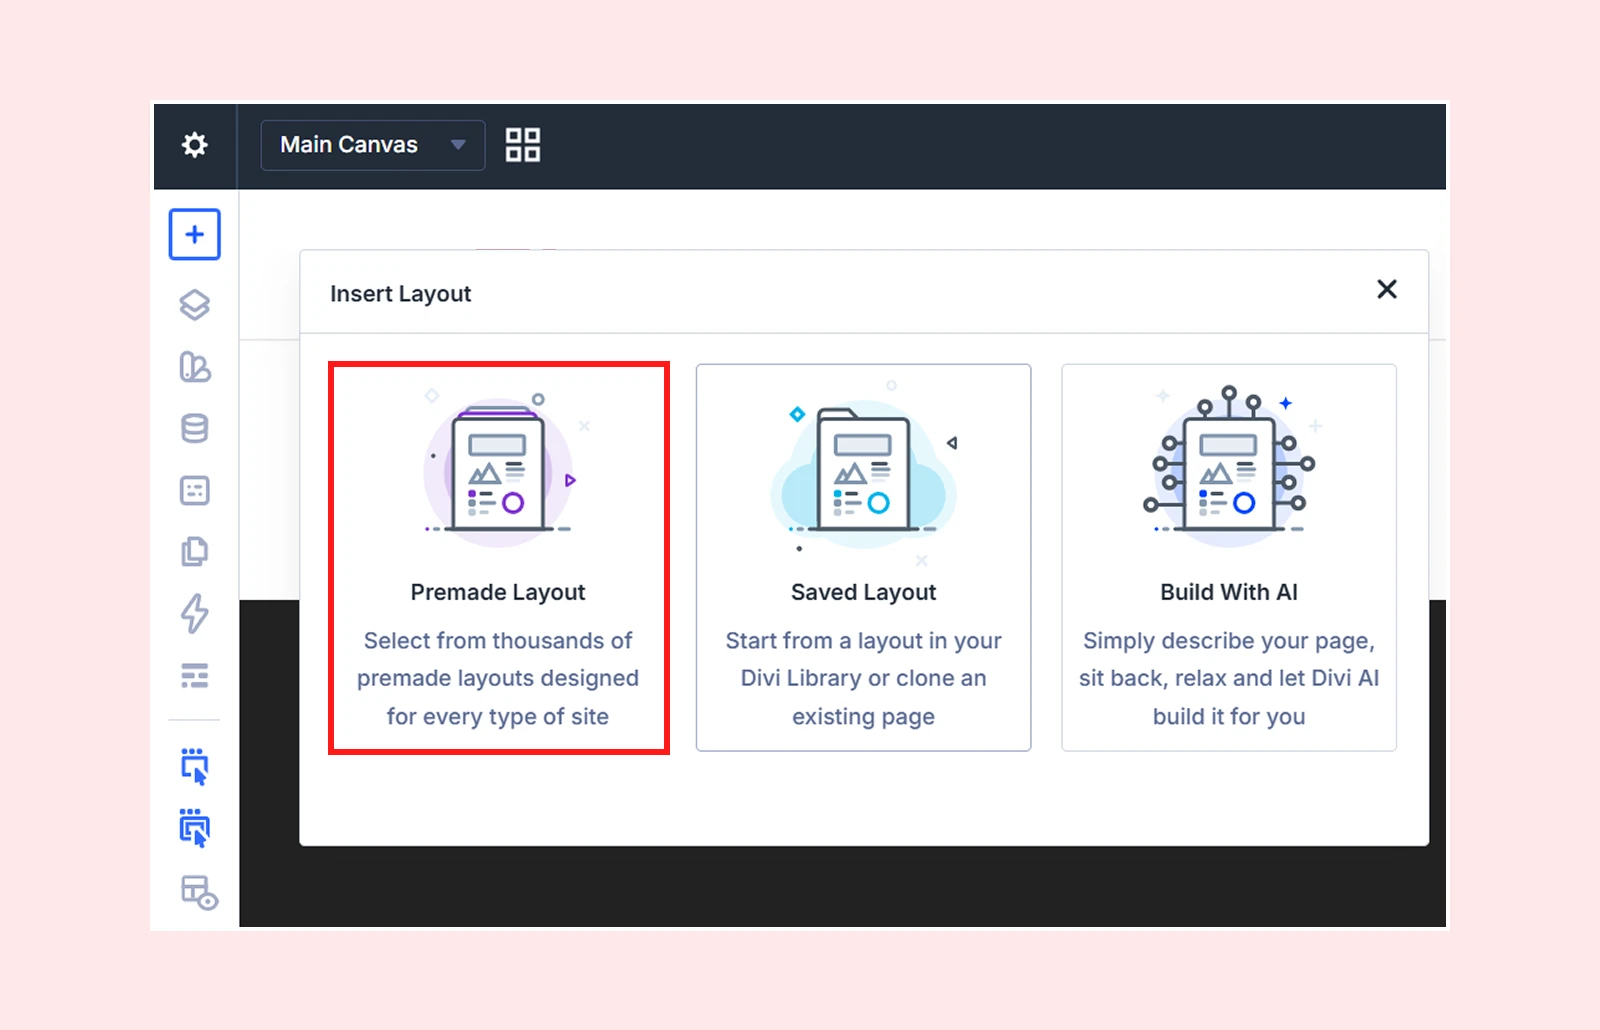
- Choose Premade Layout from the layout inserter options
- Browse the Layout Packs based on your website category and select the layout you prefer
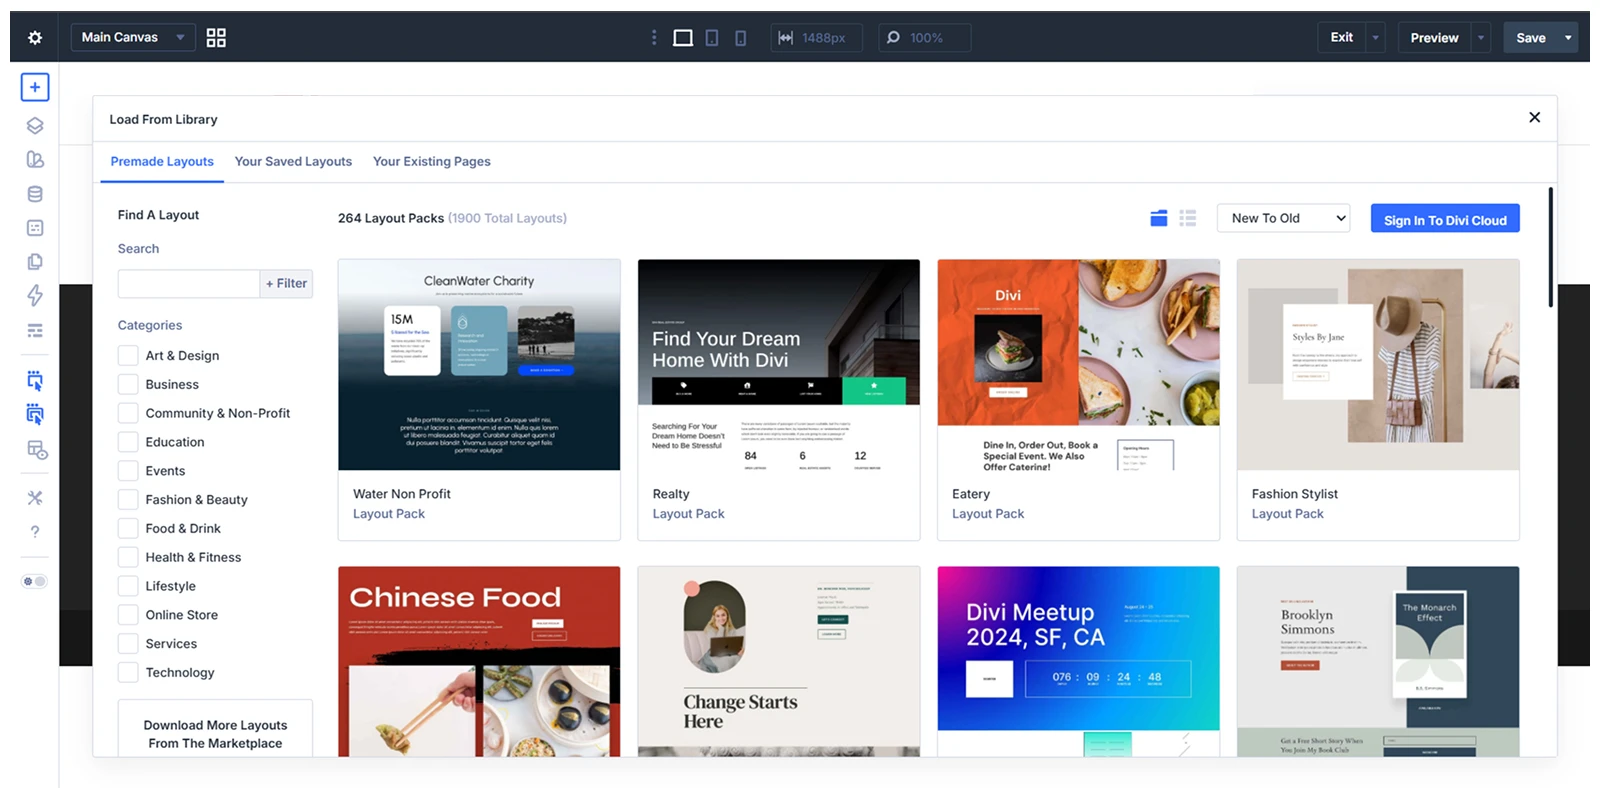
- Then choose the page you want to import and click Use This Layout
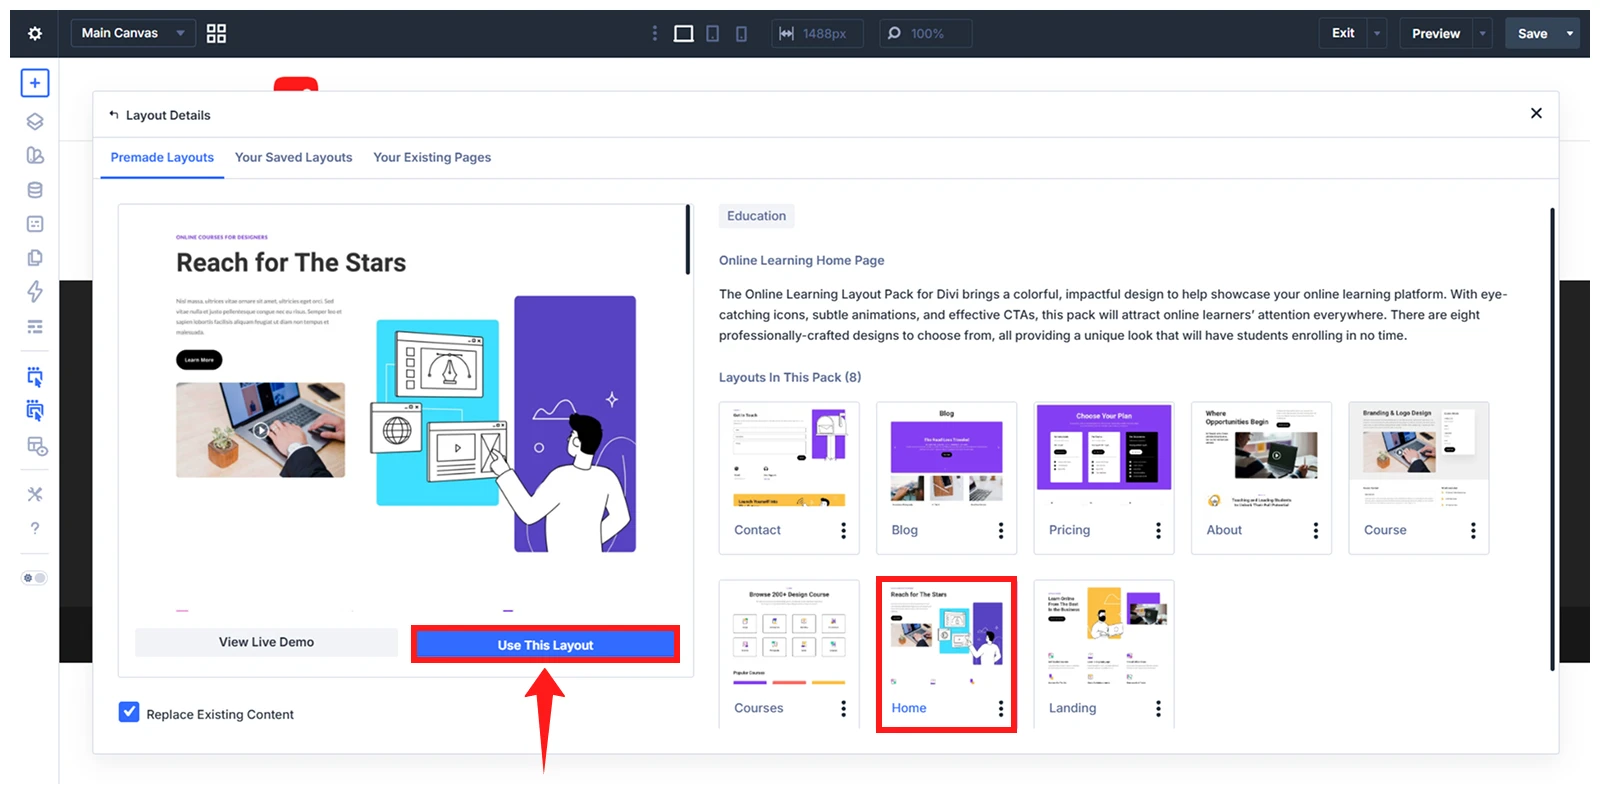
The selected page will be imported into the Divi Visual Builder with its content and styling. You can follow the same steps to import other pages from the same Layout Pack or choose individual pages from different Layout Packs based on your needs.
Tip: Most Divi Layout Packs include static pages, while some include basic animations. If you want to create a more interactive experience with animations on load, scroll, hover, or click, consider installing DiviMotion and using its animated section layouts.
Step-2: Replace the Demo Content
After importing the layout, replace or remove demo content with your own information.
- Open the imported page via WordPress Dashboard > Pages, then click Edit with Divi to launch the Visual Builder.
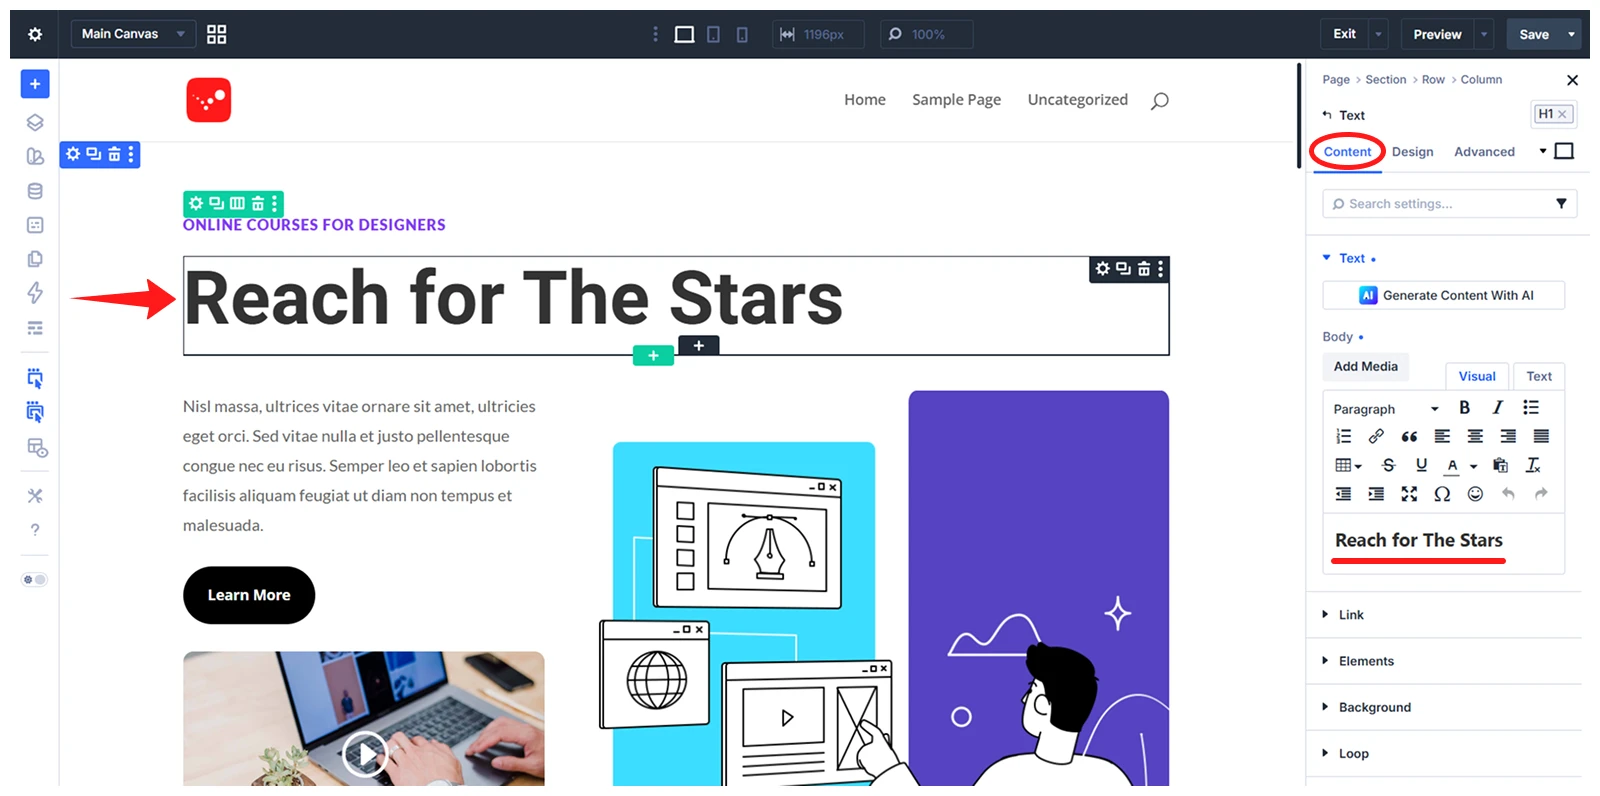
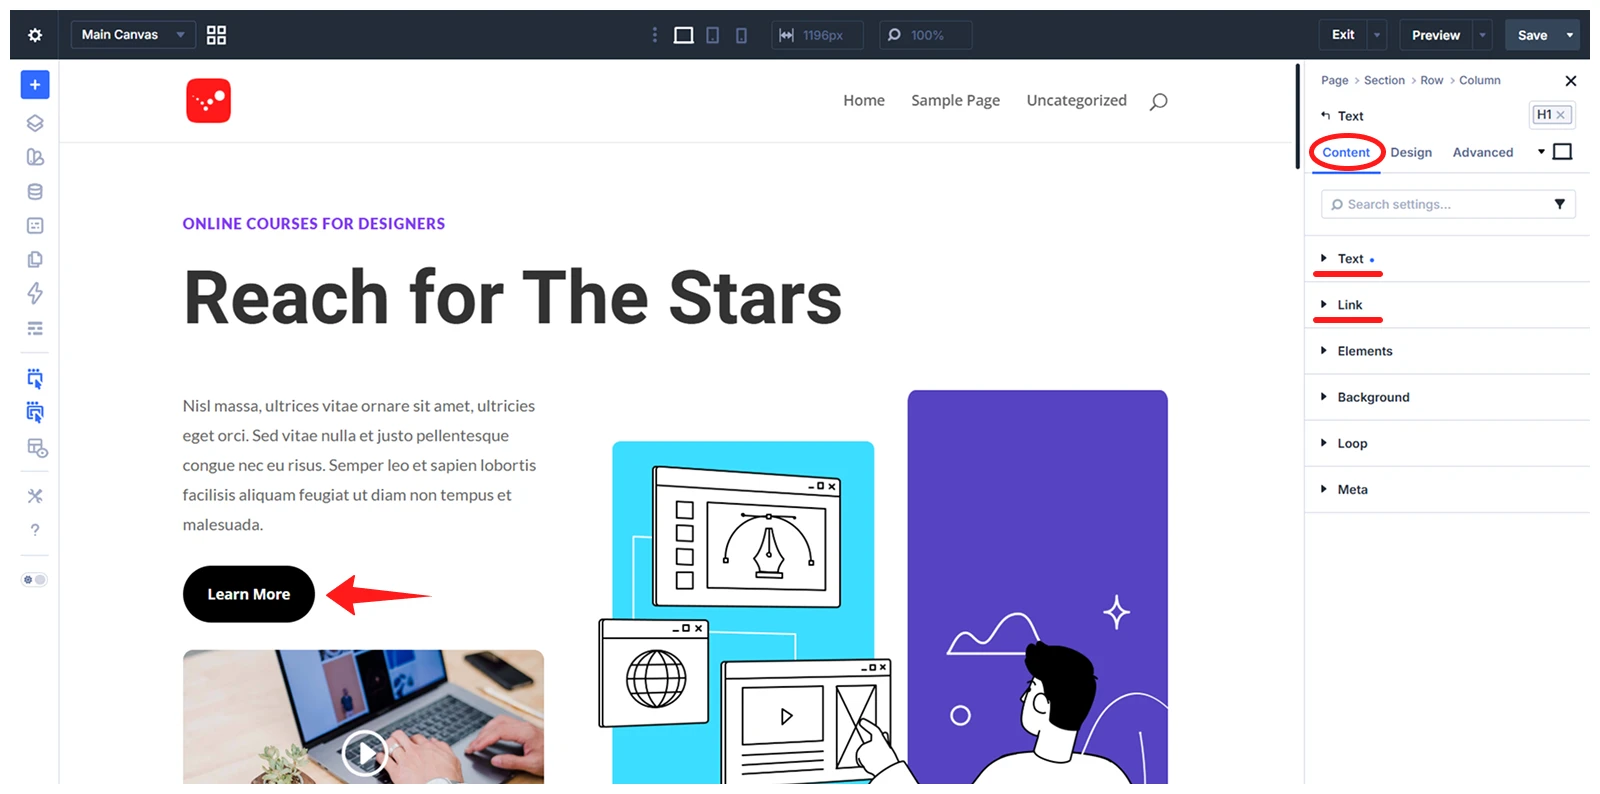
- Click on any module you want to edit and go to the Content tab
- Replace the heading and paragraph from the Text field
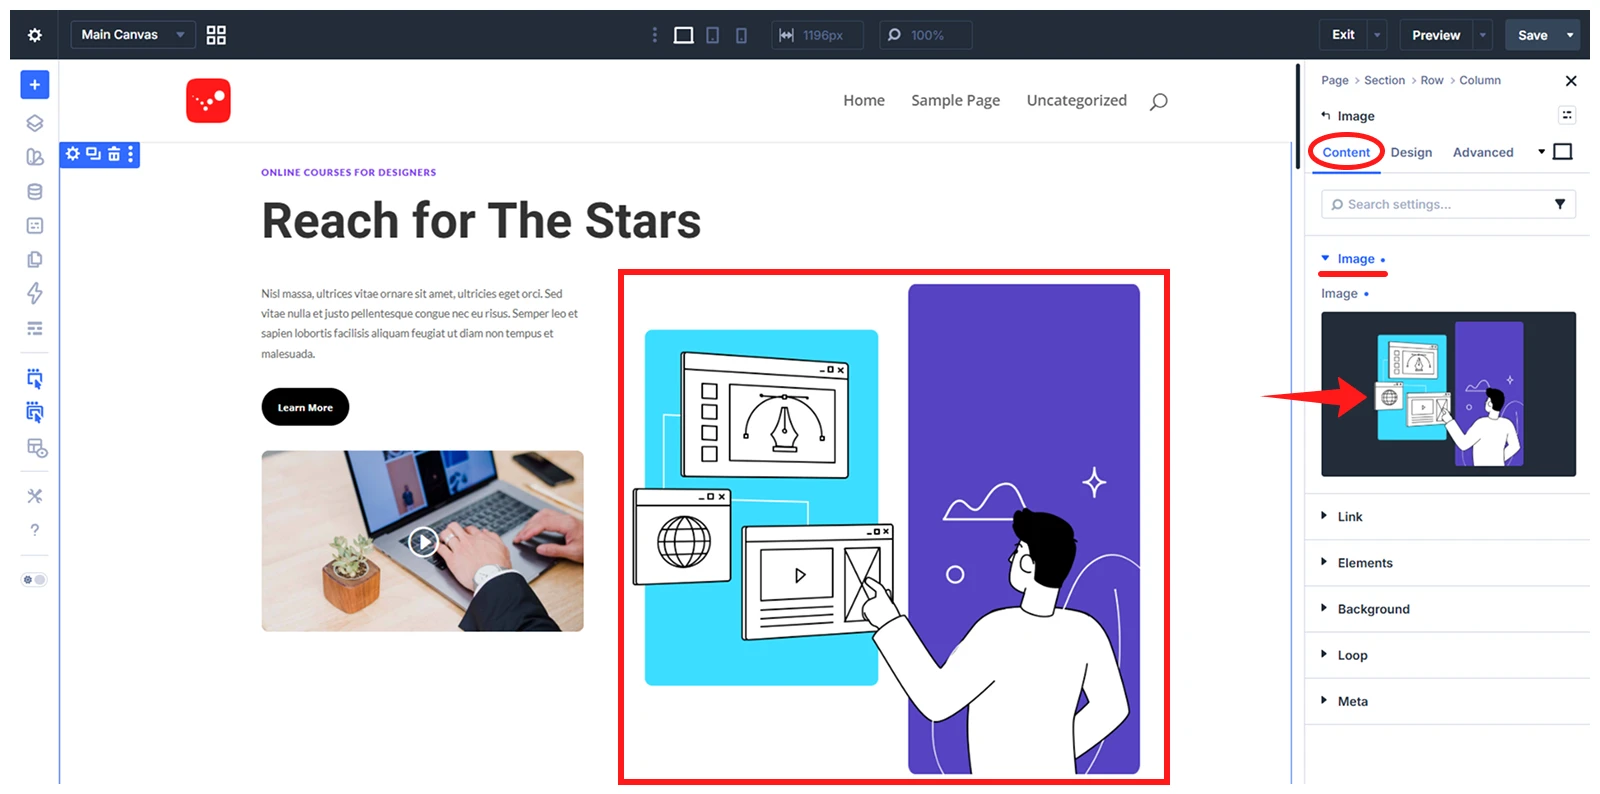
- Replace the image or media element by selecting it and going to the Content tab
- Open Image Settings > Replace the image from your media library
- Select a button module and update the button text and link URL from the Content tab.
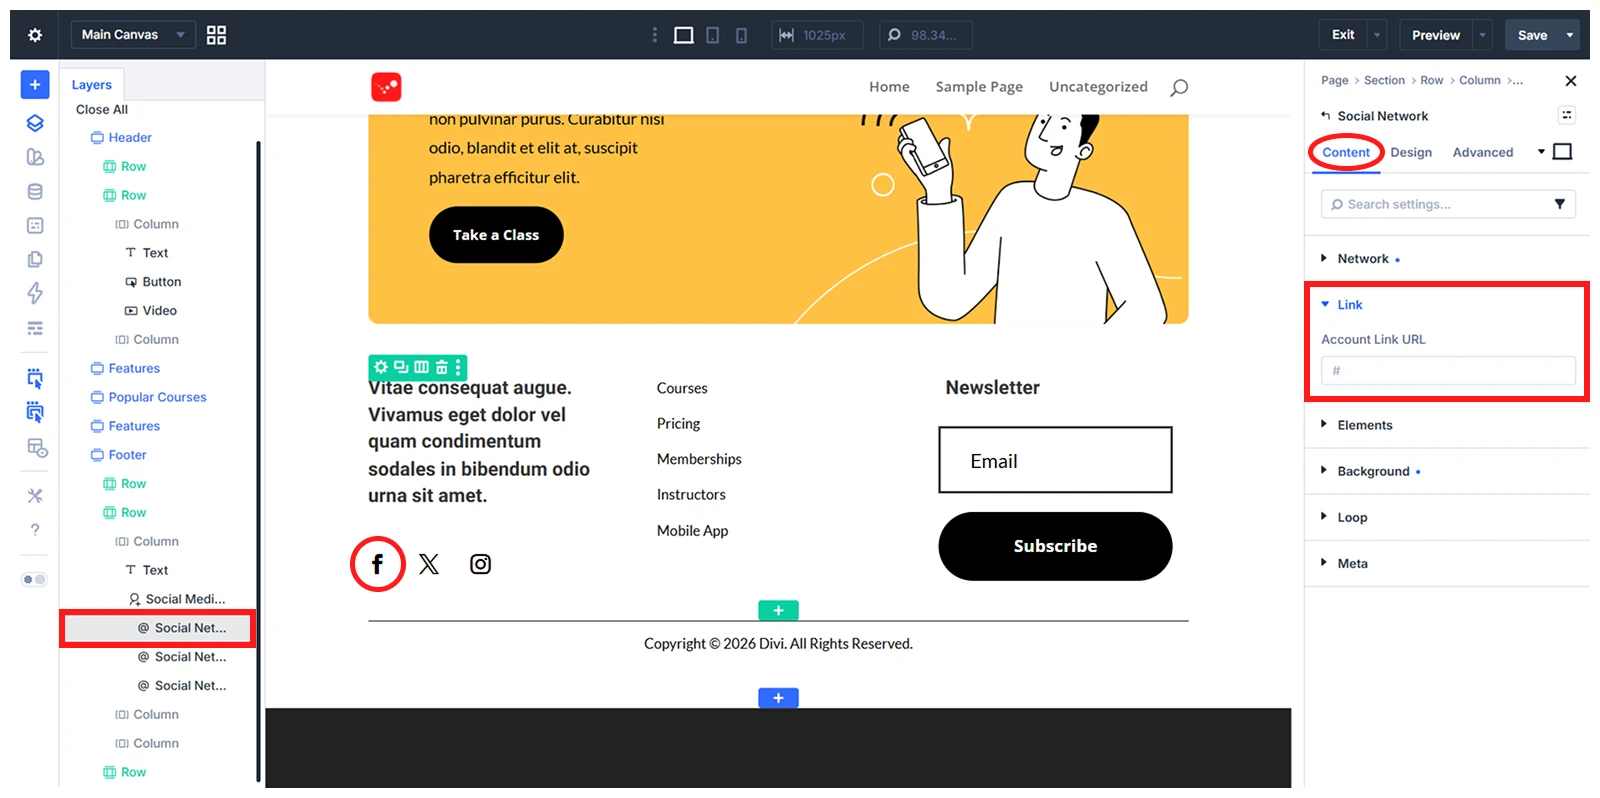
- Update page links and social media links with your own profile links from the Content tab.
- Save the changes after updating each section.
Continue this process across the entire page until all demo content is replaced.
Step-3: Apply the Brand Styles
After replacing the demo content, customize the layout to match your brand. This will make the pre-designed layout feel more unique and consistent with your brand identity.
For example, you can add your brand colors, fonts, button style, image style, icon colors, border radius and more.
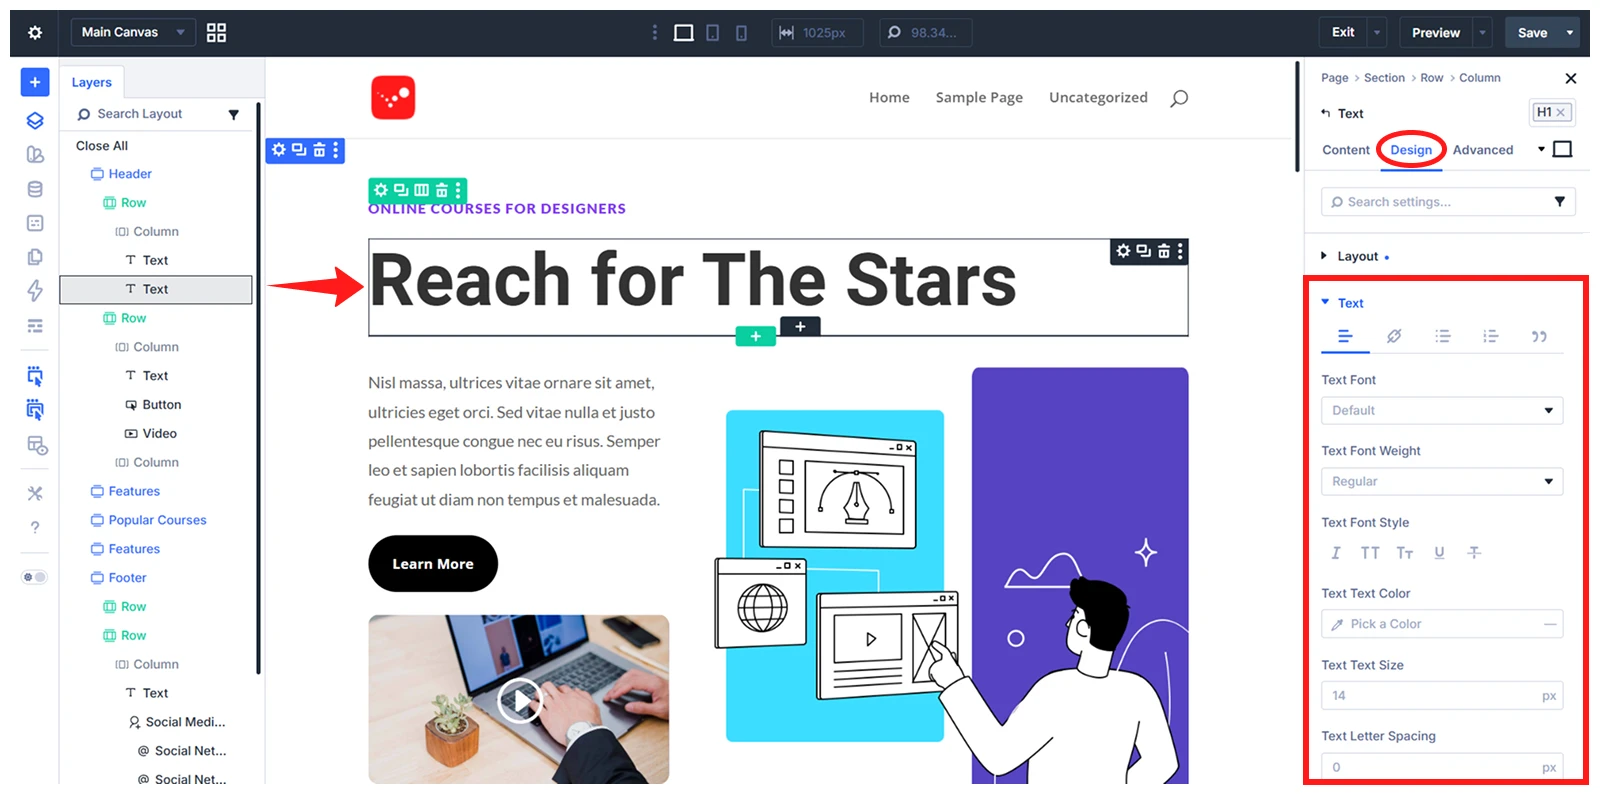
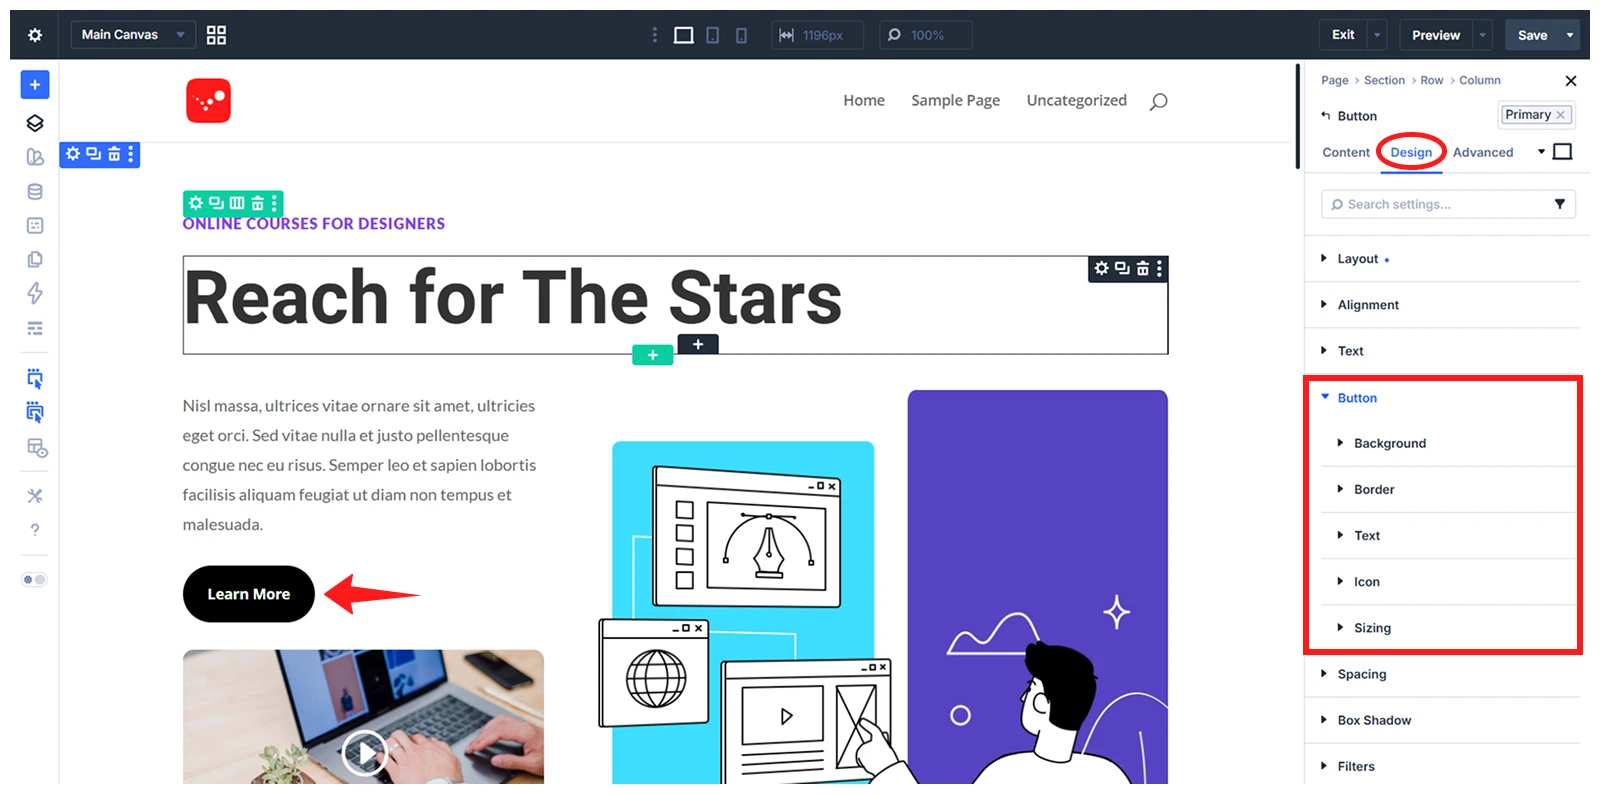
To update any element, select the section, row, or module you want to customize. Then go to the Design tab and adjust the related settings.
For Example:
- To change the style of a text module, select the Text Module > Design > Text. From there, you can update the font, text color, size, line height, heading style, and other typography settings.
- To change the style of a button, select the Button Module > Design > Button. Then update the background color, text style, border, icon, spacing, hover style, and more.
You can also update some styles globally instead of changing every element one by one.
To style them globally across the website:
- Go to your WordPress Dashboard > Divi > Theme Customizer
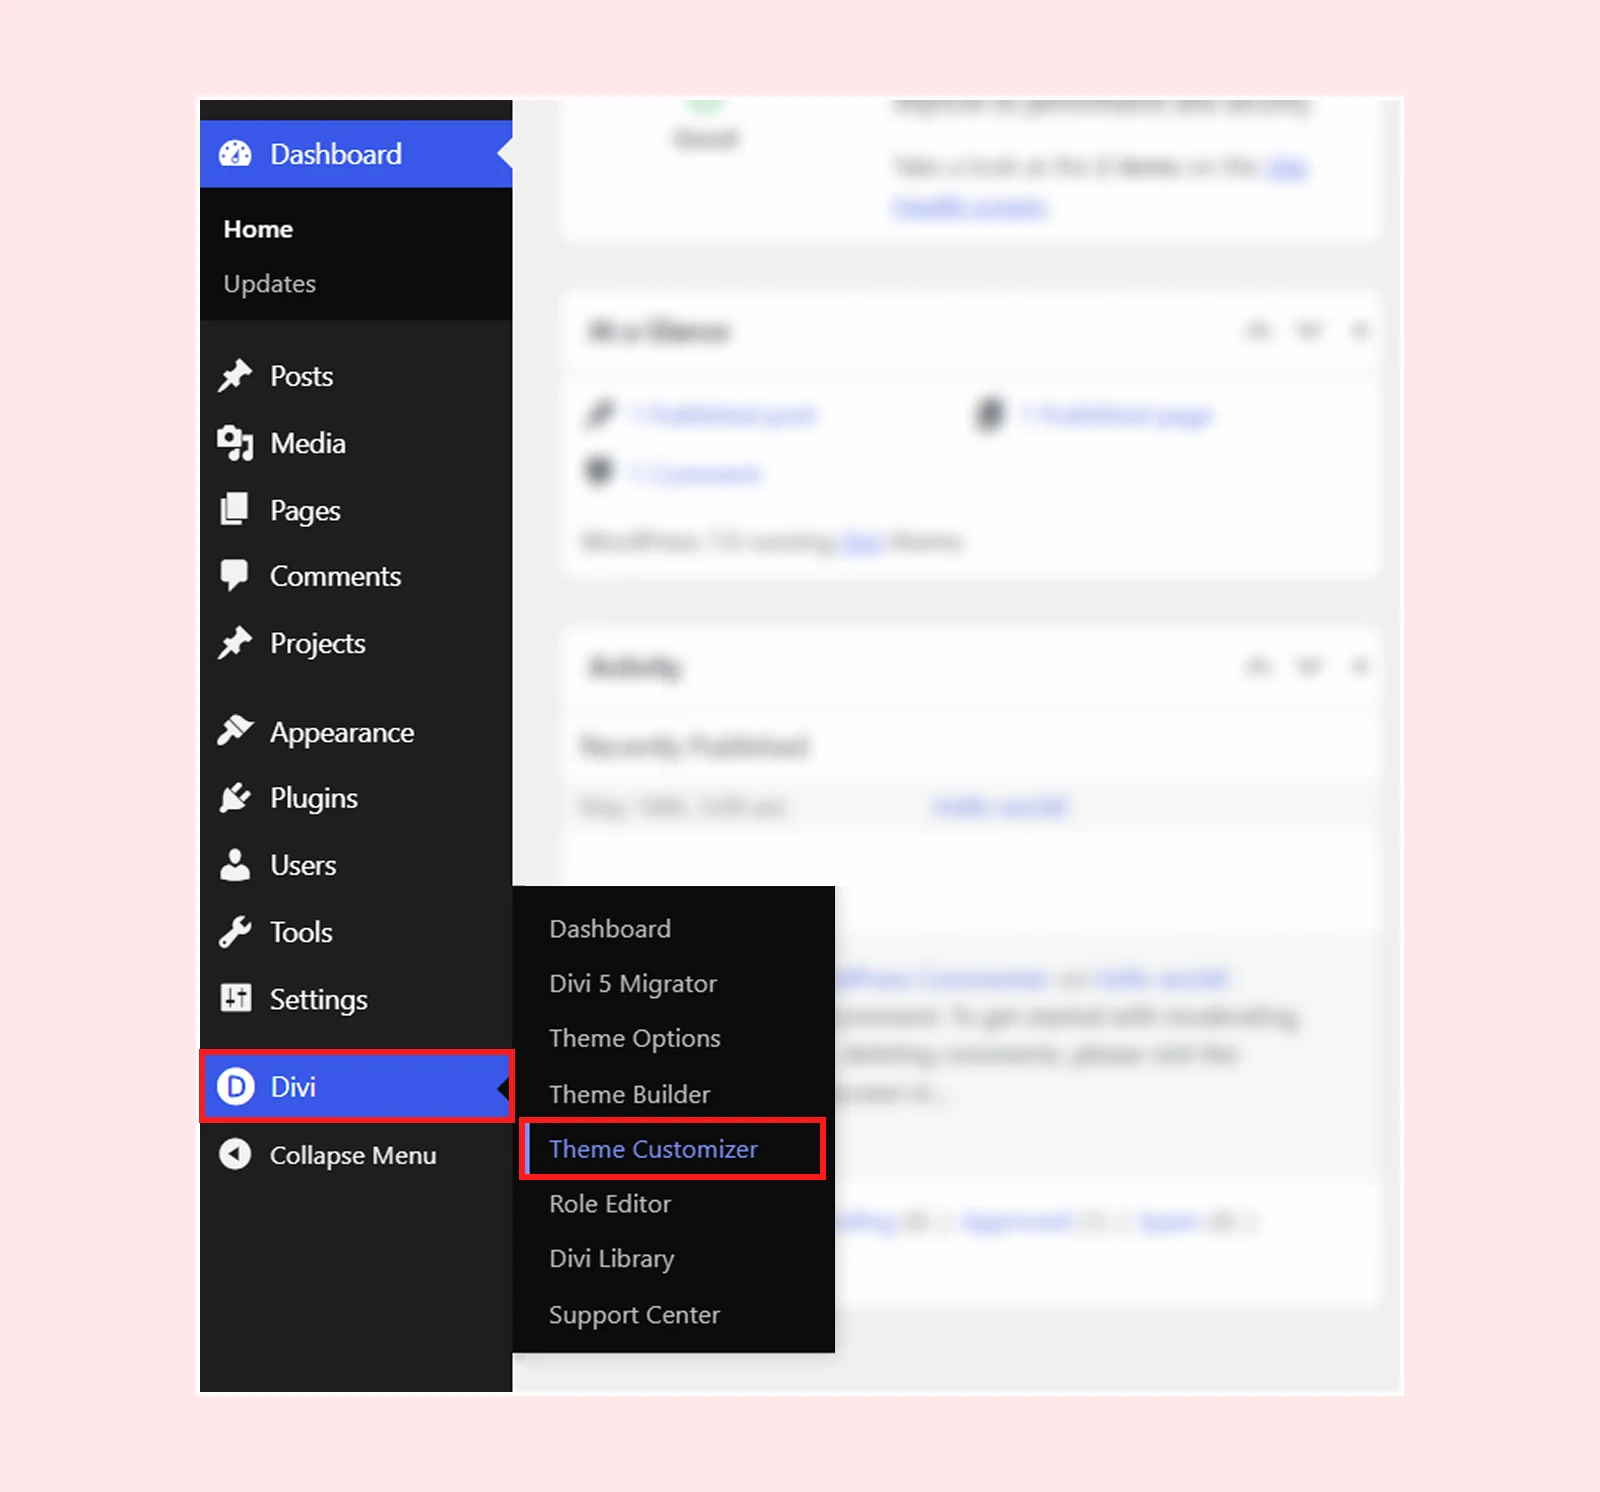
- Select General Settings
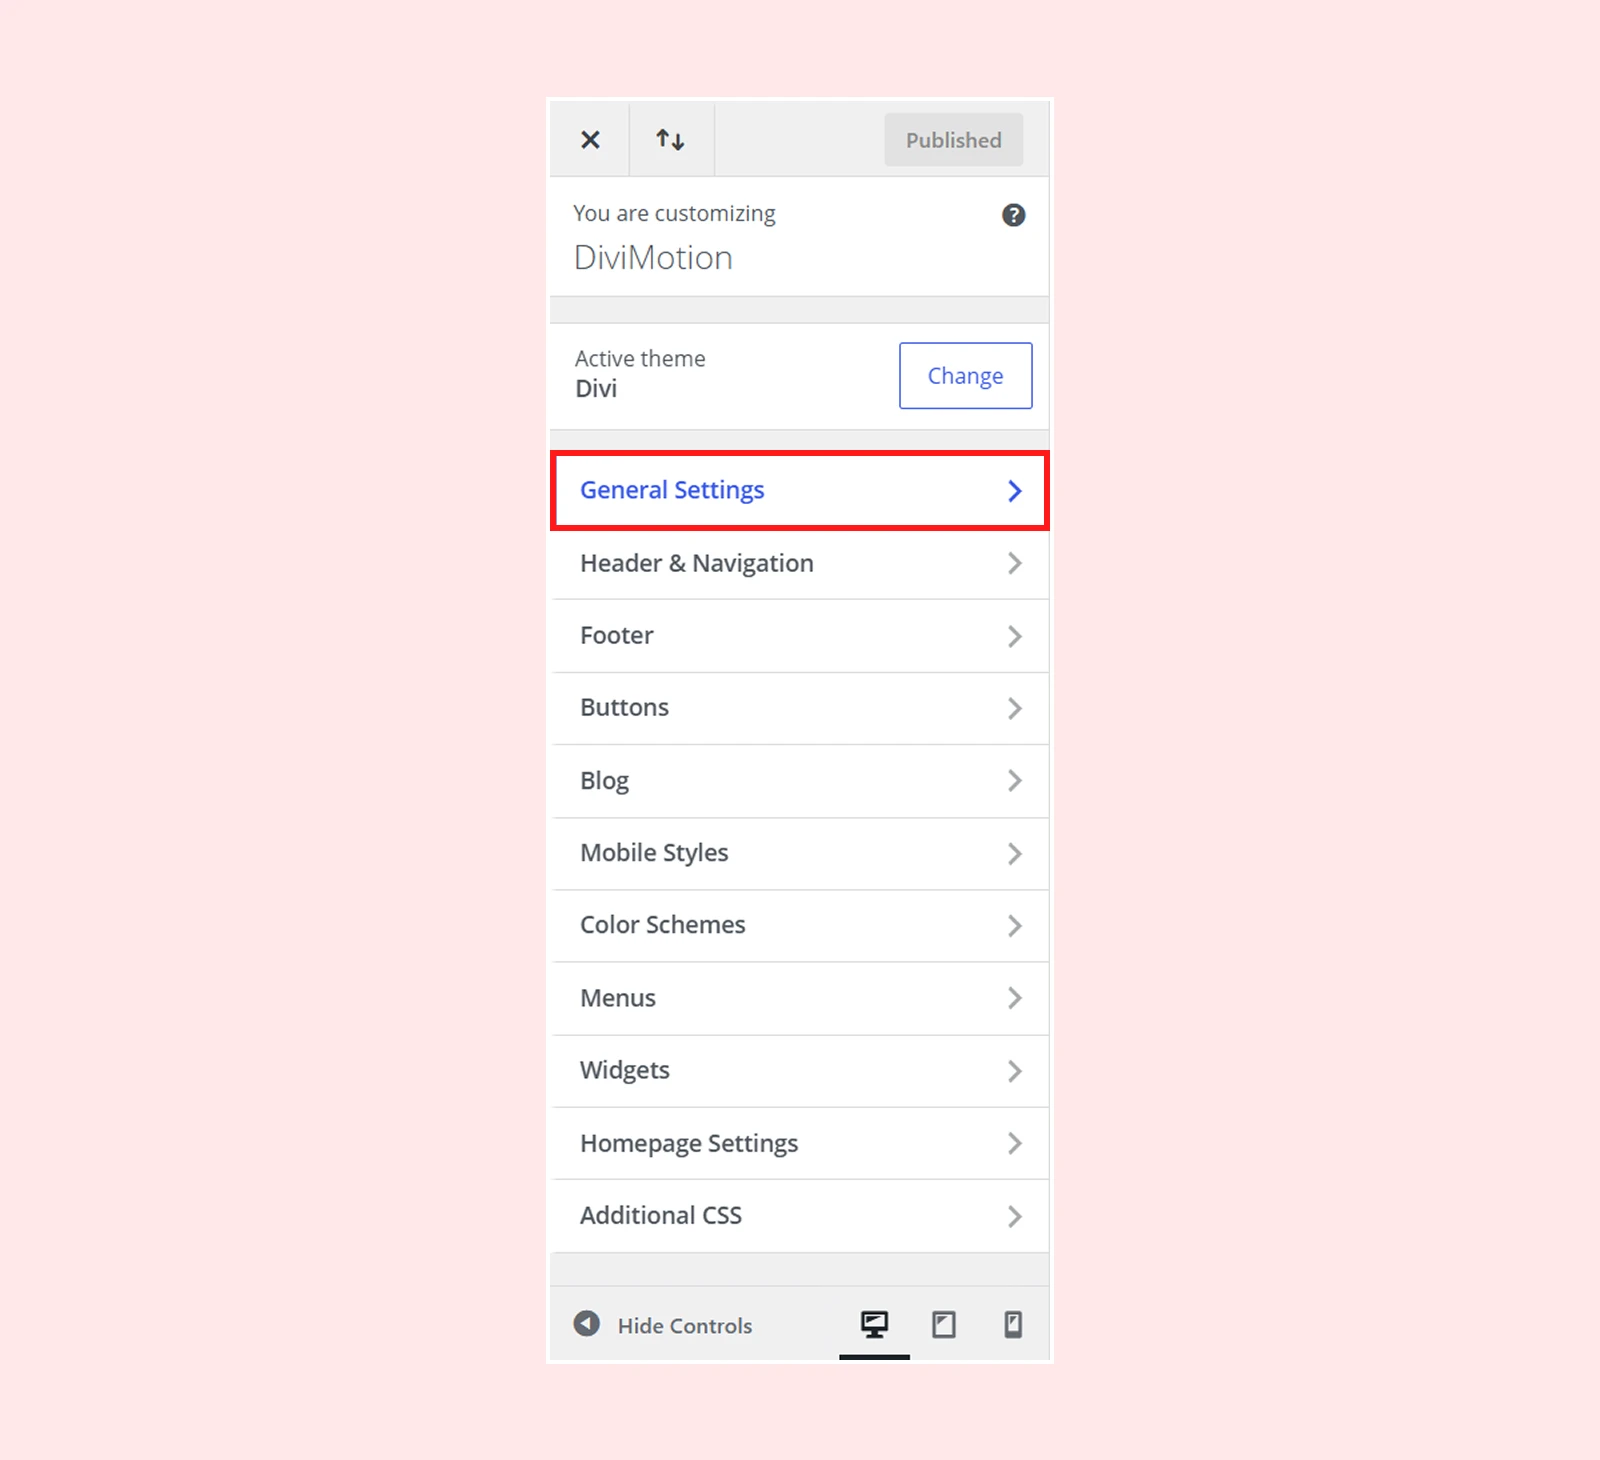
- Select Typography to set the global Typography style and set the global text style for headers and body text, including text size, font, color, and other settings.
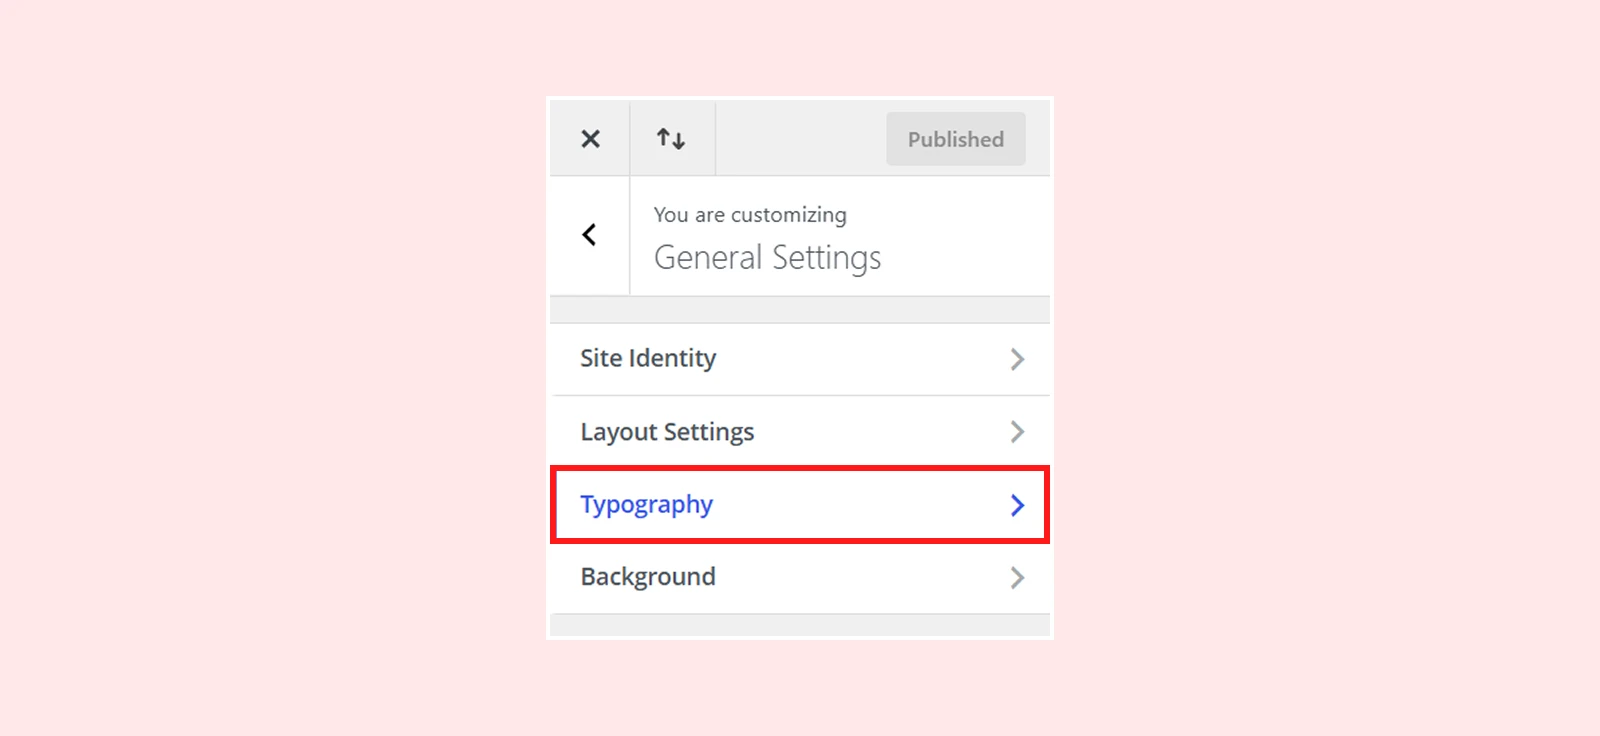
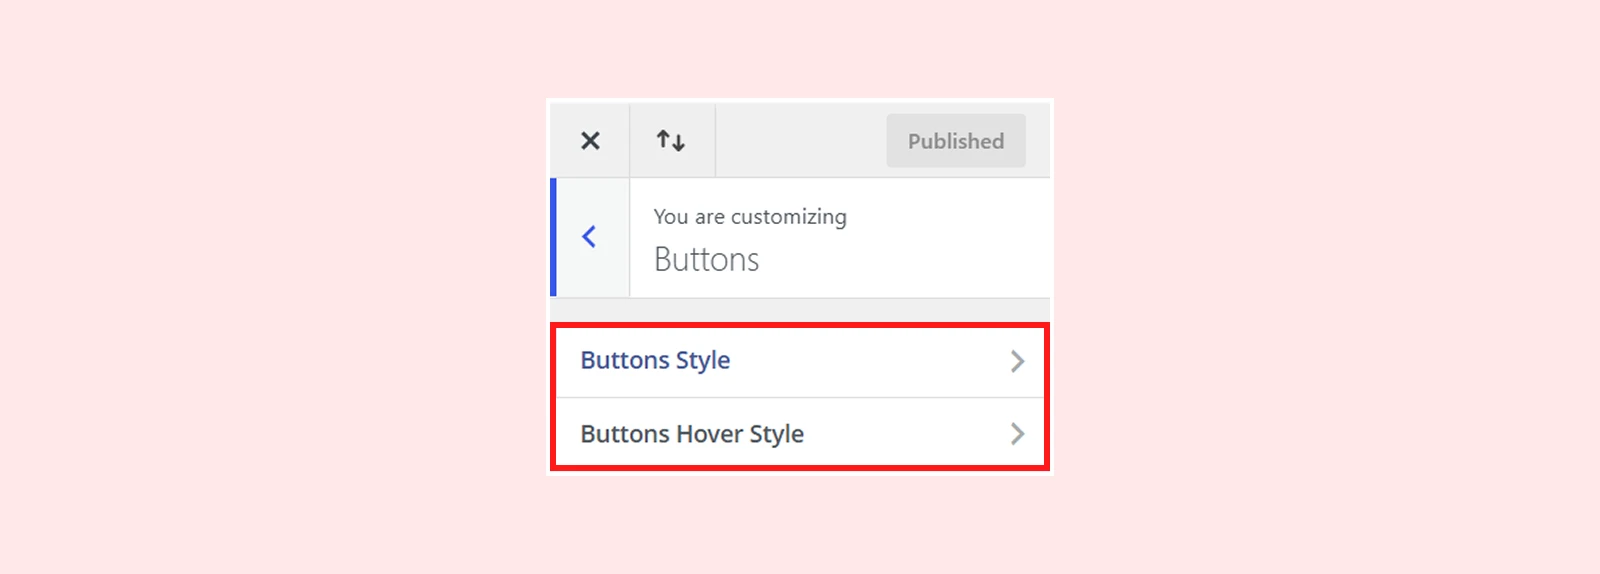
To style the buttons globally
- Go to your WordPress Dashboard > Divi > Theme Customizer > Buttons
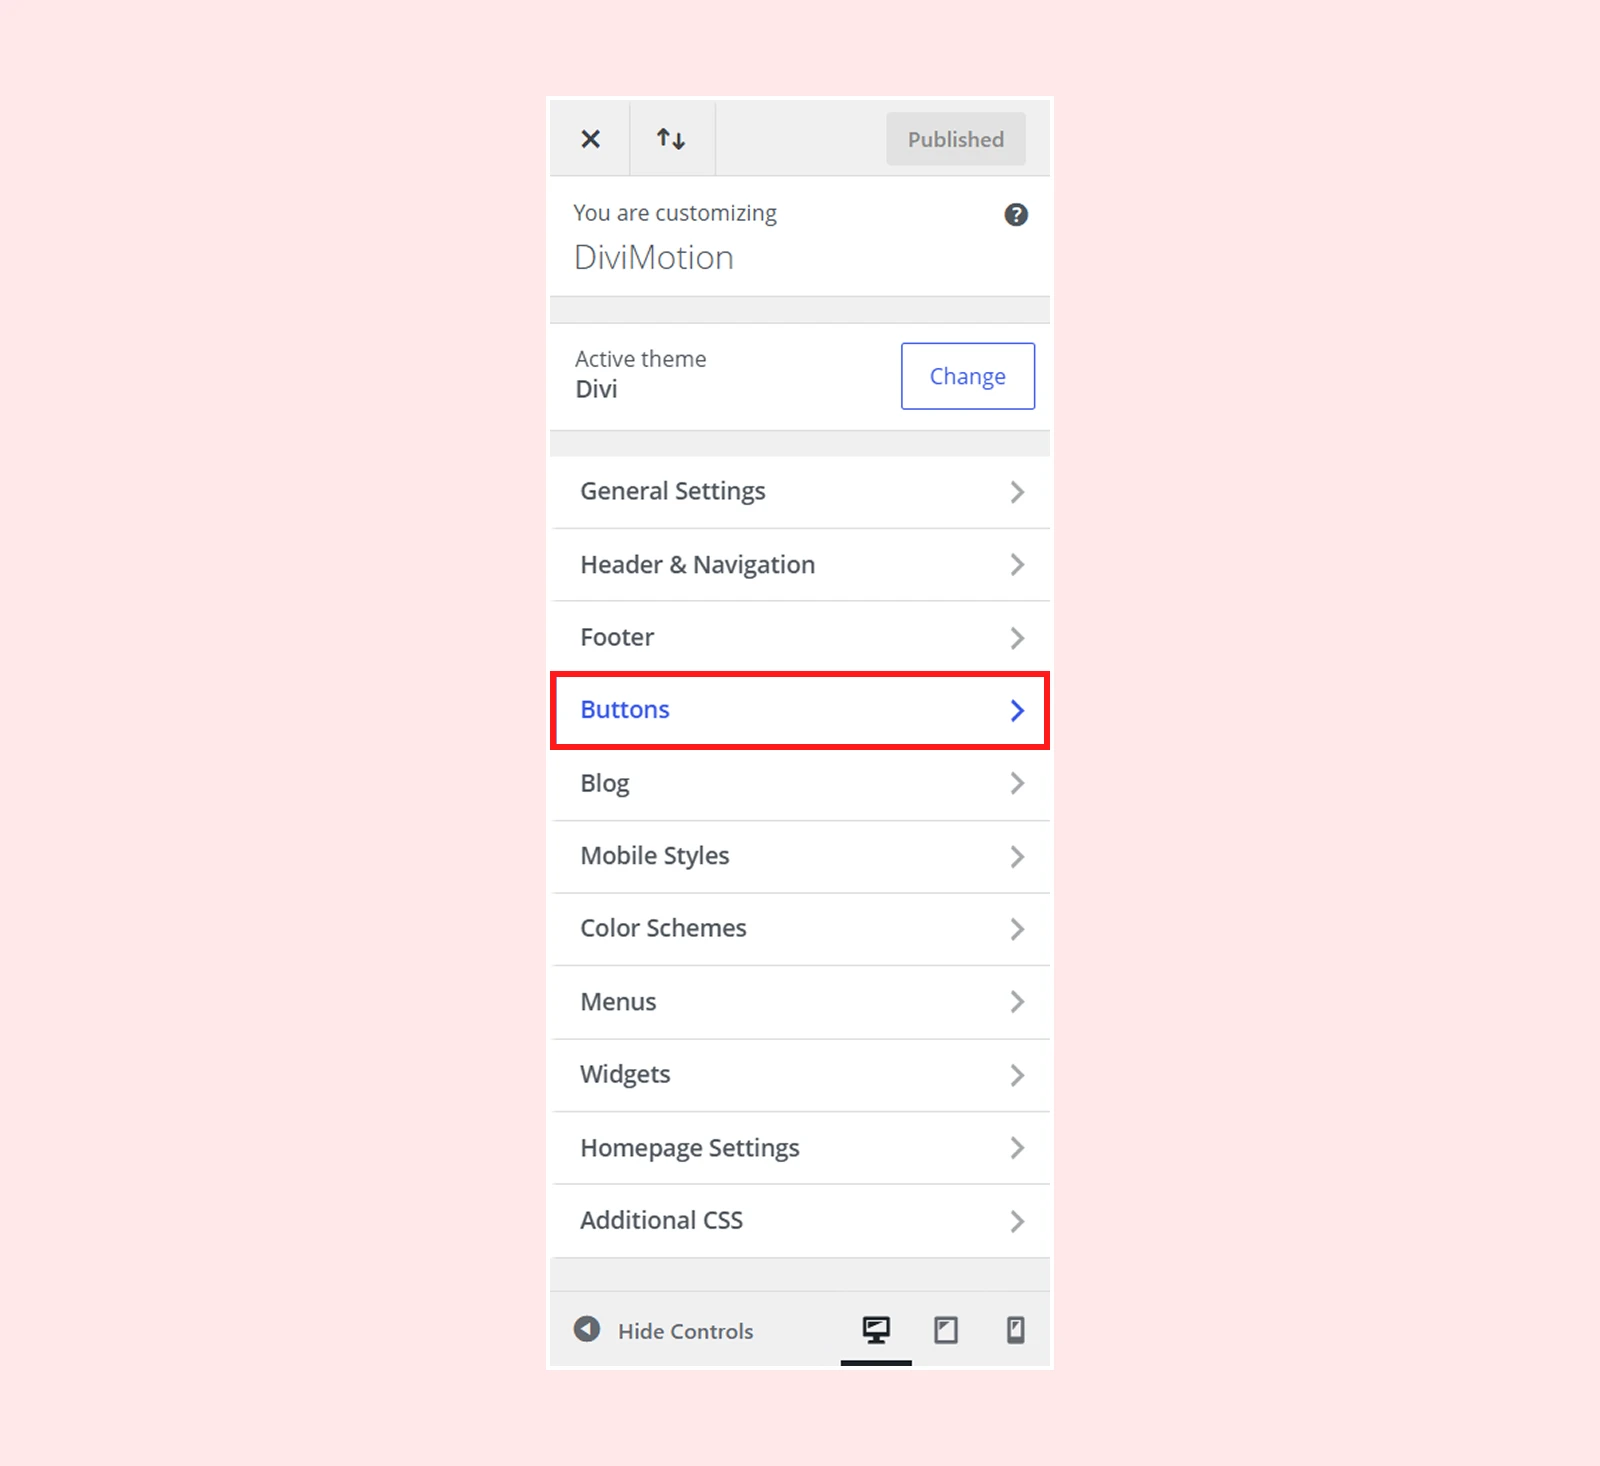
- Style the button for both normal and hover states
If you are using Divi 5, you can also use the Variable Manager and Preset Manager from the Visual Builder’s left sidebar.
Use variables for colors, fonts, and other shared design values, and use presets to save reusable styles for modules, sections, rows, and columns.
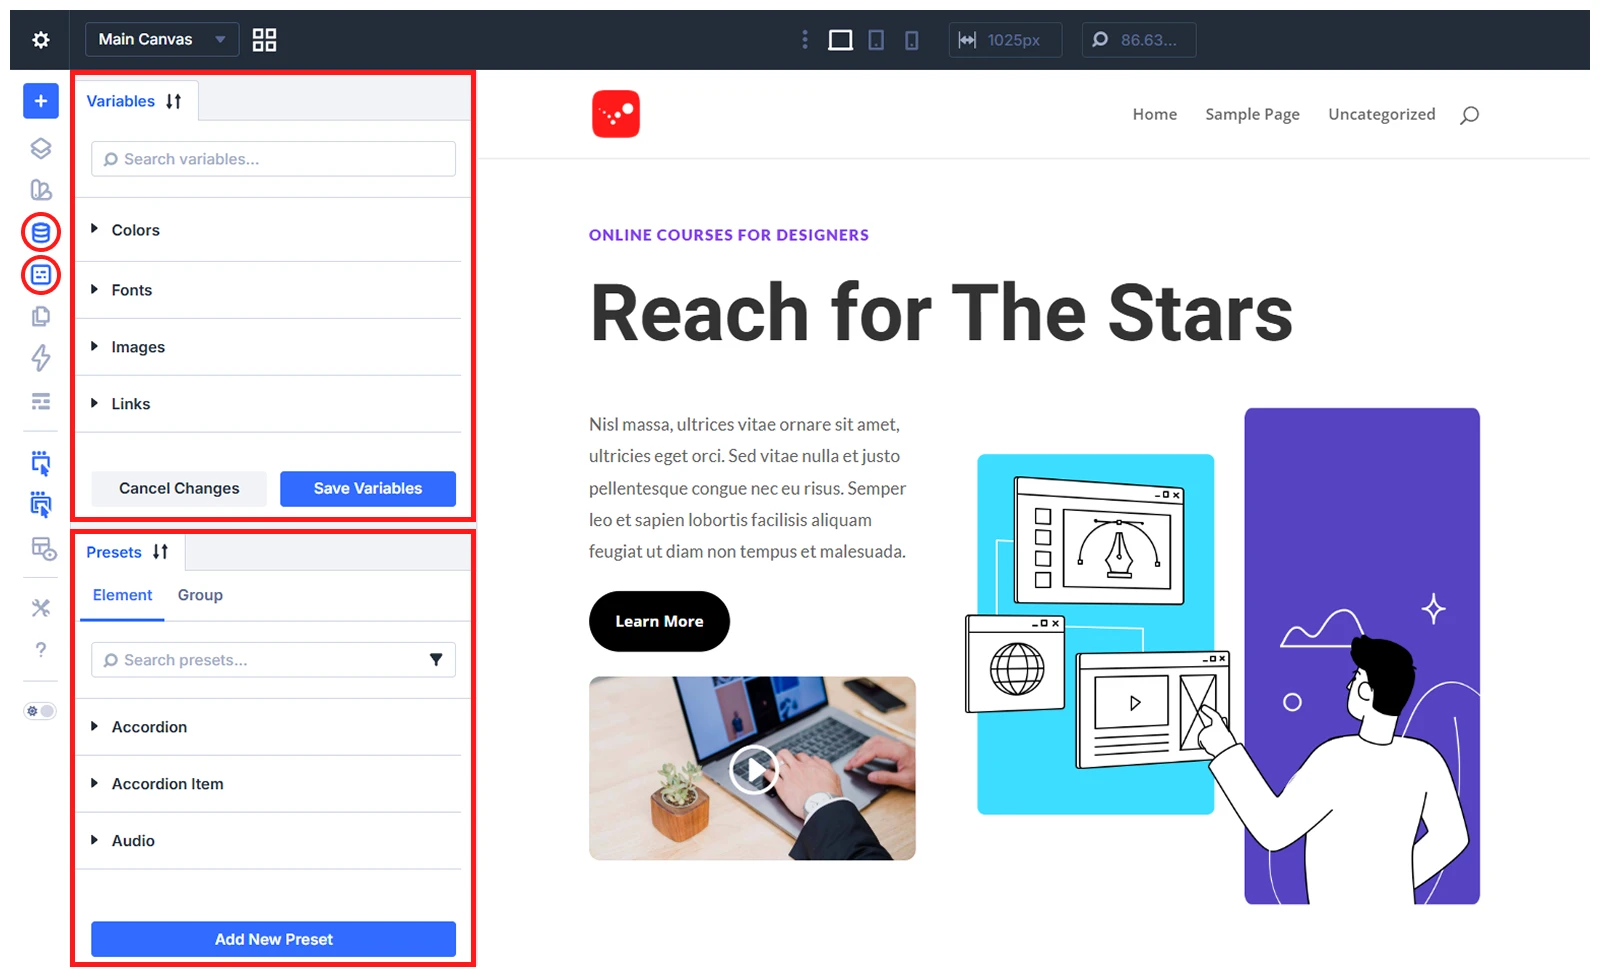
This helps you manage colors, fonts, and repeated element styles more efficiently across the website.
Step-4: Customize the Header and Footer
After customizing the page content and brand styles, update the header and footer.
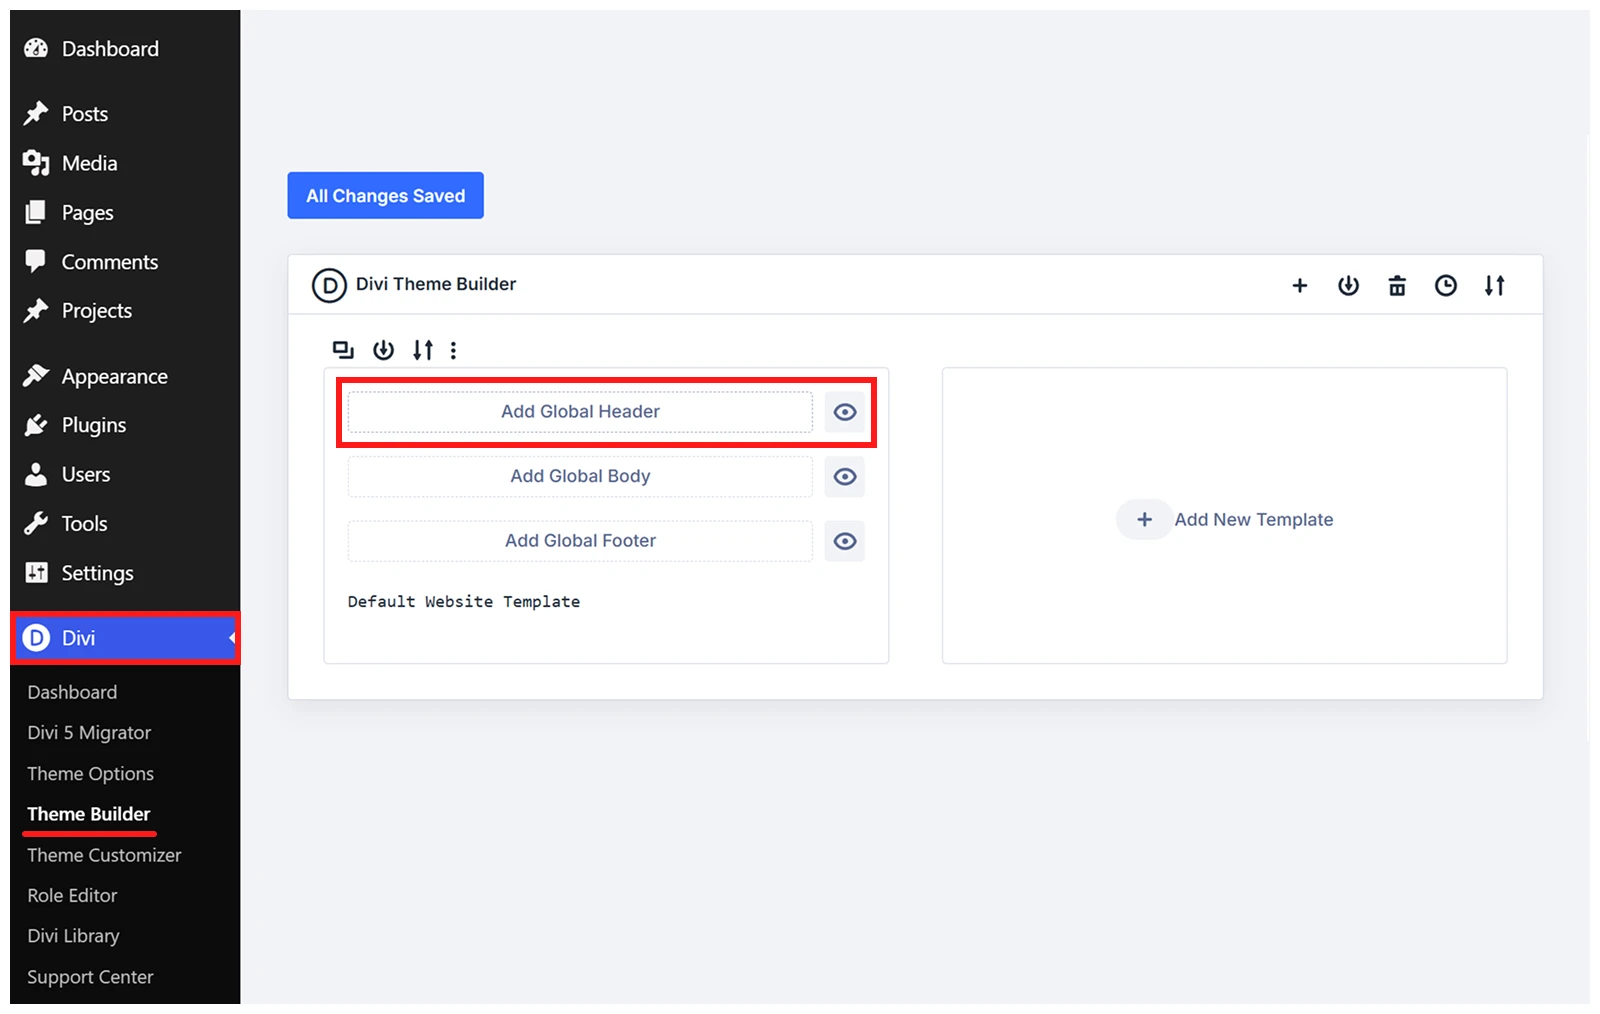
To customize them, go to WordPress Dashboard > Divi > Theme Builder. From here, you can create or edit the global header and global footer.
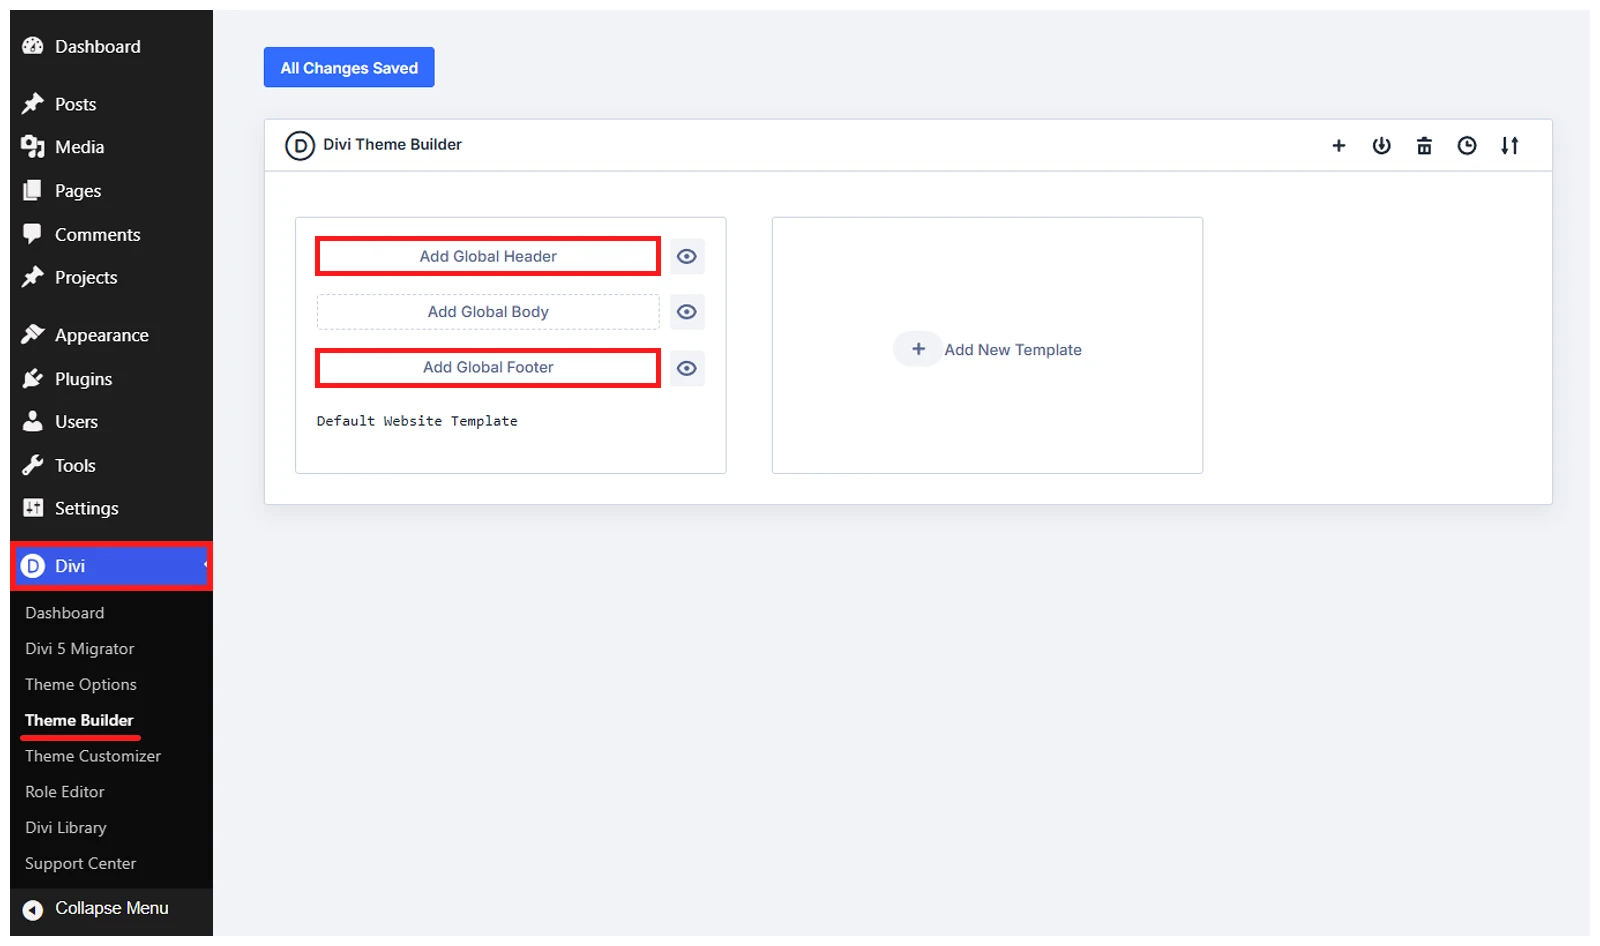
- Click Add Global Header and select Build Global Header. Design a header that applies across your entire site using your logo, navigation menu, call-to-action button, and mobile menu.
- Click Add Global Footer and select Build Global Footer. Design a footer that applies across your entire site using elements such as your logo or brand description, important page links, contact information and more.
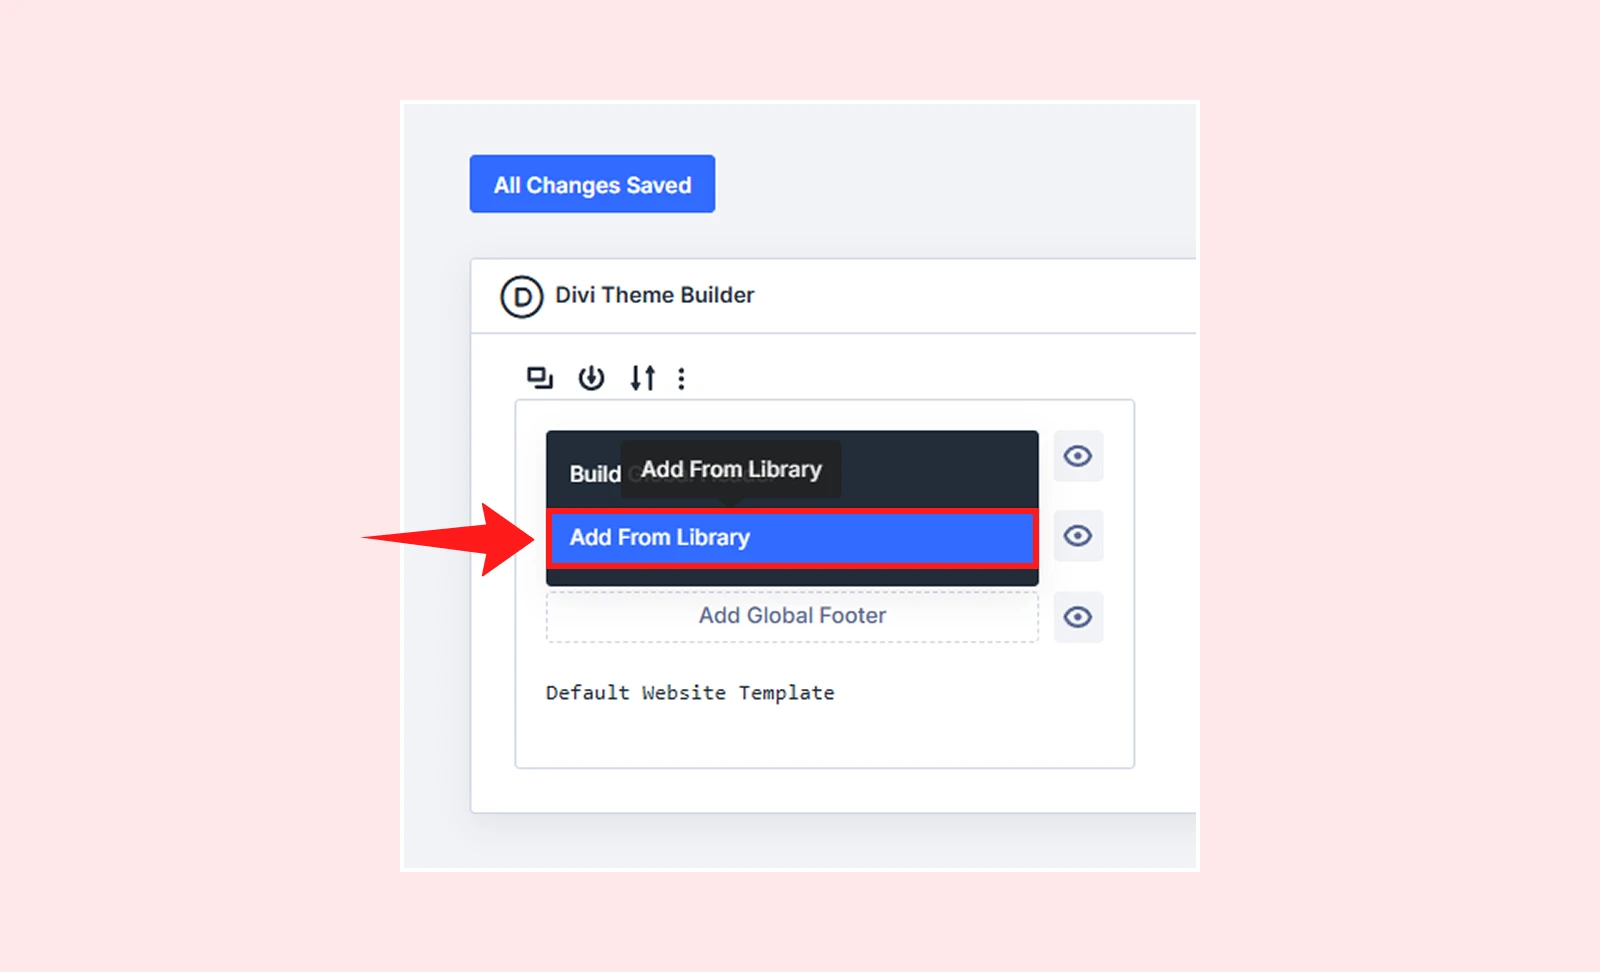
After creating both, save your changes. You can also import a header and footer layout from the pre-made layouts by clicking Add from Library.
Once the header and footer are in place, take a moment to preview a few pages in the frontend to ensure everything looks consistent. Check that the logo, navigation menu, buttons, links, and footer elements display properly across different layouts.
Now, you can move on to making responsive adjustments and preparing your site for launch.
Method 2: Build a Divi Website from Scratch
If you want full design control from the beginning, you can build the website from scratch. This method is useful when you want a custom design instead of editing a pre-designed layout.
Step 1: Create a Global Design System
Before designing pages, set up a basic design system. This helps you keep the website consistent from the beginning.
Start with the main design settings:
- Global color palette
- Global typography
- Website width and spacing
- Reusable presets
Configure the global color palette
To configure the global color palette, create a page from WordPress Dashboard > Pages > Add Page and open it with the Divi Visual Builder.
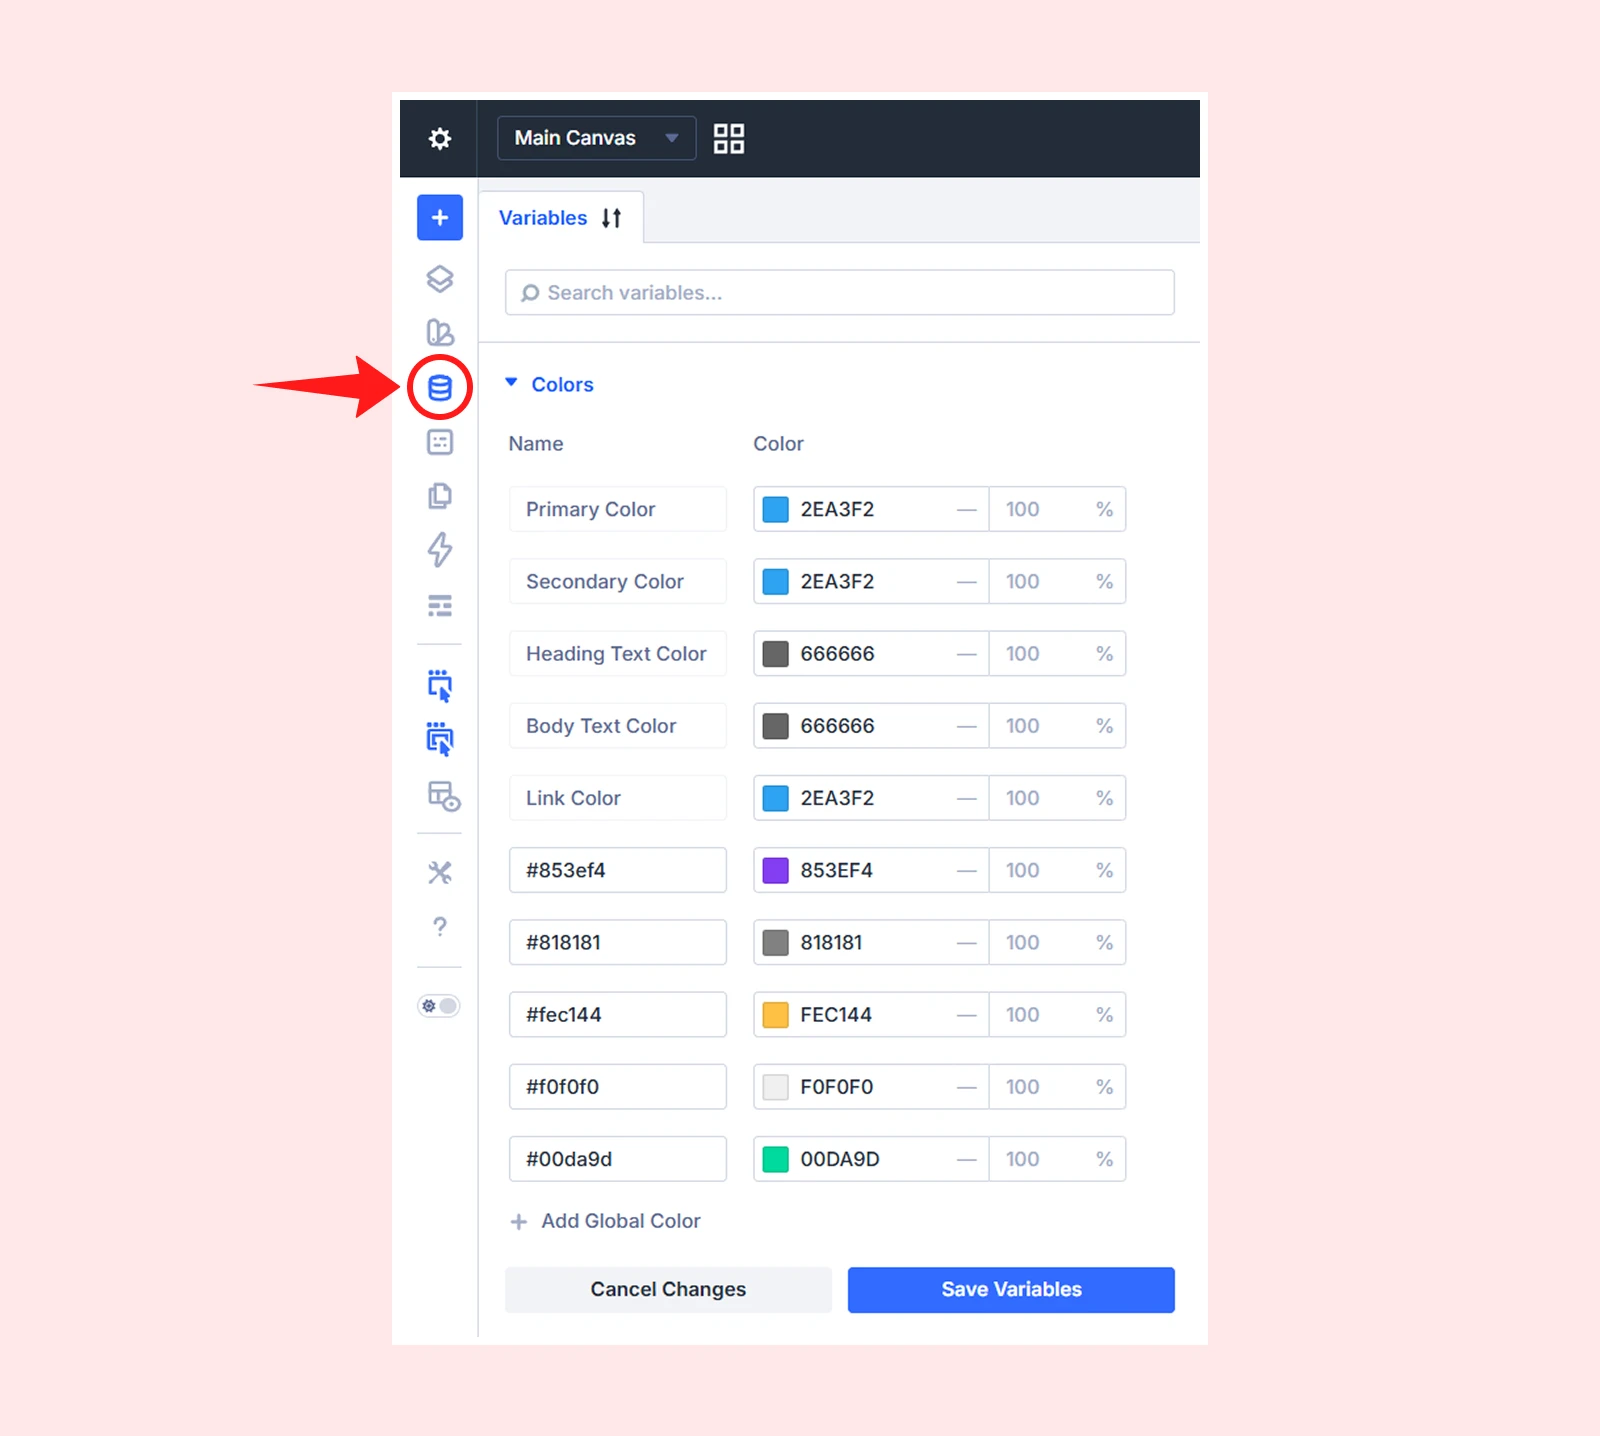
Then use the Variable Manager from the left sidebar to add your main brand colors. You can set colors for primary buttons, secondary buttons, headings, body text, links, backgrounds, and other design values.
After adding the colors, click Save Variables. You can then access these colors while building different pages.
Note: You can also create variables for repeated design values like fonts, spacing, images, links, and custom text.
Configure the Website Width and Spacing
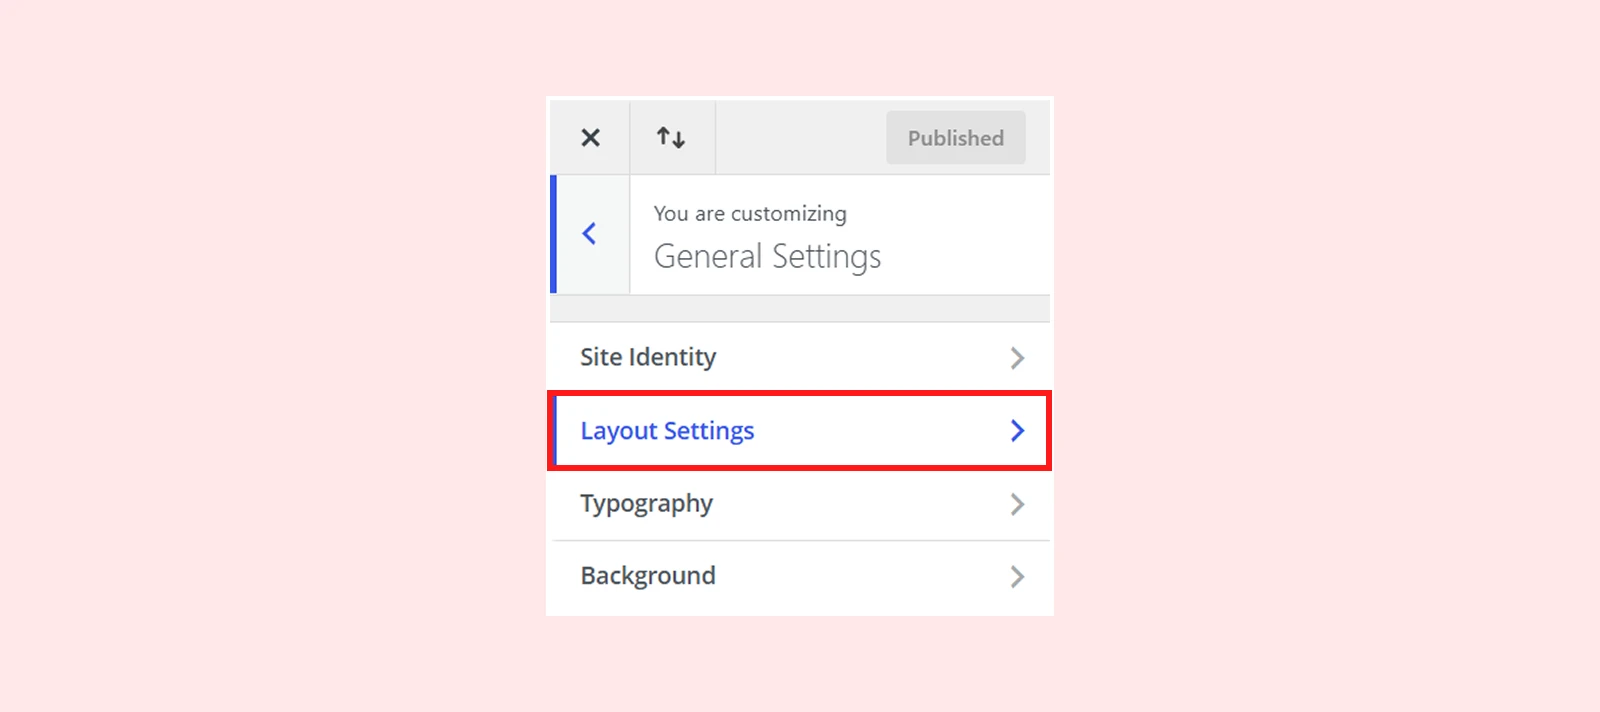
- Go to WordPress Dashboard > Divi > Theme Customizer
- Select General Settings > Layout Settings
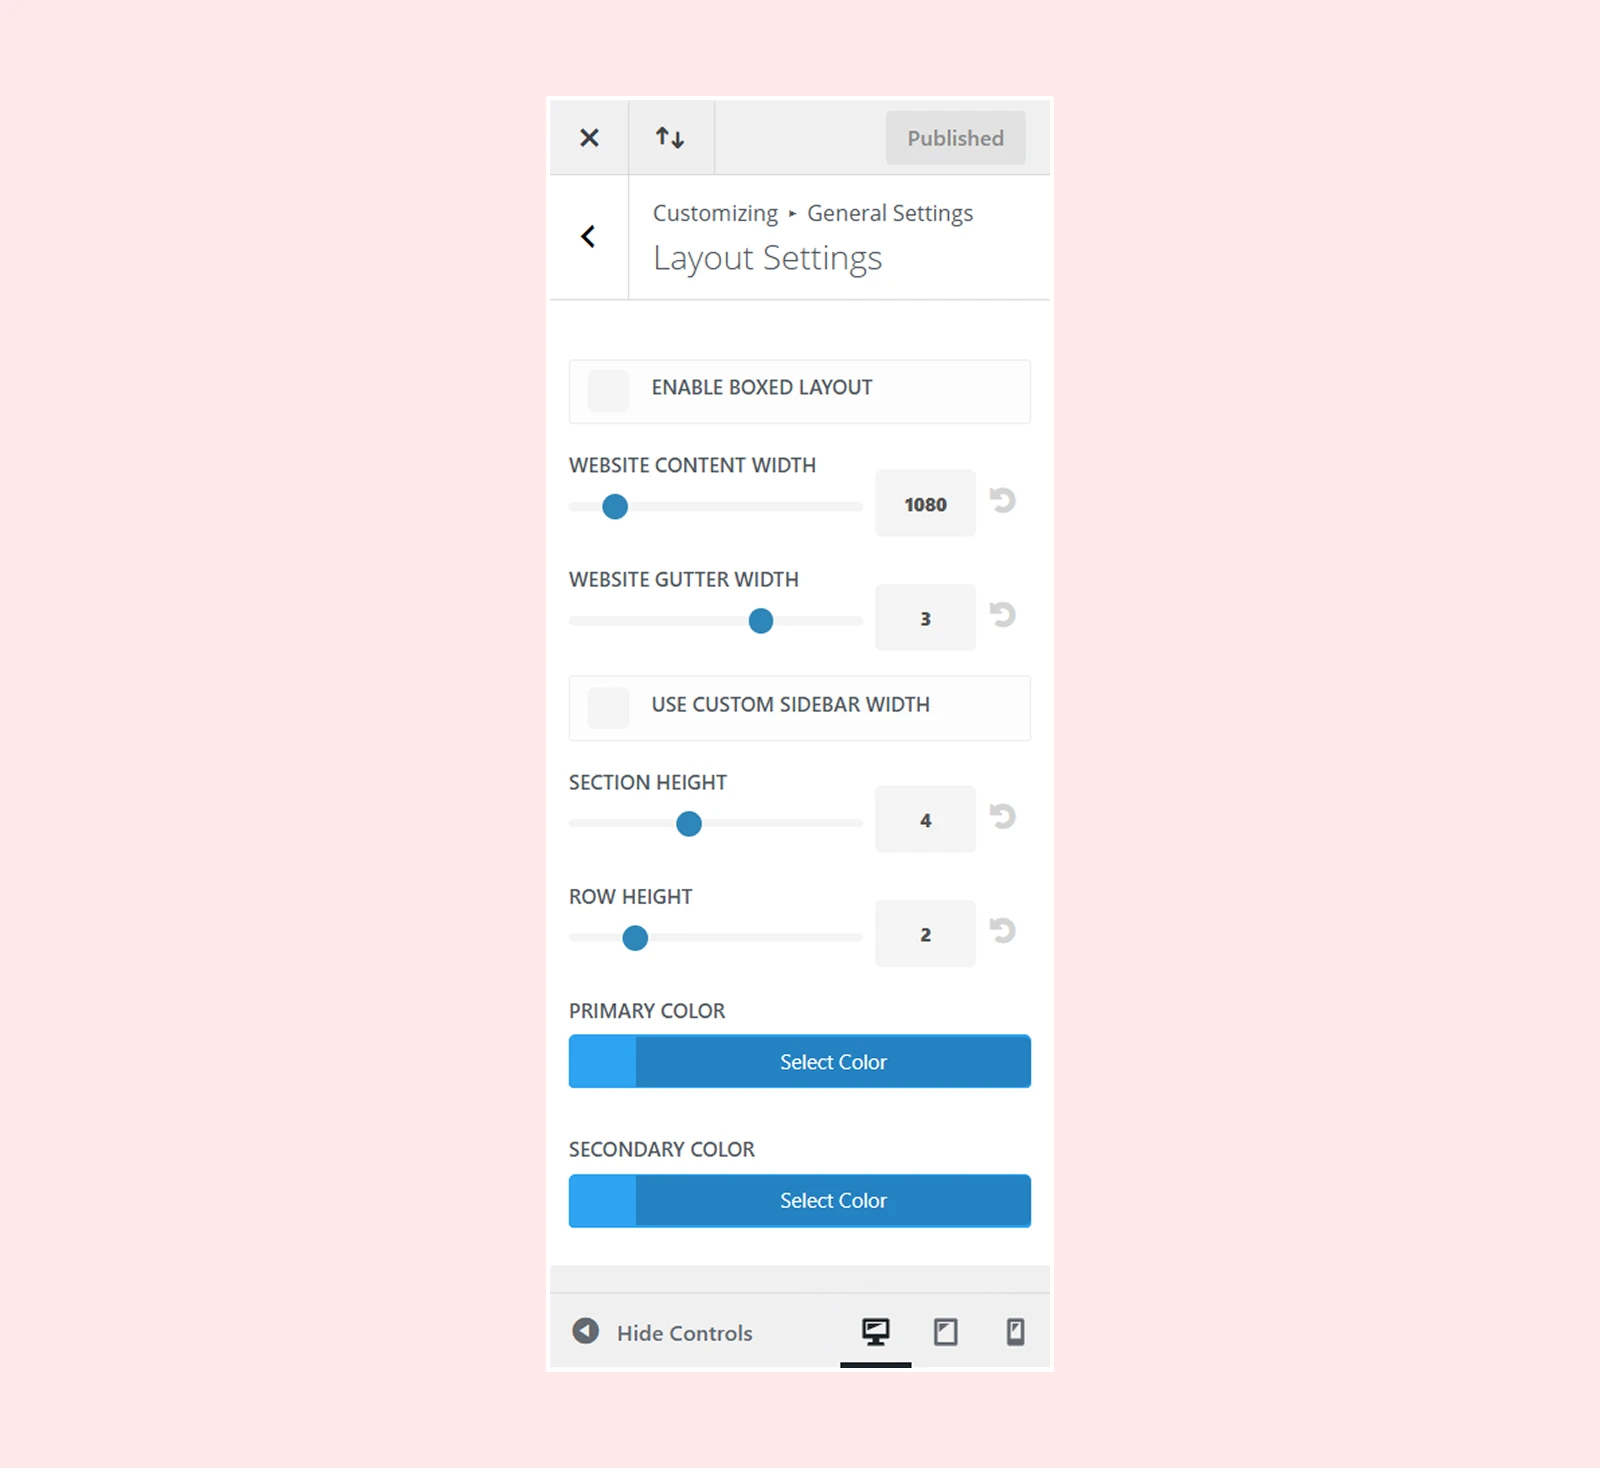
- Content and gutter width, section width, and row width
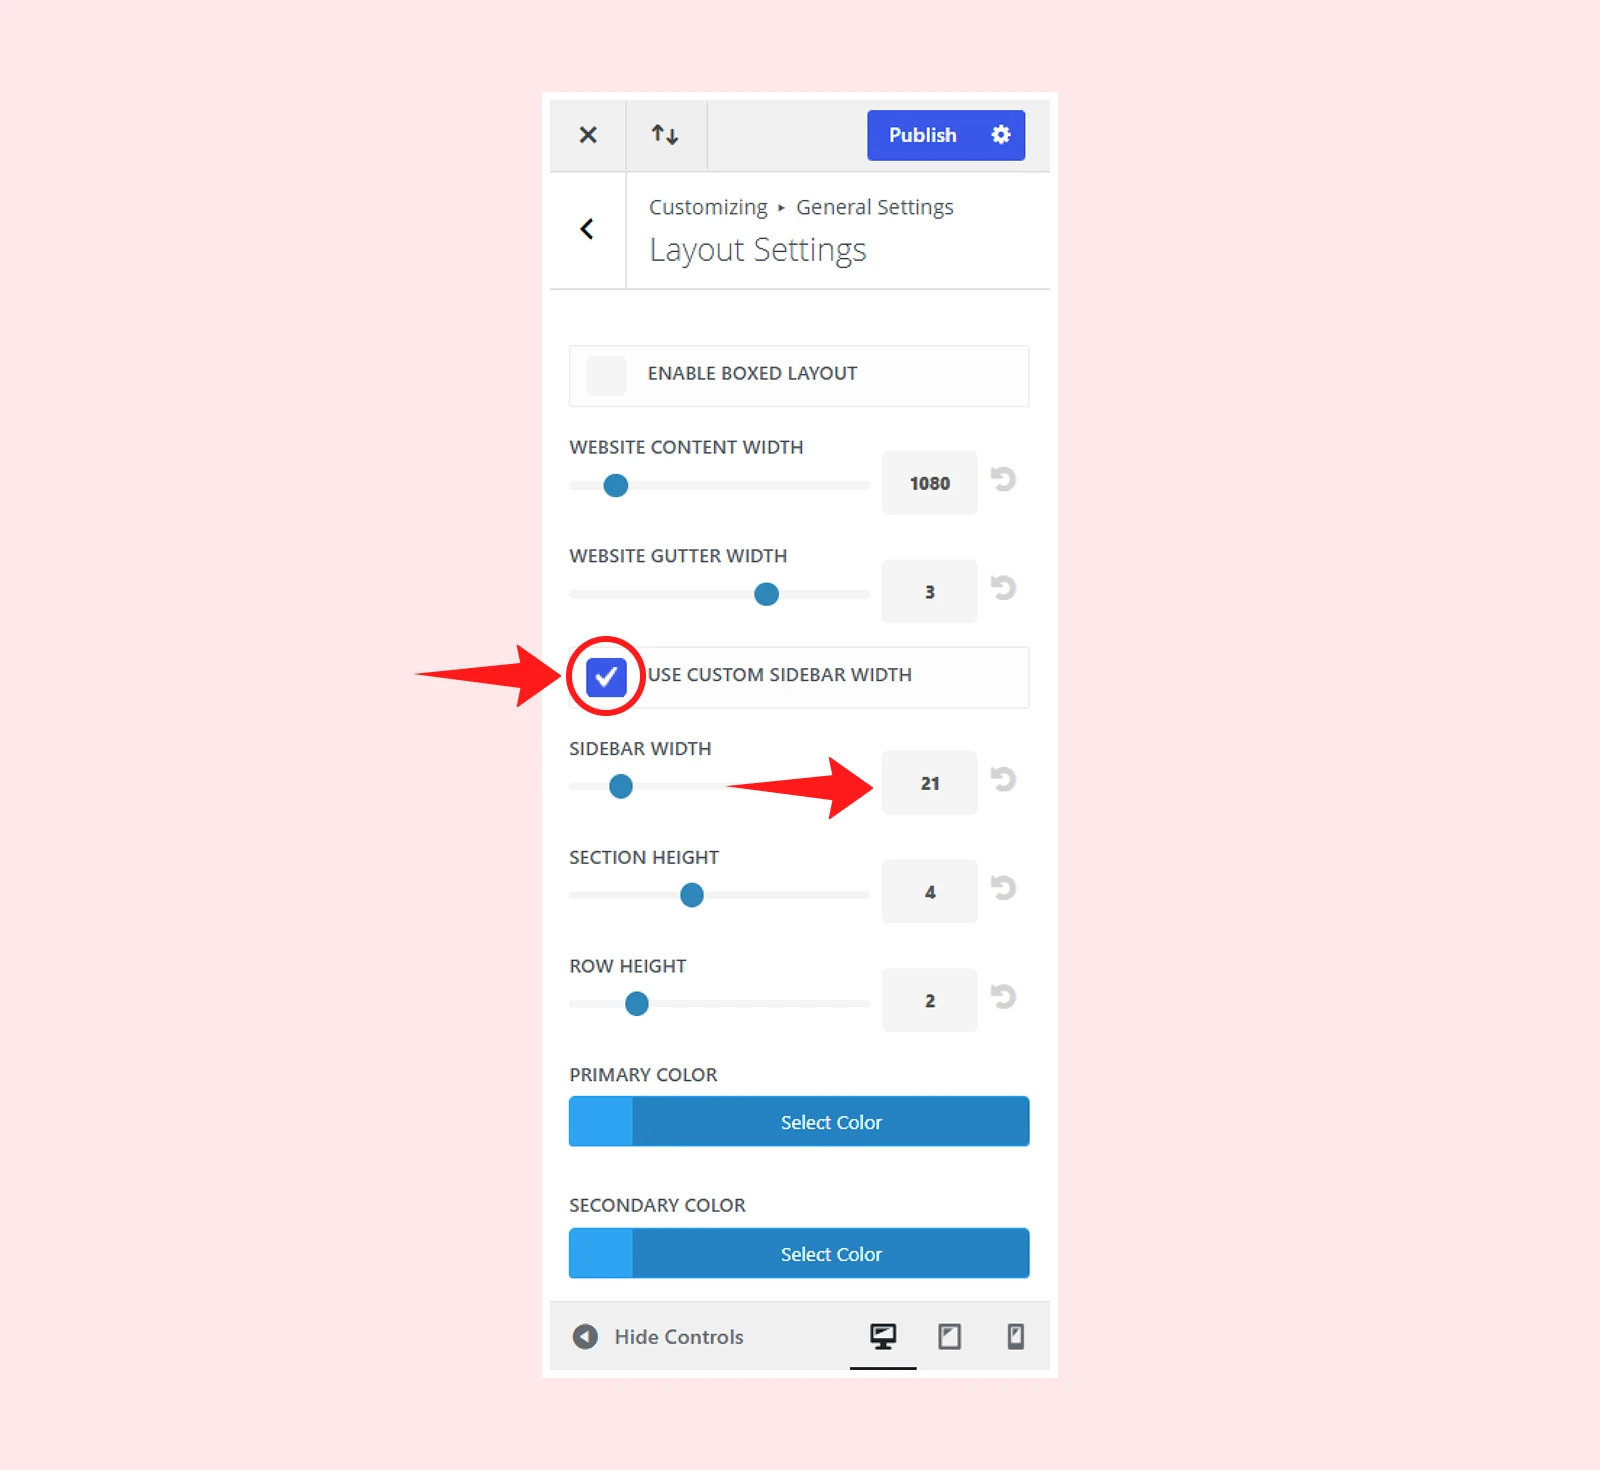
- Check the Custom Sidebar width to width of the left/right sidebar.
- You can also Enable Boxed Layout to use a fixed layout
Configure Global Typography
- Go to WordPress Dashboard > Divi > Theme Customizer
- Select General Settings > Typography
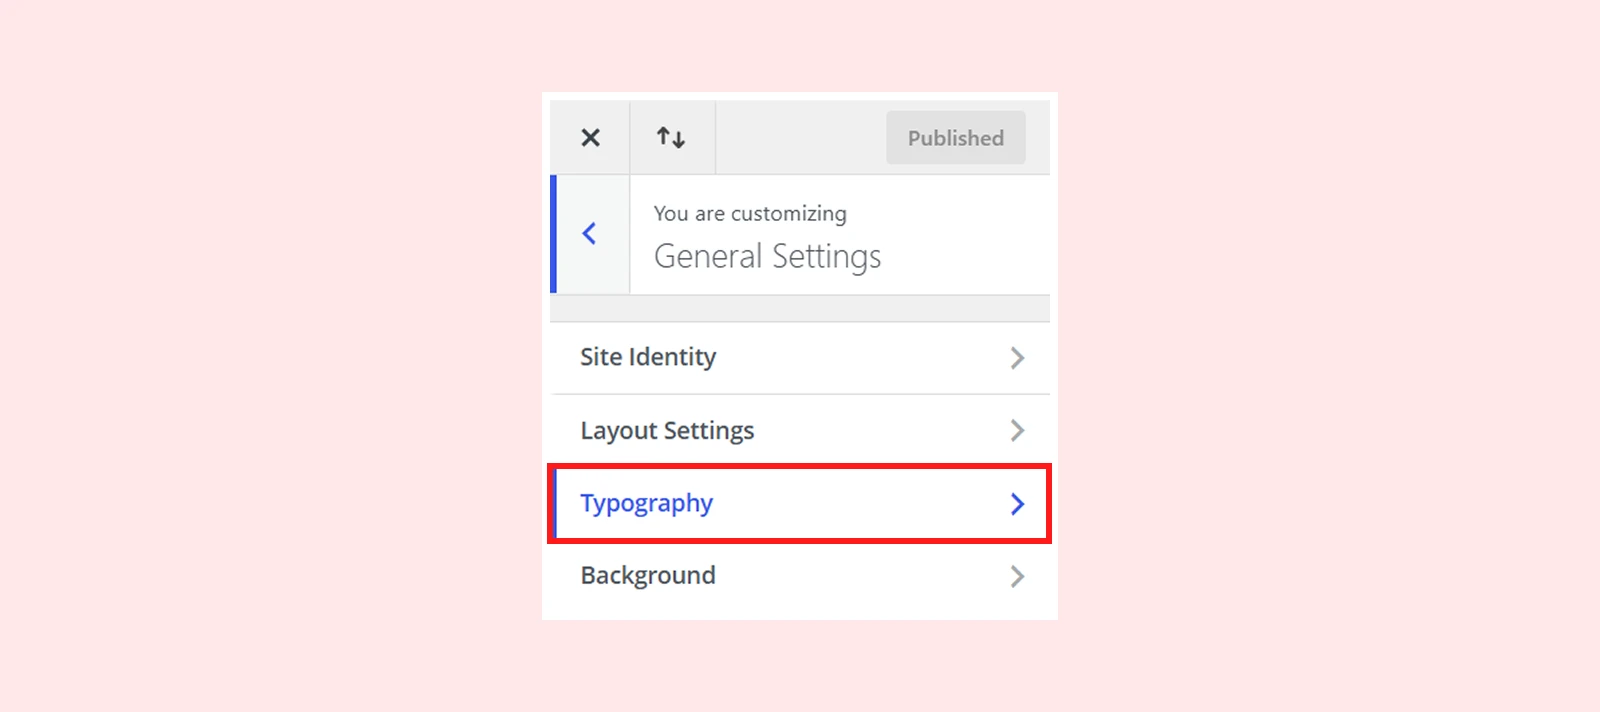
- Select the default font Style for the Heading and Body text
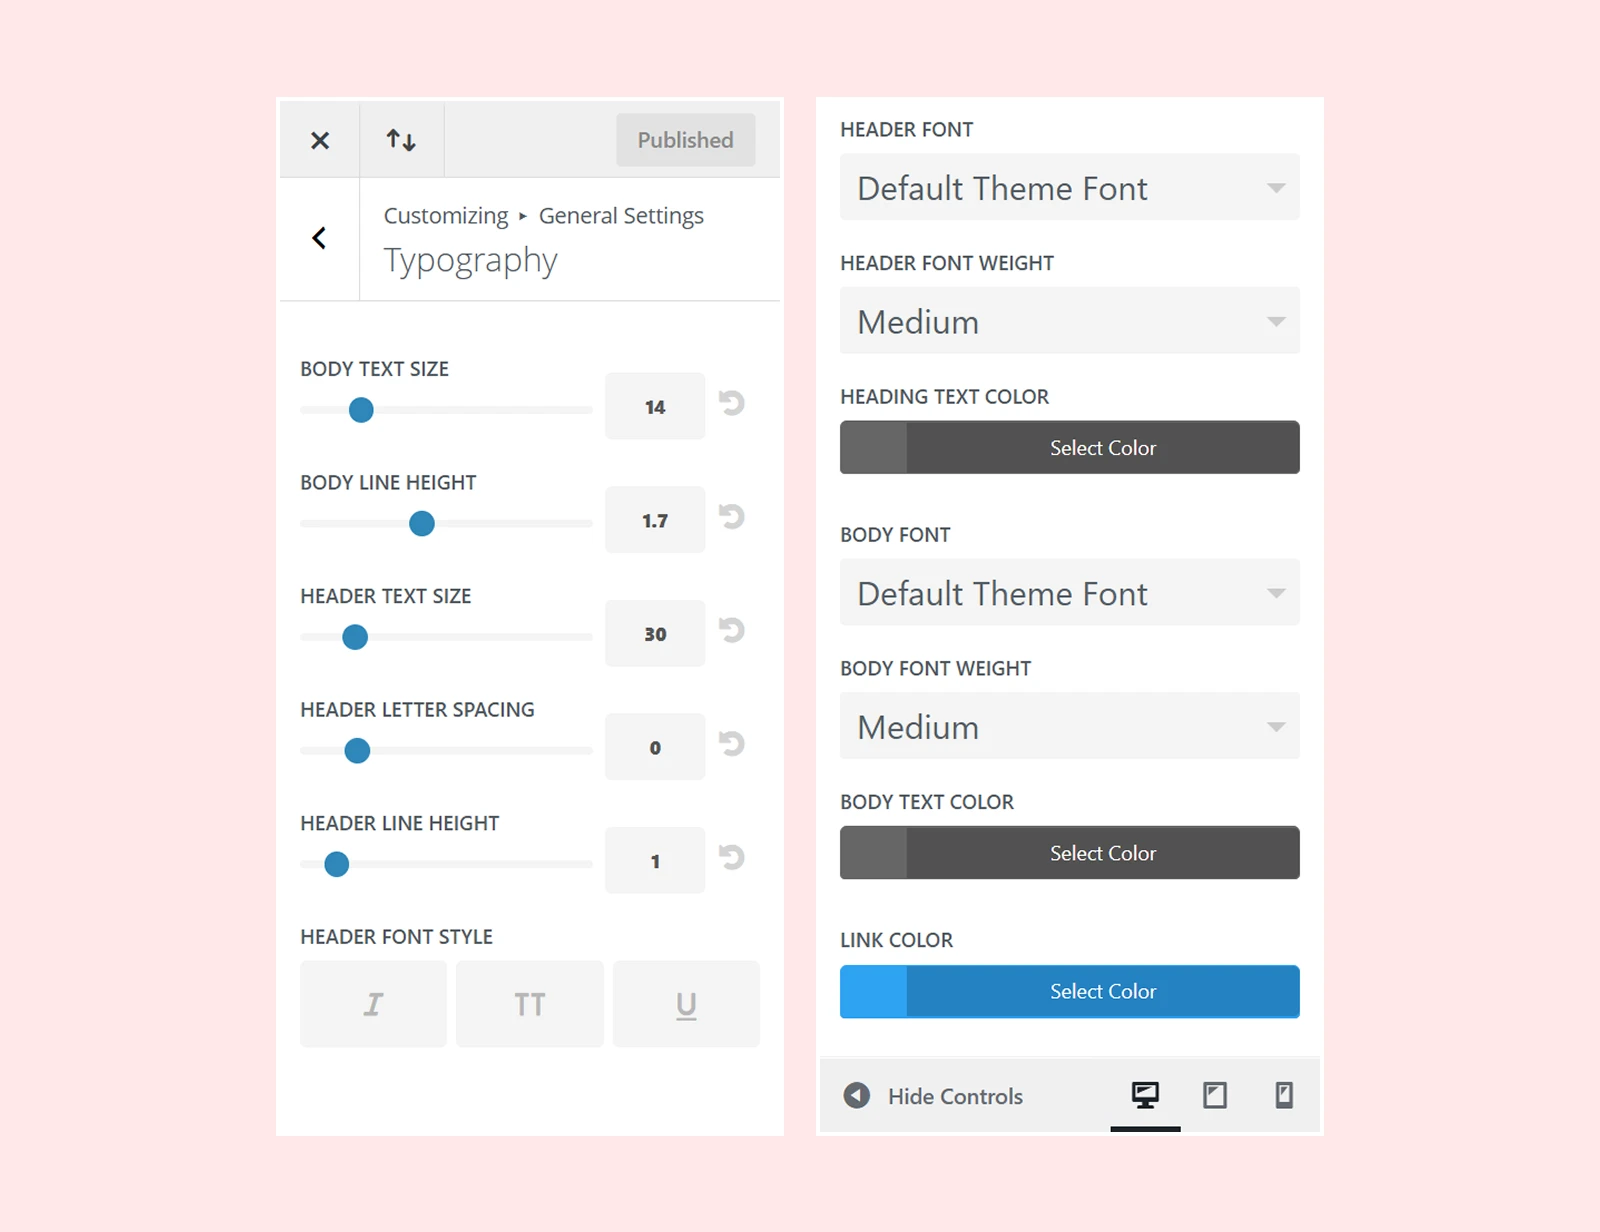
From here, set the default font style for your heading and body text. You can adjust the font, size, color, line height, and other typography settings.
Step-2: Create the Website Pages & Make them Responsive
Now create the pages you planned earlier, such as Home, About, Services, Blog, Contact, and Privacy Policy.
- To create a page, go to WordPress Dashboard > Pages > Add Page.
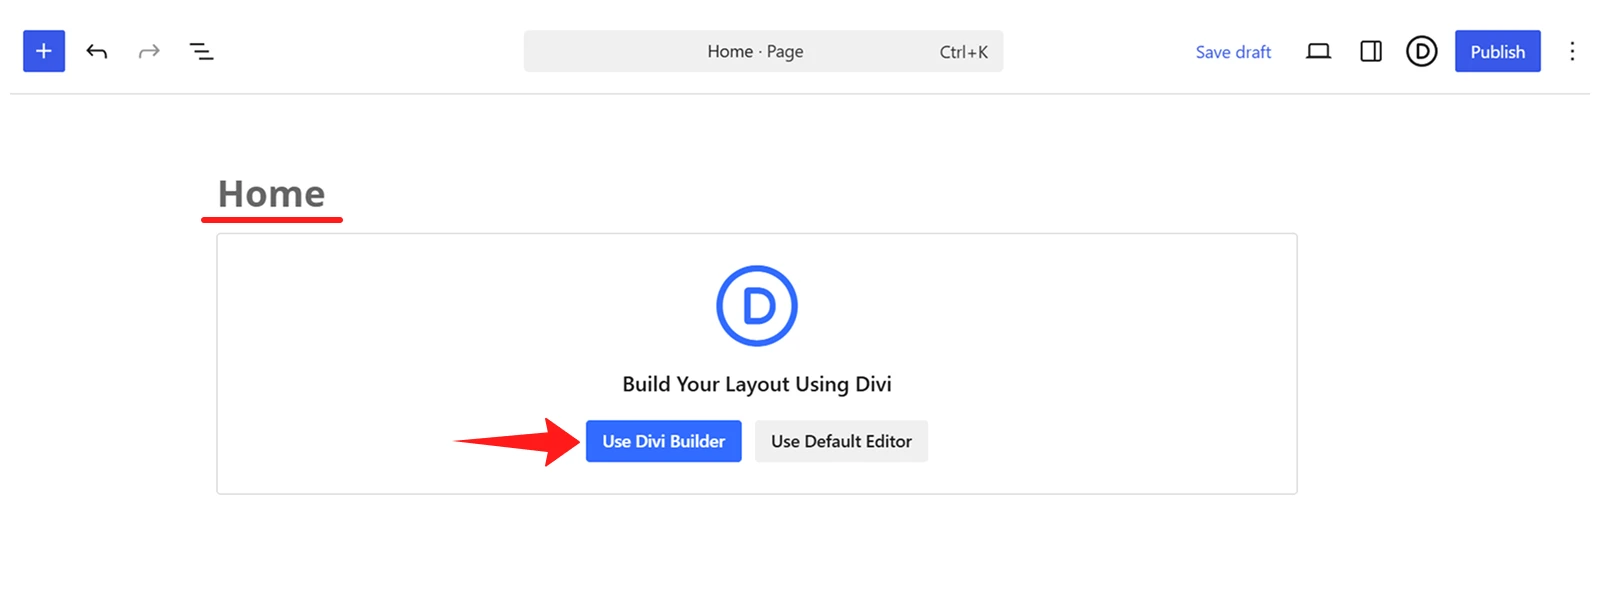
- Add the page title and select Use Divi Builder to open it in the Divi Builder
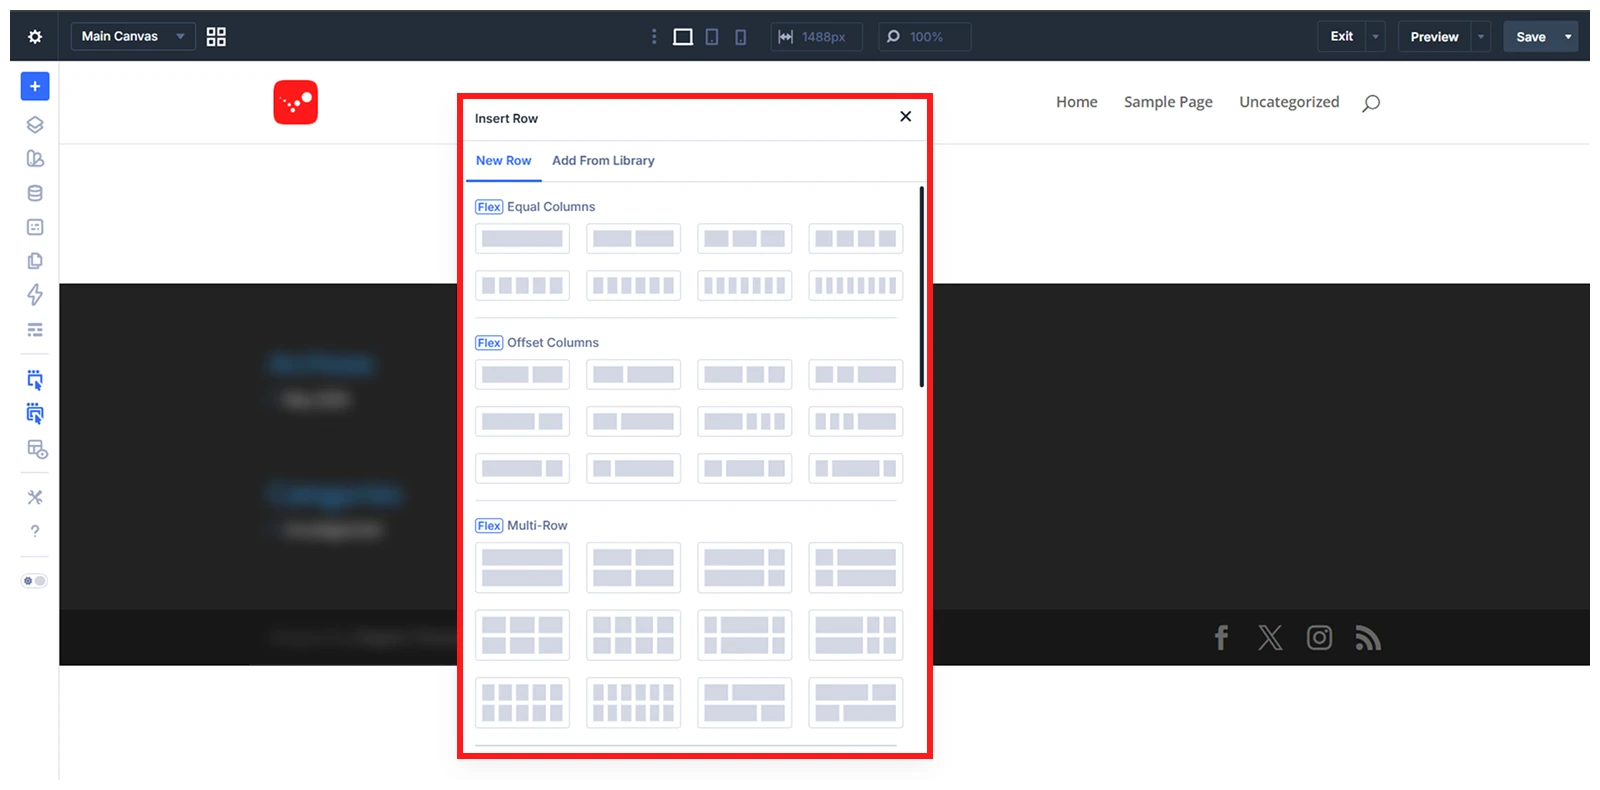
- Click the green plus icon to add a new row
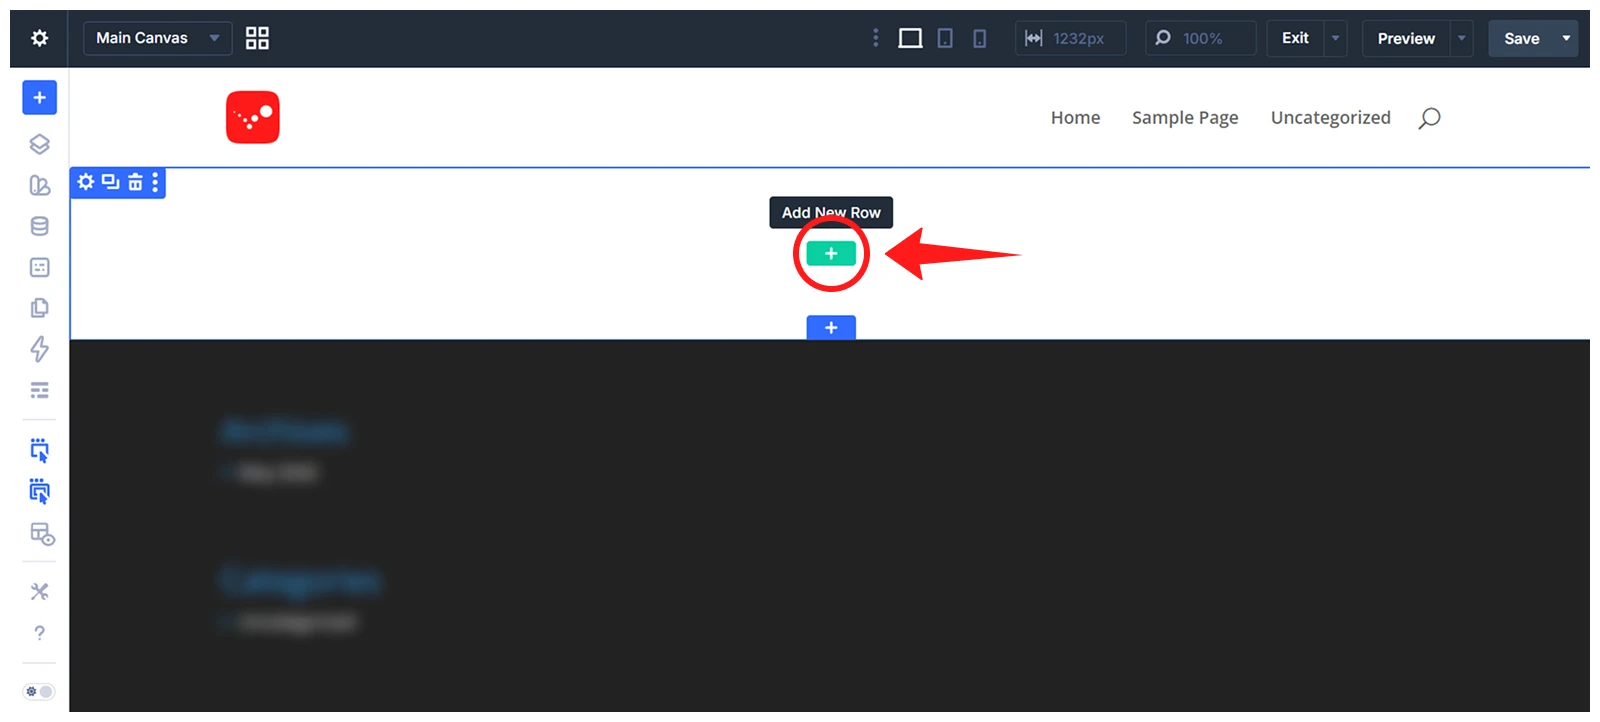
- Choose a single-column or multi-column row based on your layout preference.
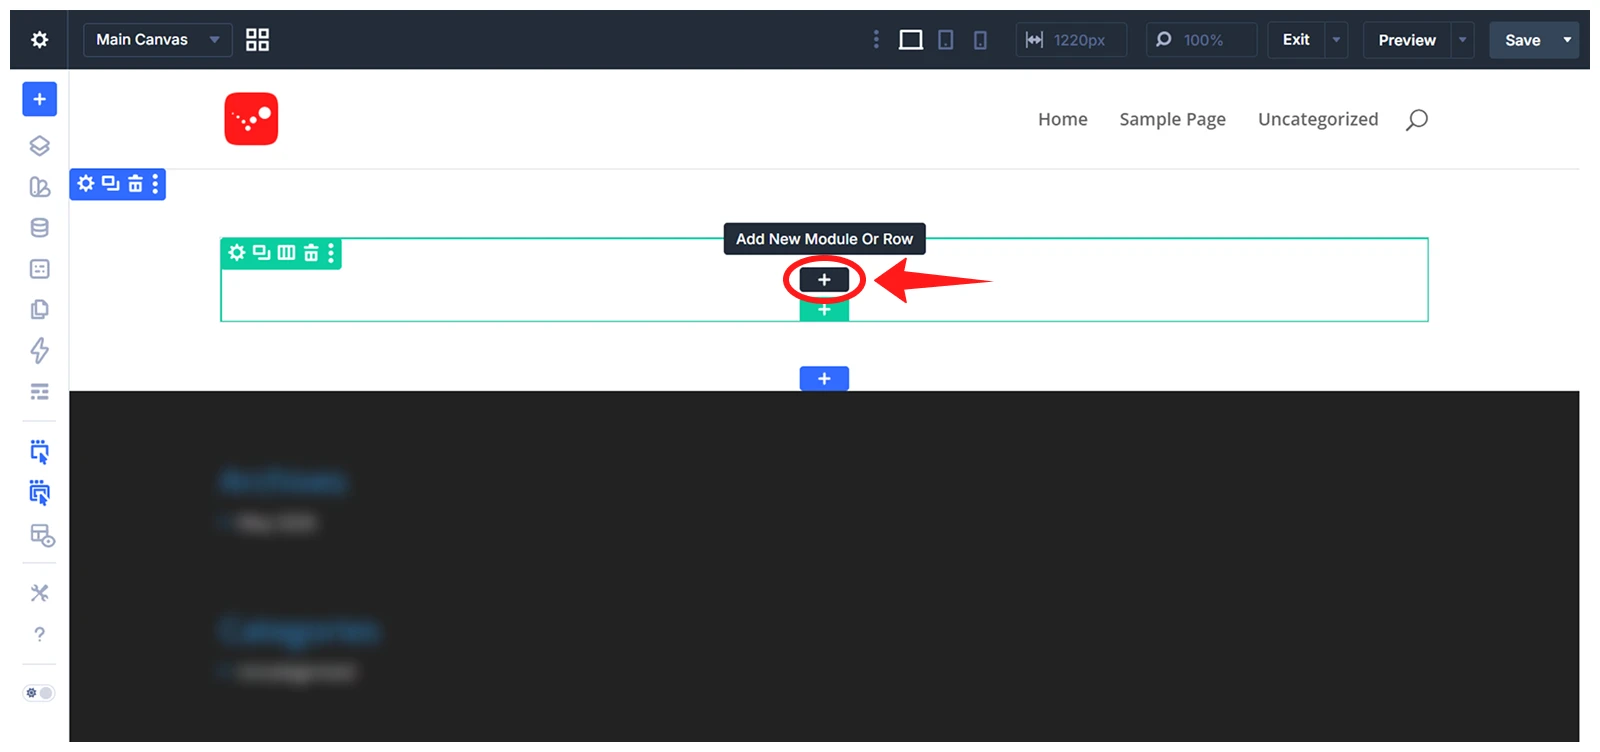
- After adding the row, click the black + icon inside the row to add a module.
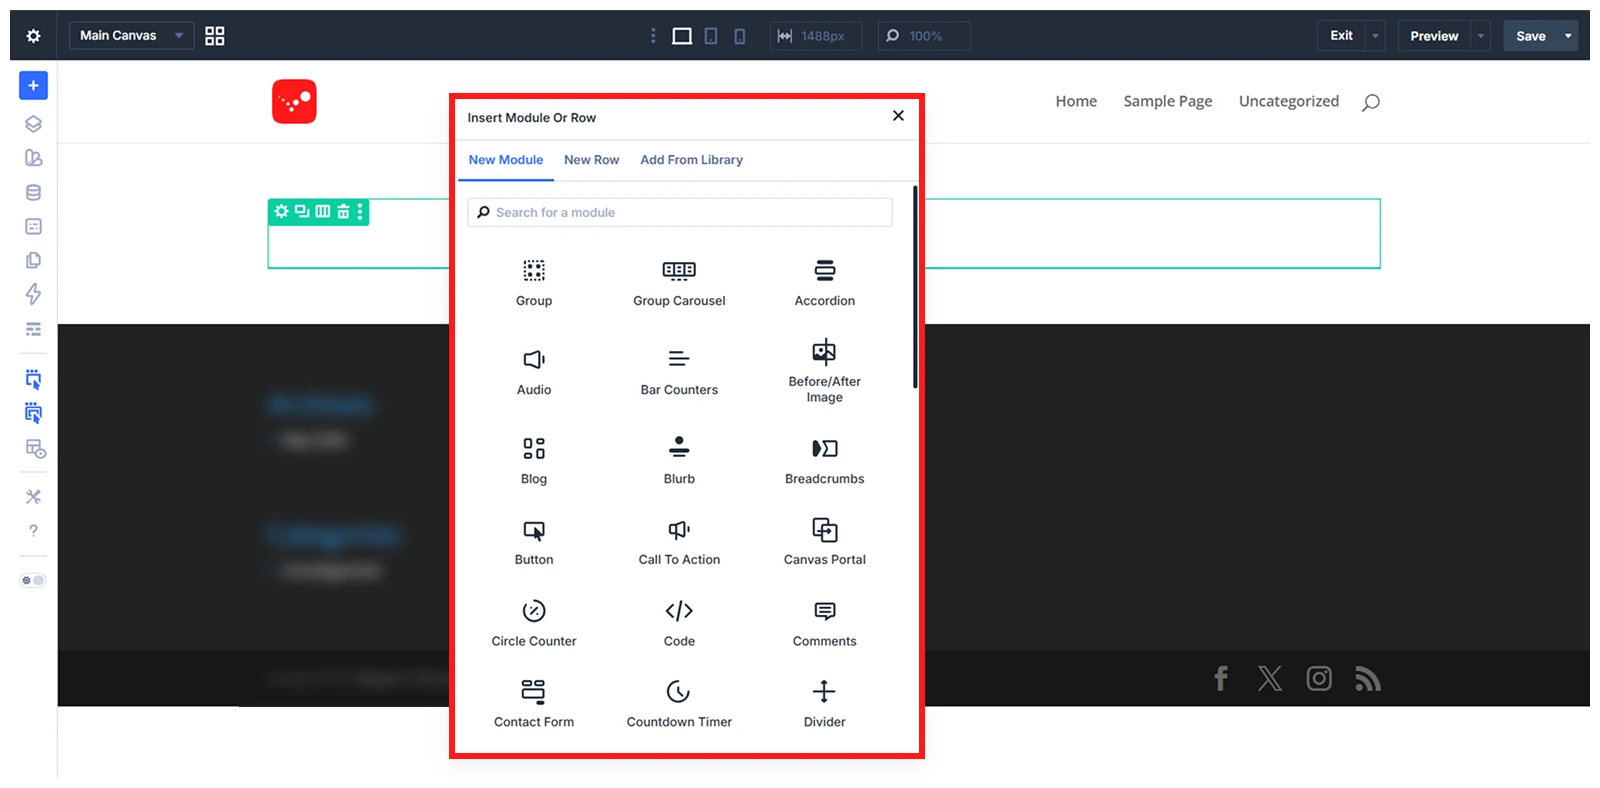
- Choose a module based on your content needs from the 45+ Divi Modules.
- For example, you can choose the Heading Module to add a heading text.
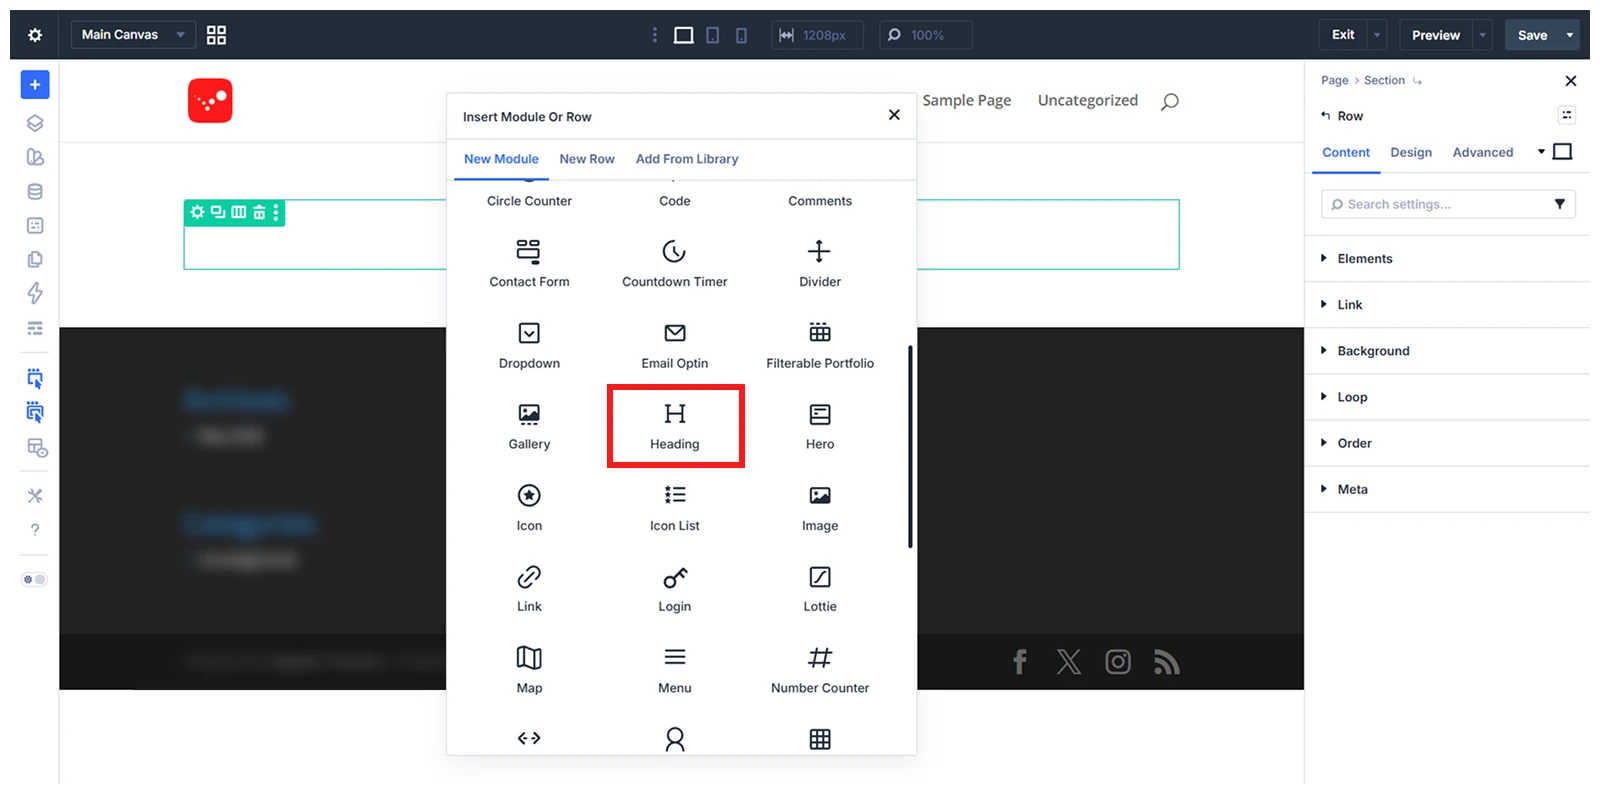
- After selecting a module, customize it from the settings panel using three main tabs:
- Content: Add text, images, links, or other content
- Design: Adjust fonts, colors, spacing, alignment, and layout
- Advanced: Add custom CSS, animations, visibility settings, and other advanced options
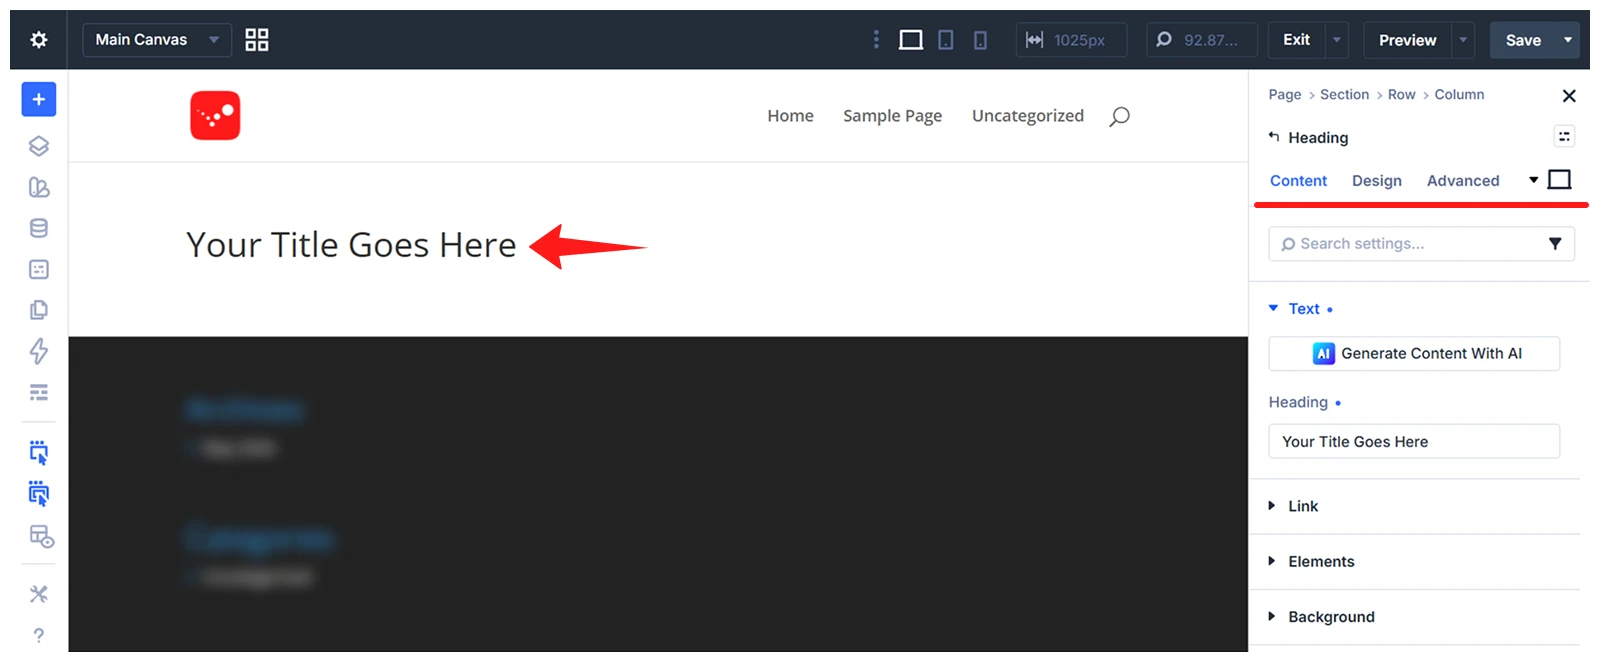
- The same settings panel also works for other Divi elements, including sections, rows, and columns.
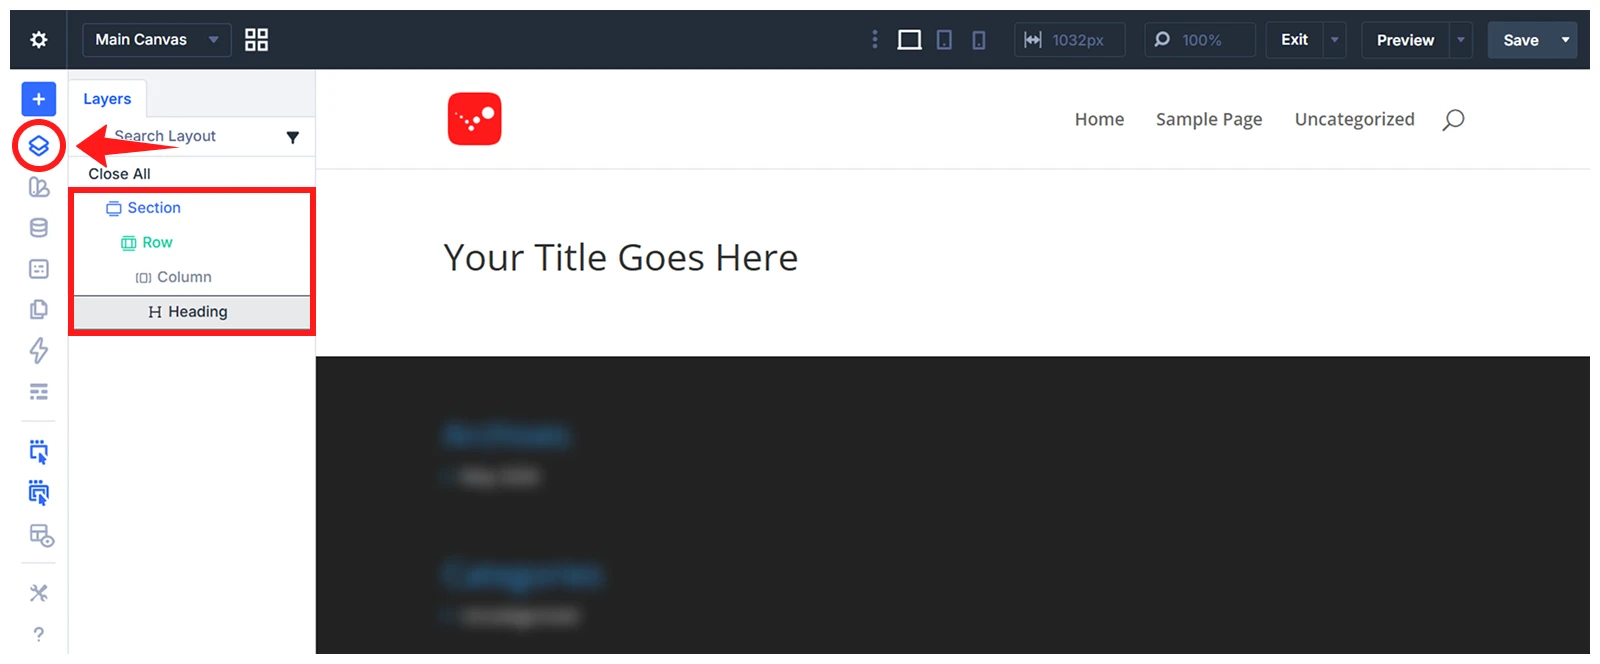
- To move between elements easily, use the Layers panel from the left sidebar. From there, you can select sections, rows, columns, and modules, then duplicate or reposition them quickly.
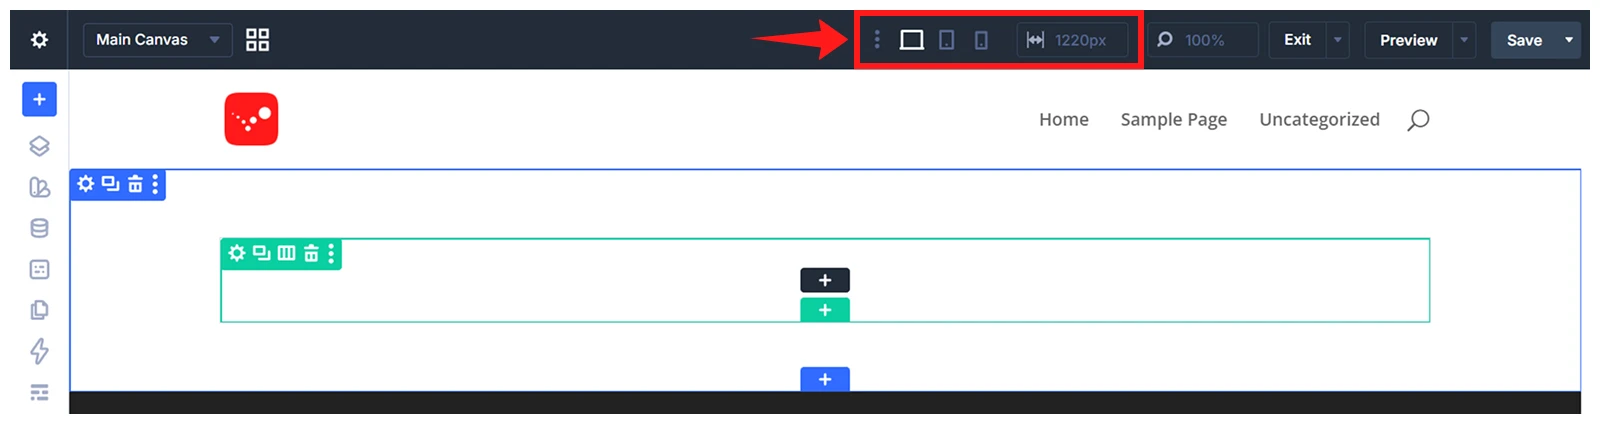
While building each page, also check how it looks on different devices. Use Divi’s responsive preview options to review desktop, tablet, and mobile views. Adjust font sizes, spacing, column stacking, images, and button sizes where needed.
Step-3: Create Reusable Presets
After customizing a Divi element, you can save its style as a reusable preset.
- For example, if you design a button and want to use the same style across the website, open the Button Module settings and go to the Design tab.
- Then open the Design tab, hover over the style group you want to save, and click Assign Presets.
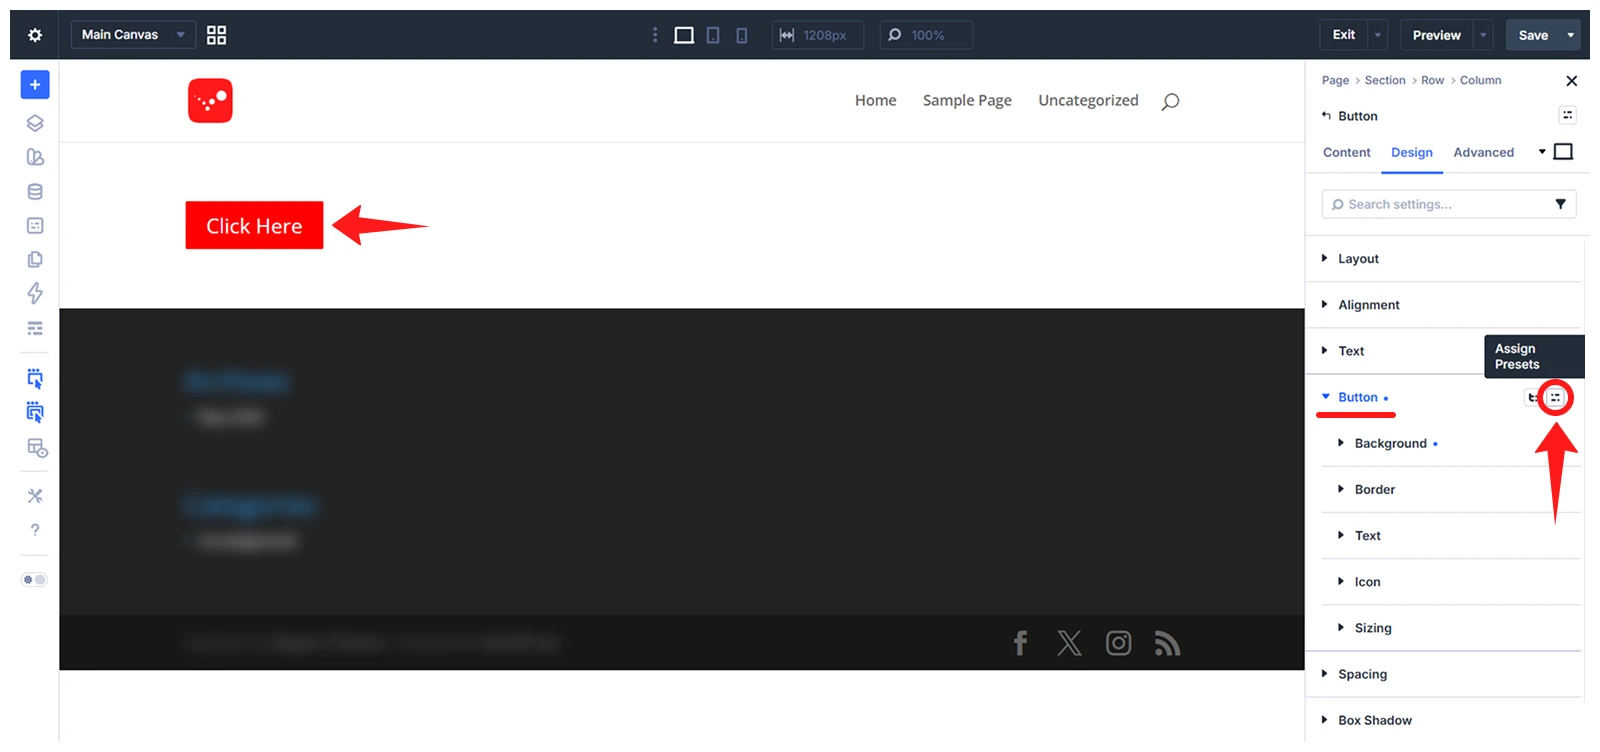
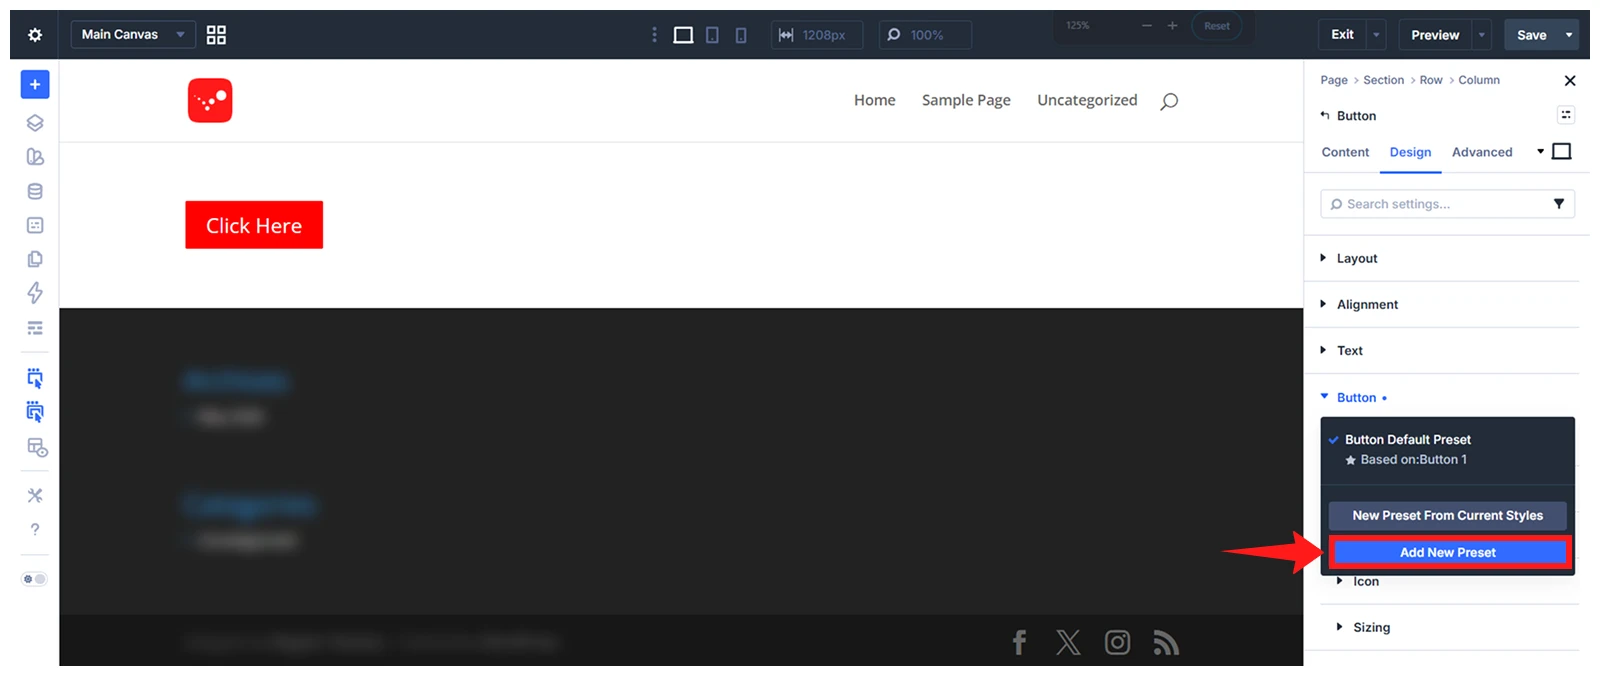
- Select Add New Preset.
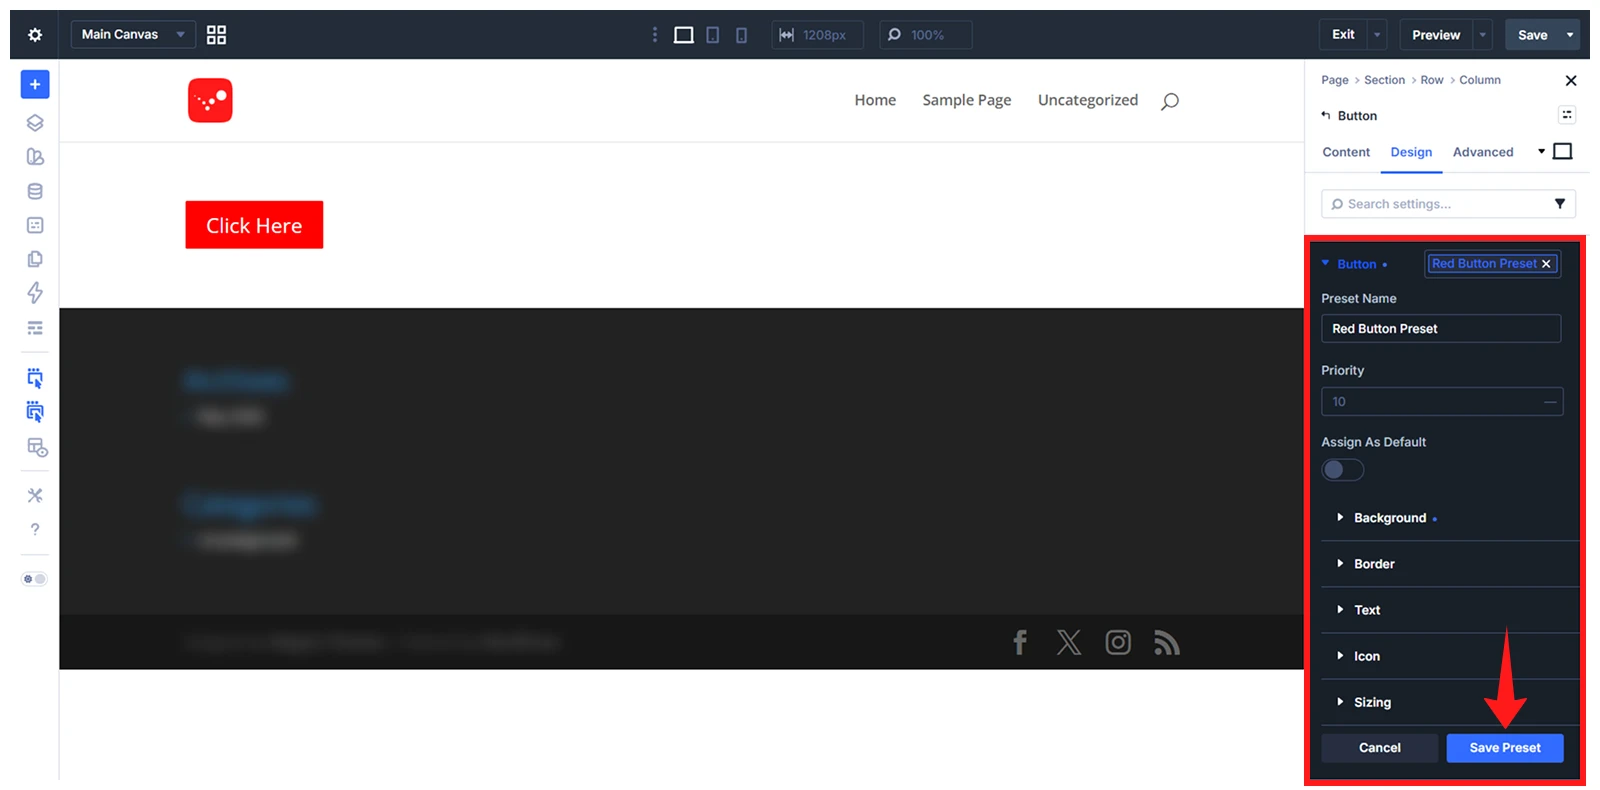
- Add a preset name and adjust the preset style, such as background, border, text, icon, and sizing. Then save the preset.
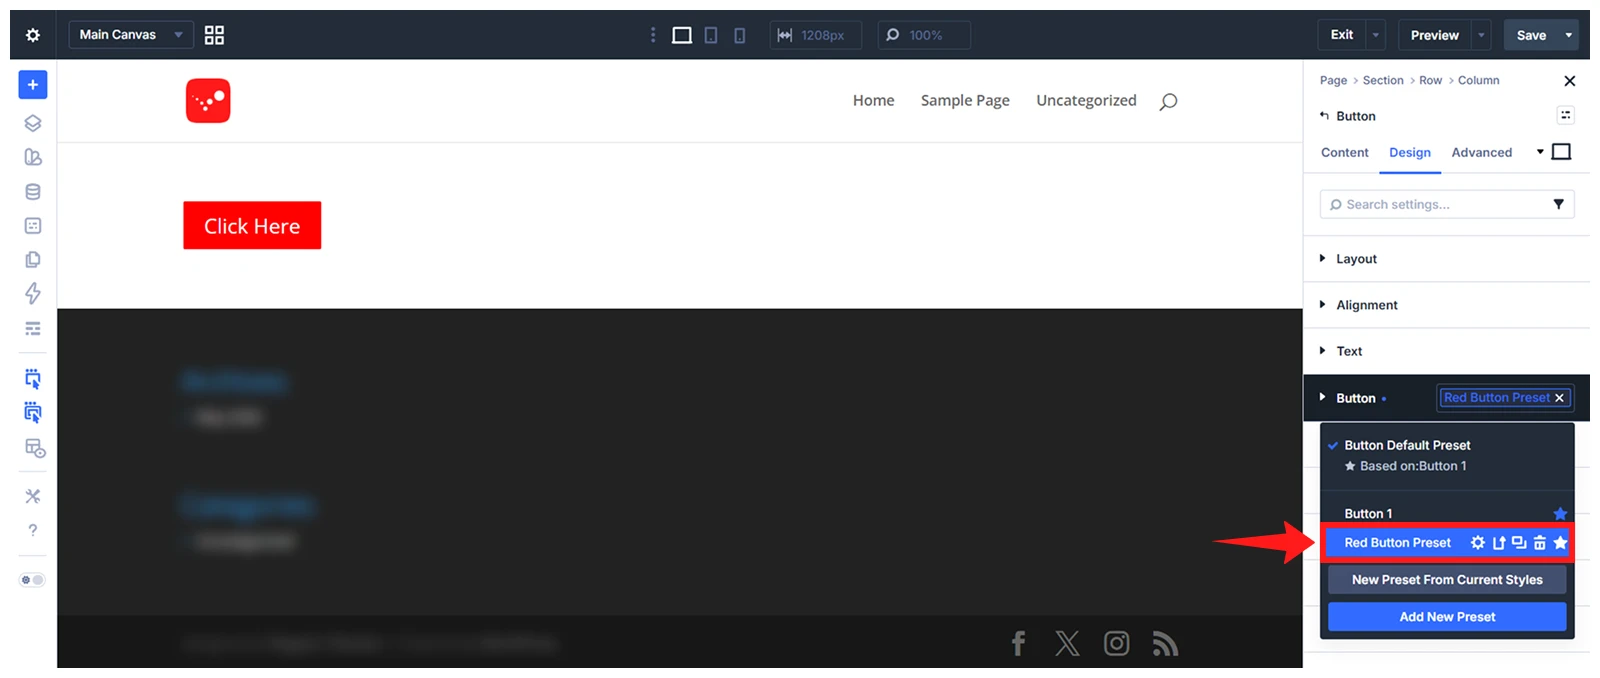
Whenever you want to use the same button style again, open another Button Module and go to Design > Button > Assign Presets. Select the preset you created earlier, and the same design will be applied.
Note: You can follow the same steps to create more presets for other Divi elements, such as headings, text modules, blurbs, image styles, sections, rows, and columns.
Step-4: Create the Navigation Menu
After creating the pages, create the navigation menu so visitors can move between important pages.
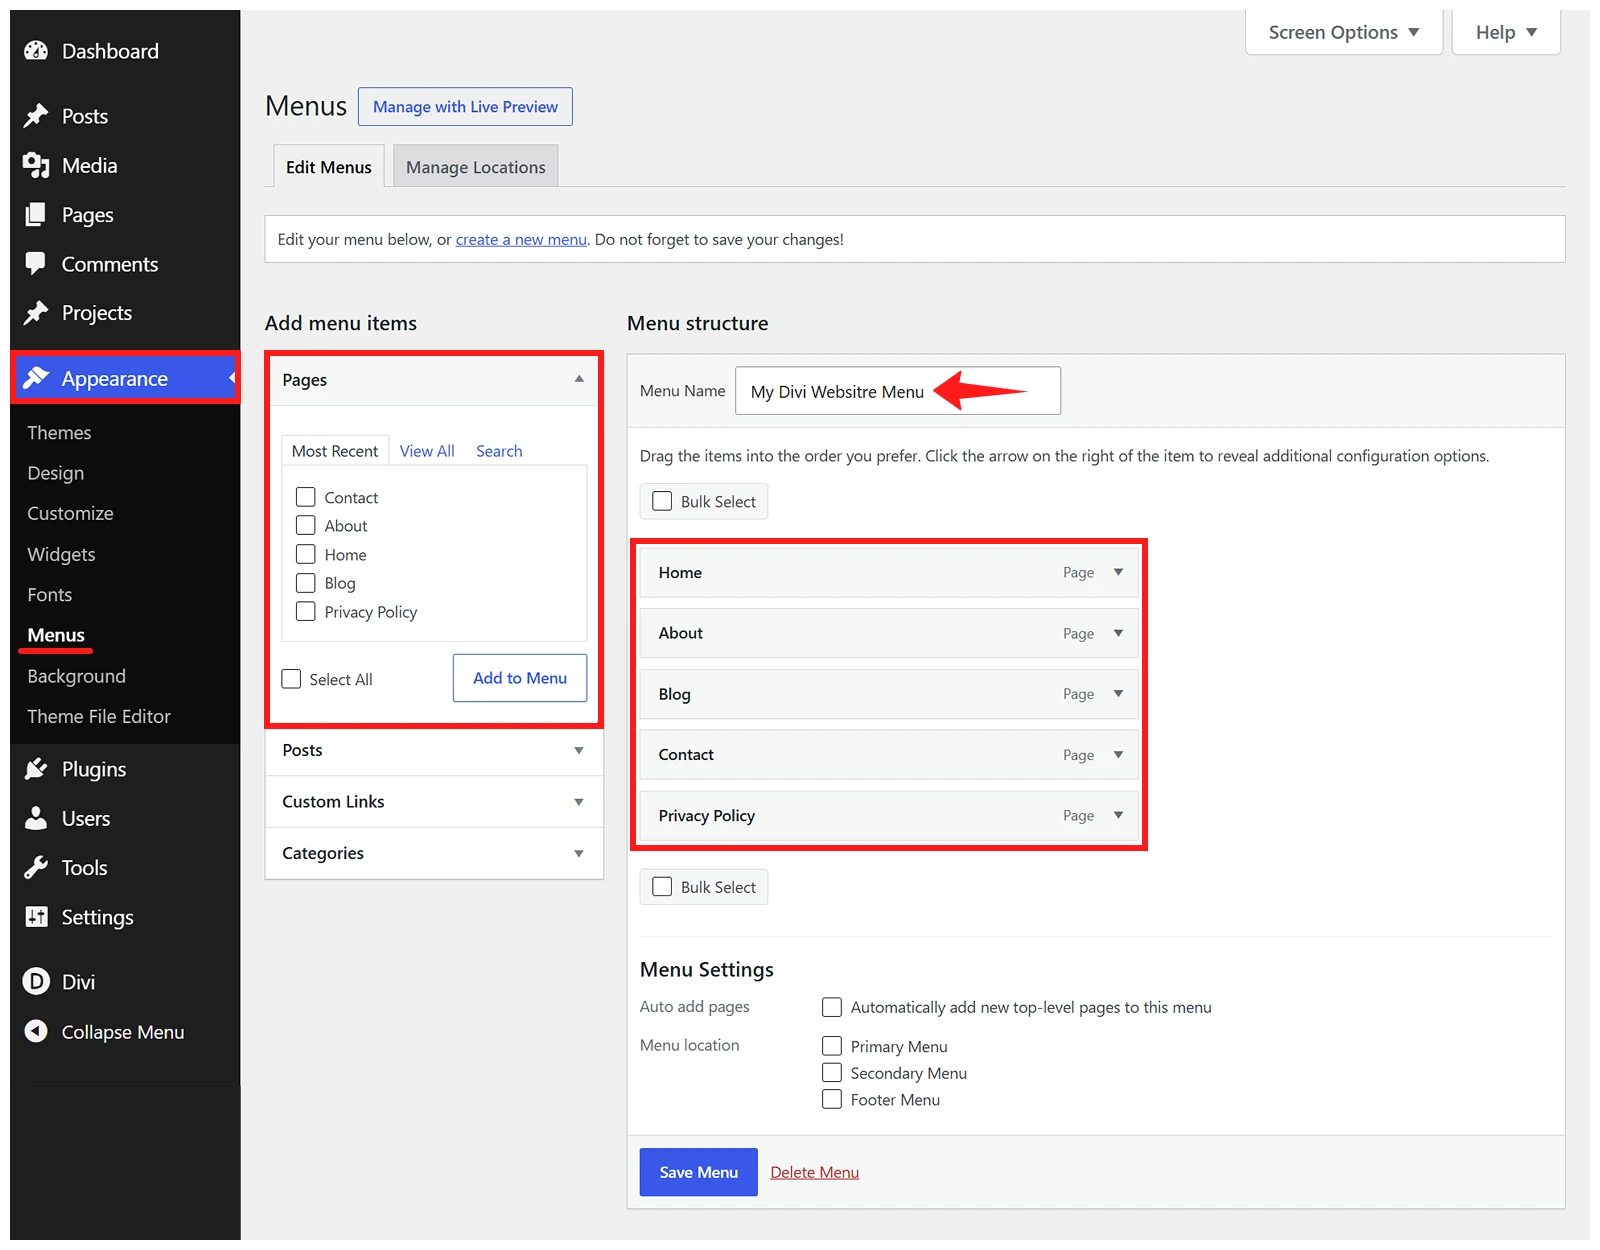
- Go to your WordPress Dashboard > Appearance > Menu
- Add a menu name, select the pages you want to show, and arrange them in the right order, then click Save Menu.
Step-5: Build the Global Header and Footer
Next, build the global header and footer from WordPress Dashboard > Divi > Theme Builder.
- To create the header, select Add Global Header > Build Global Header.
- Choose a single-column or multi-column layout based on your design preference.
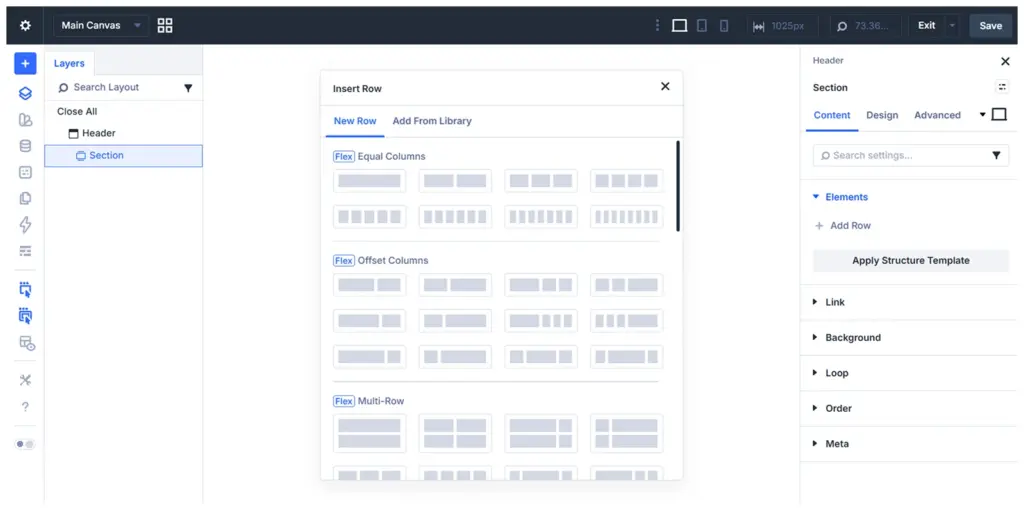
- Add the elements you need, such as a logo, navigation menu, call-to-action button, search module, or other header elements.
- To create the footer, select Add Global Footer > Build Global Footer.
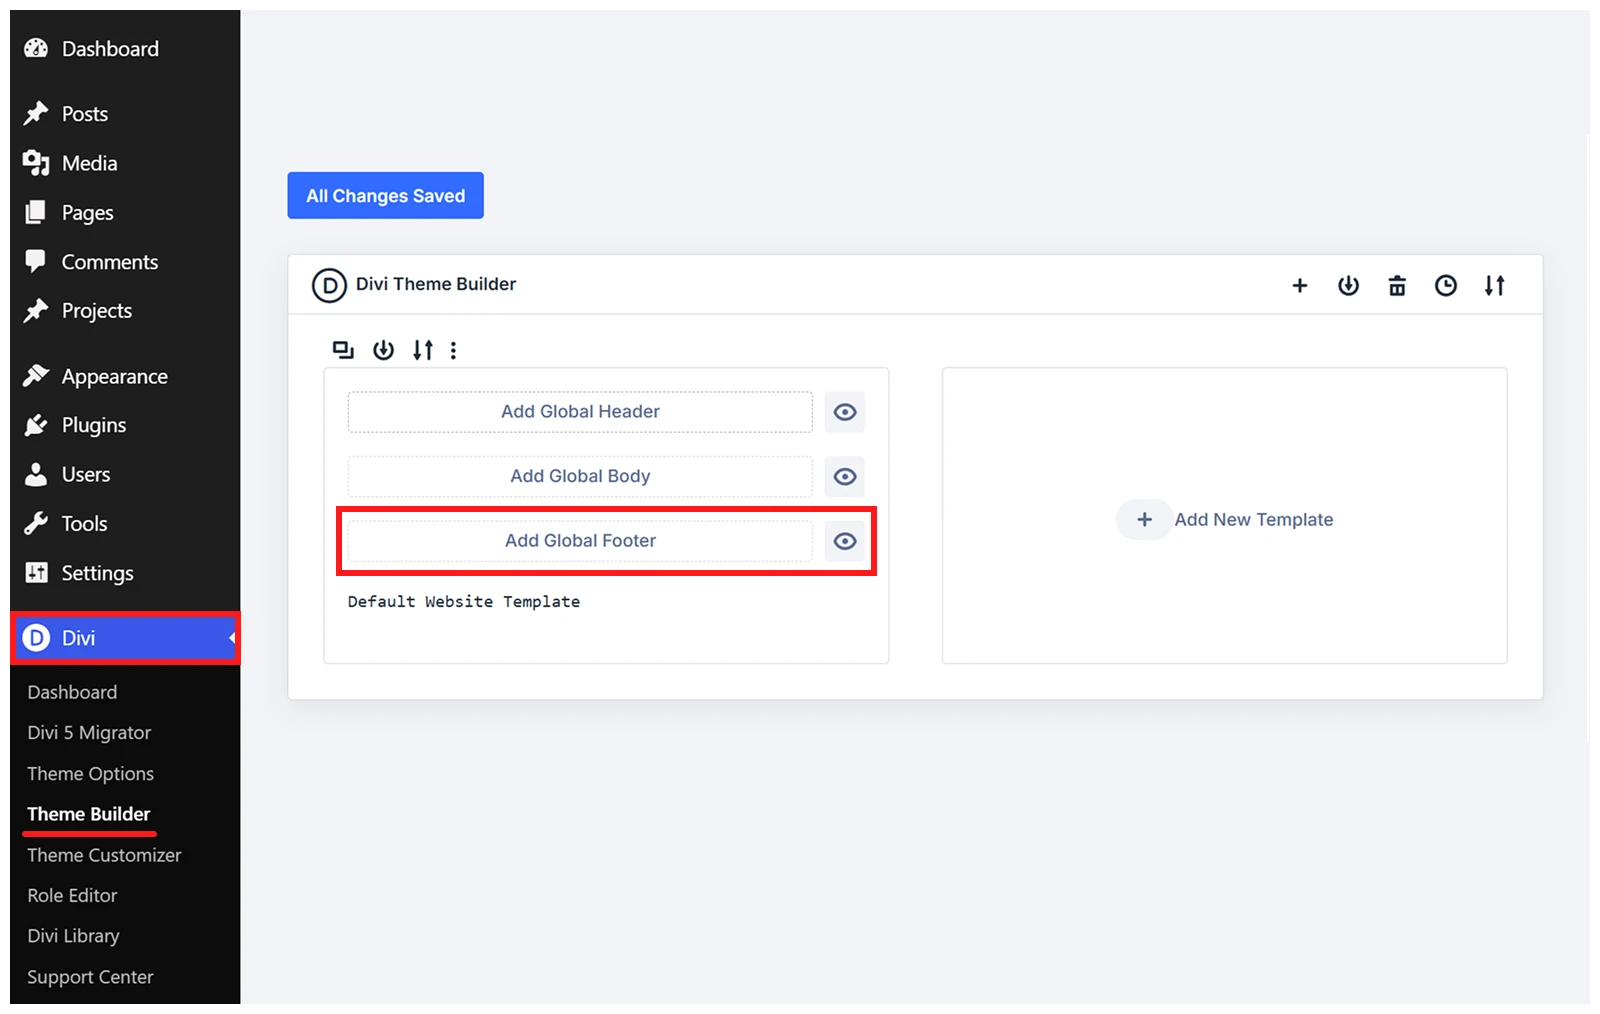
- Choose the layout you prefer and add elements such as a logo, short site description, important links, contact information, social icons, copyright text, and legal pages.
After designing both areas, save the layout and then save the Theme Builder changes.
Step-6: Configure the Home page and Post page
If your website includes a blog, decide which page will be used as the homepage and which page will be used as the blog archive page. To set this:
- Go to your WordPress Dashboard > Divi > Theme Customizer
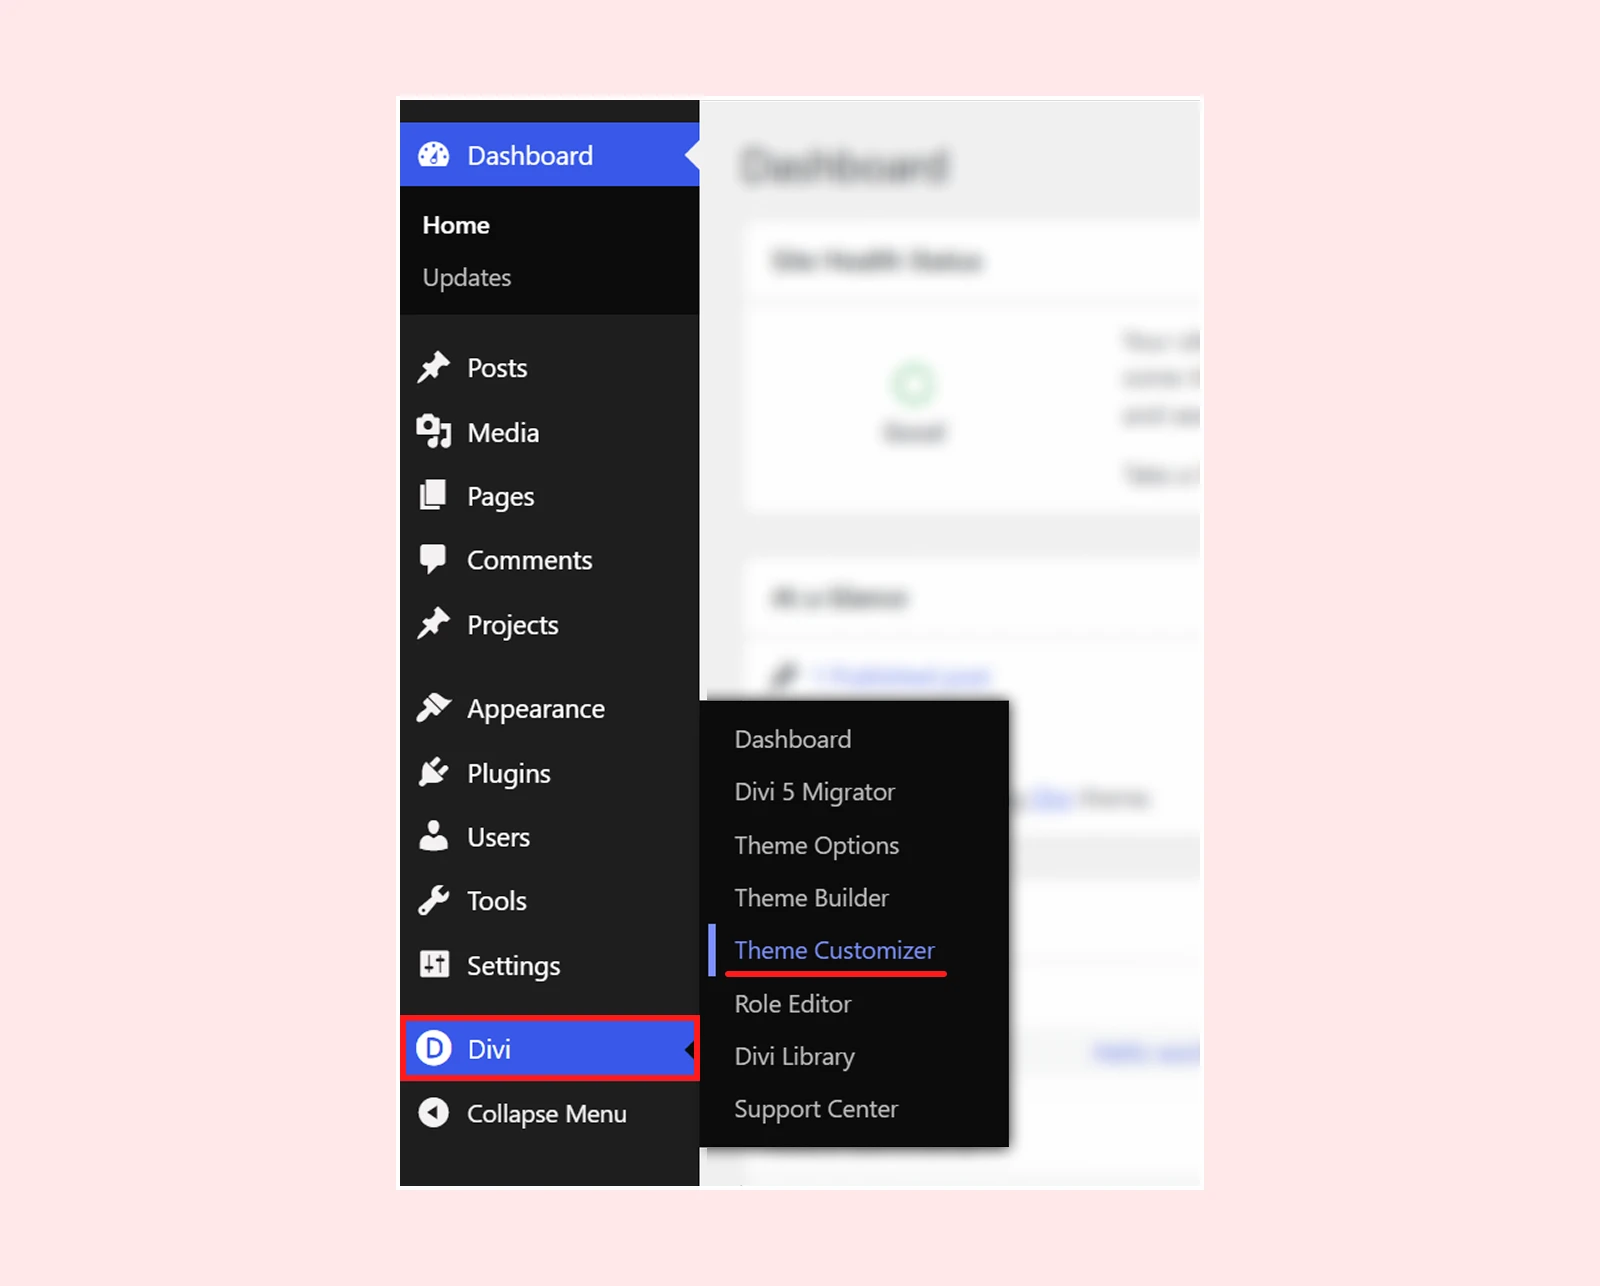
- Then select Homepage Settings.
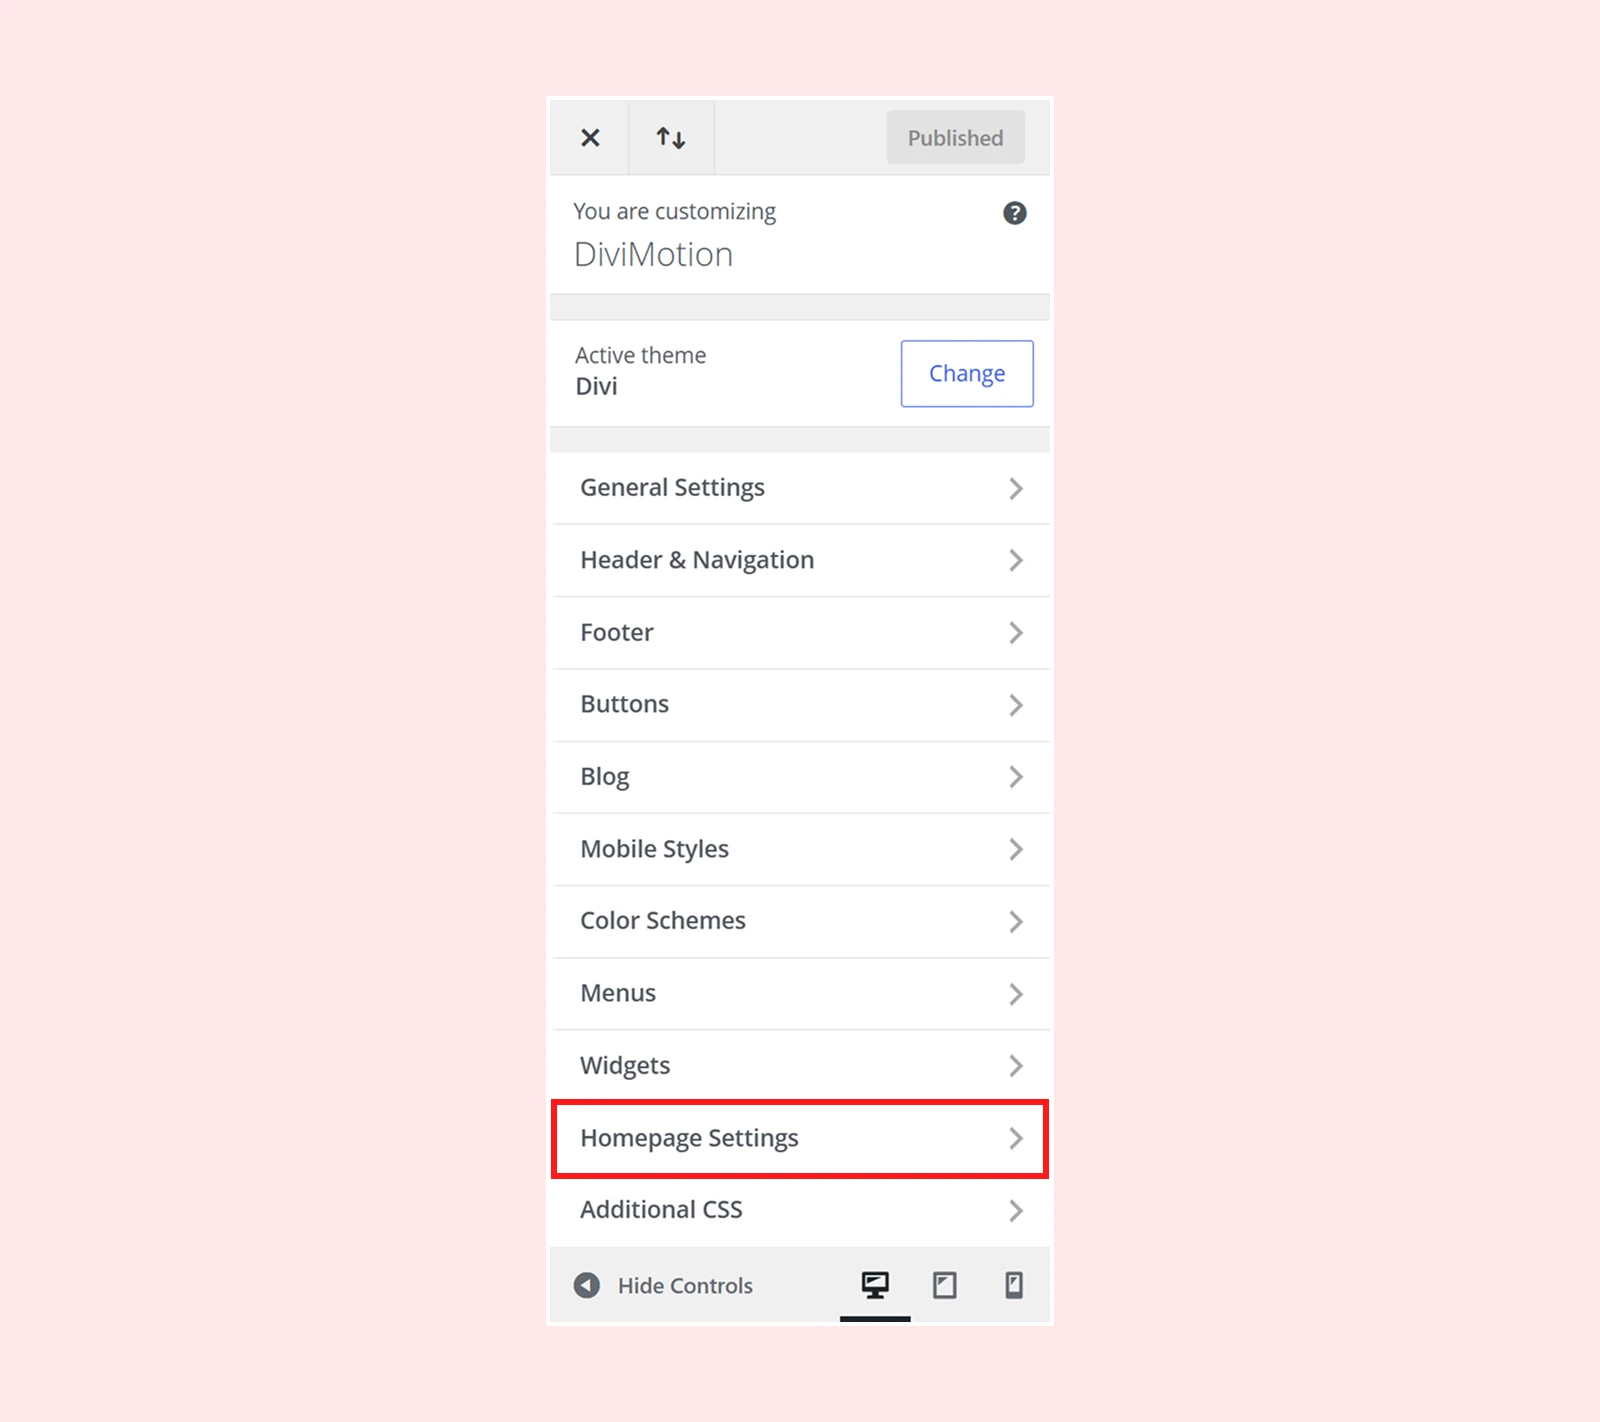
- Under Your homepage displays, choose A static page.
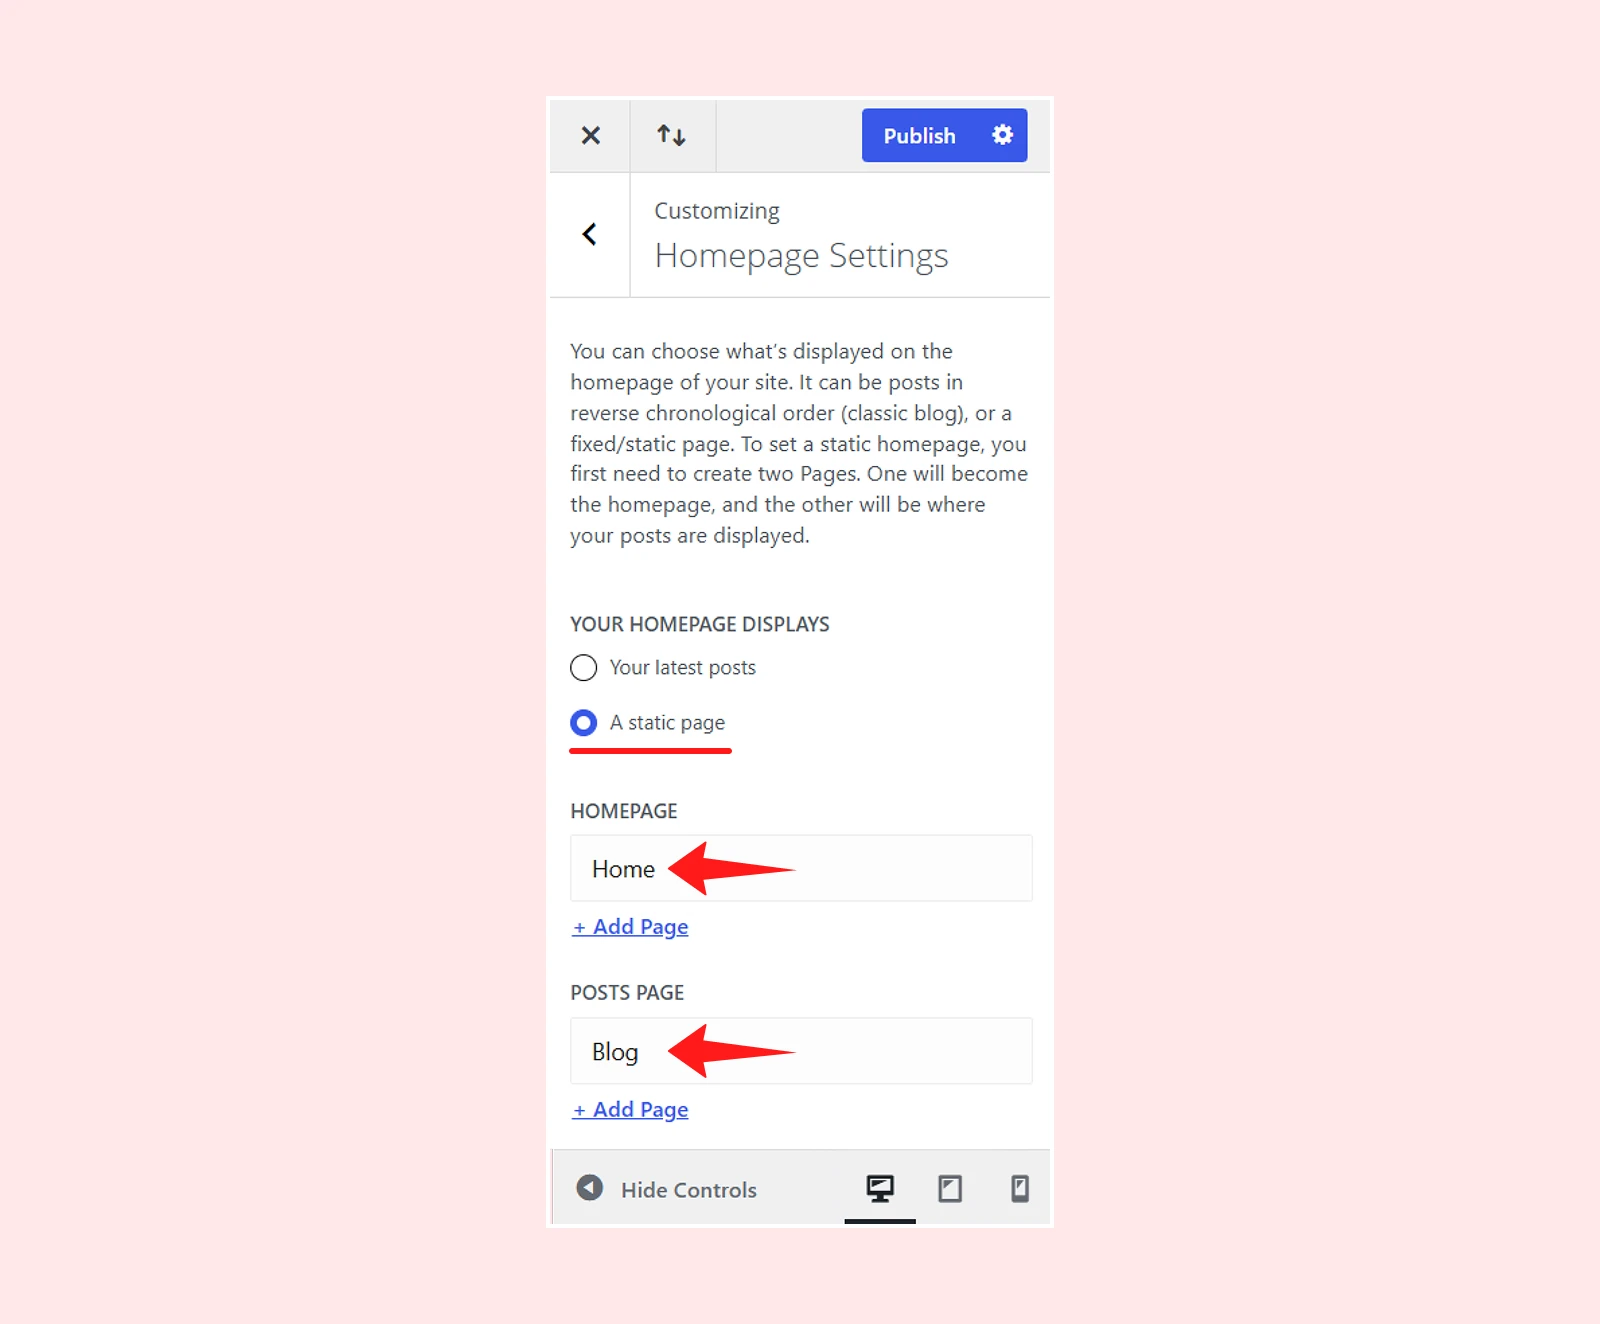
- Select your Home page as the homepage and select your Blog page as the posts page. Then publish the changes.
You can also create custom blog templates from Divi > Theme Builder > Blog > Post if you want more control over the single post layout and blog archive design.
Launching Your Divi Website
Before launching your Divi website, review the important parts of the site carefully. This will help you avoid broken layouts, missing content, and common publishing mistakes.
Check the following before going live:
- Use global colors, typography, variables, and presets for consistency.
- Review the header and footer across all pages.
- Optimize images before uploading them to WordPress.
- Check the website on desktop, tablet, and mobile devices.
- Test buttons, links, menus, forms, and social links.
- Use animations only where they improve the user experience.
- Install only the plugins your website actually needs.
- Set up basic SEO, analytics, backups, and security.
- Remove unused sections, modules, plugins, and pages.
A clean website is easier to manage and usually performs better. Once everything looks good and works properly, you are ready to publish your Divi website.
Wrap Up
Creating a website with Divi is easier with a clear plan and the right approach. Use Divi AI for a quick start, Layout Packs for faster builds, or build from scratch for full control.
Keep your site clean, consistent, and user-friendly. Focus on essential pages, apply your brand styles, ensure responsiveness, and test before publishing.
To enhance the user engagement, add interactive motion effects to your page layouts with DiviMotion.
It allows you to create GSAP-powered animations and bring your website to life with advanced animation effects that are triggered by scrolling, loading, clicking, or hovering.



0 Comments