


You can add GSAP to a Divi website in several ways. The easiest ways are using a plugin like DiviMotion to add GSAP-powered animation controls or integrating the GSAP library manually through a CDN.
In this guide, we cover both methods so you can choose the one that best fits your workflow.
Method 1: Add GSAP to Divi Using a Plugin
The easiest way to add GSAP to any Divi website is to use a plugin like DiviMotion. It brings GSAP animation libraries into the Divi Visual Builder.
Using DiviMotion, you can trigger animations on scroll, hover, click, and page load using the native Divi Builder.
Note: DiviMotion only works with Divi 5.0 or later and does not support Divi 4 or earlier versions.
Step 1: Download, Install, and Activate the Plugin
- Purchase and download the plugin from your DiviMotion account
- Install and activate the plugin like any other premium WordPress plugin
Step 2: Apply GSAP Animations in Divi Using DiviMotion
After activating DiviMotion, its animation controls become available inside the Divi Visual Builder.
You can access the DiviMotion panel from the Design tab in the Divi Builder after selecting any section, row, column or module. You can then animate that element, its modules, or another element on the page.
DiviMotion follows a simple three-part workflow:
When (Interaction) → What (Action) → How (Properties)
Here is how to create an animation using this workflow.
1. Open the DiviMotion Panel
Open the page you want to animate in the Divi Visual Builder. Then:
- Hover over the section, row, column or module you want to work with.
- Click the gear icon to open its settings.
- Go to the Design tab.
- Scroll down and expand DiviMotion.
- Click + Add Interaction.
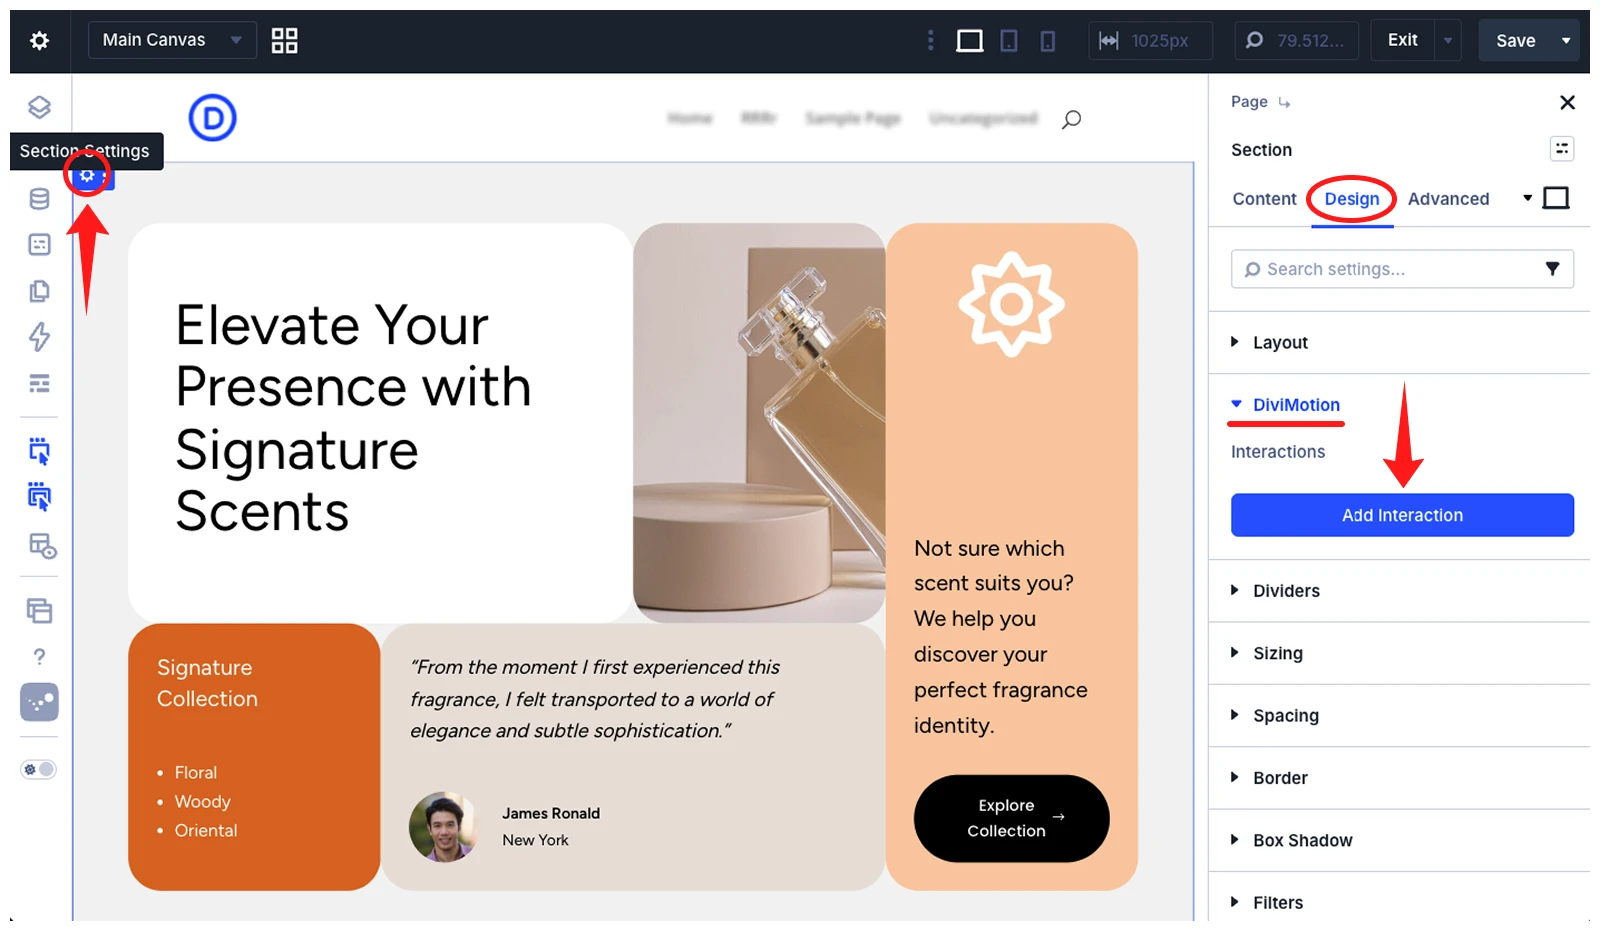
The selected section, row, column or module becomes the default trigger element.
2. Select an Interaction
This is the When part. Choose what should start the animation:
- On Scroll
- On Click
- On Hover
- On Page Load
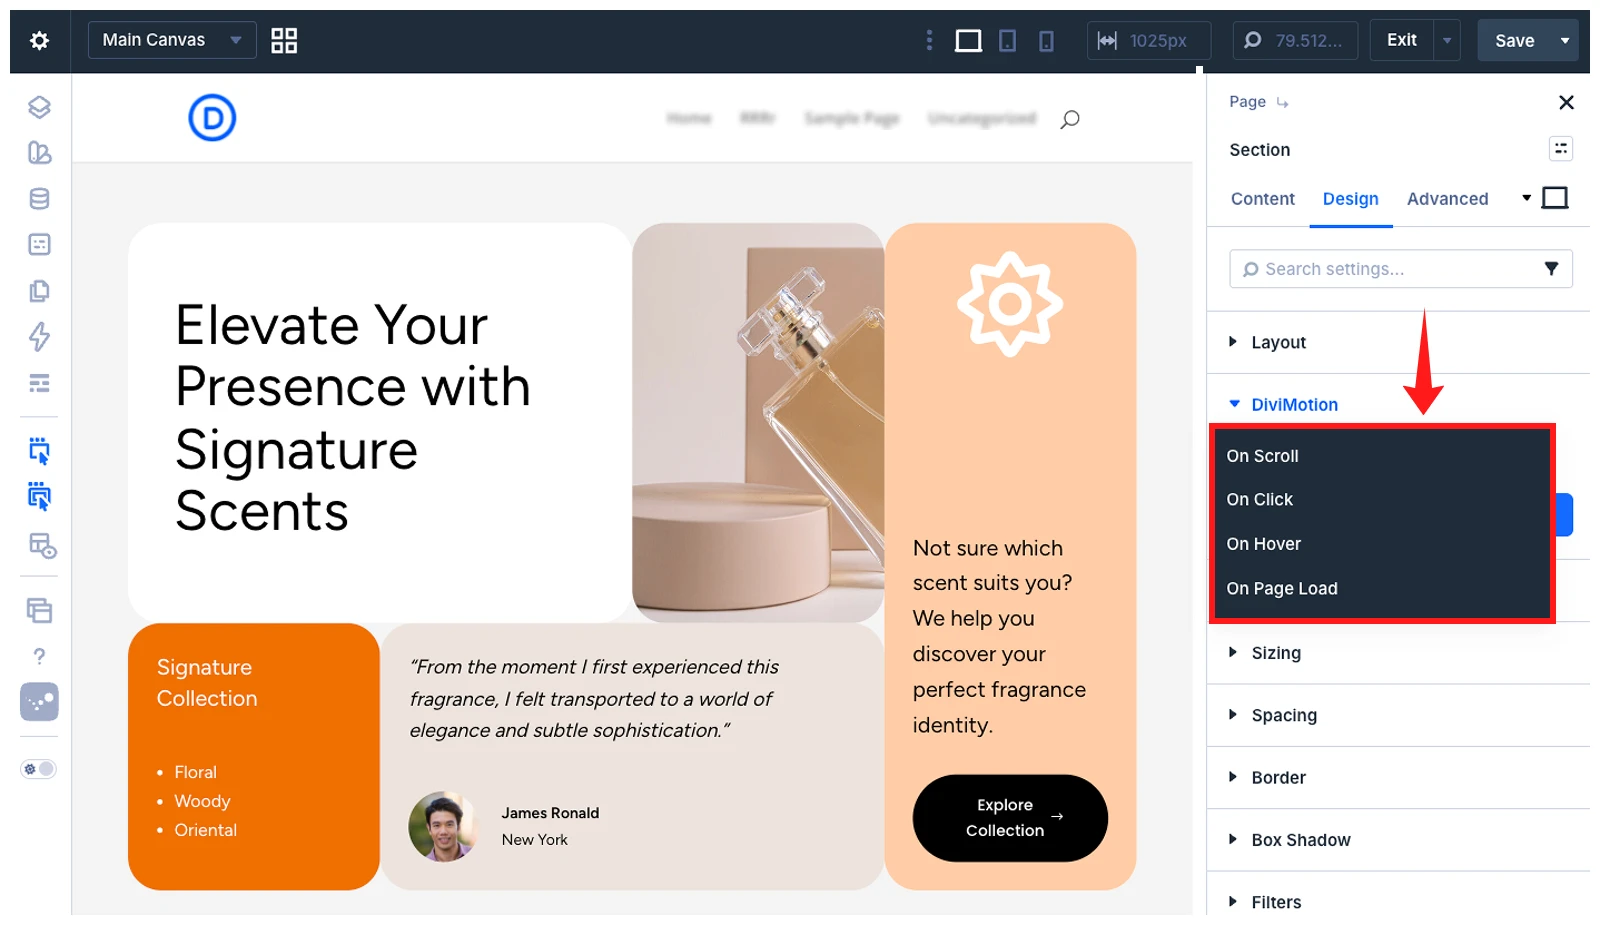
After selecting an interaction, DiviMotion creates an Interaction Card. Click the Trigger Settings icon on the card to open its settings panel on the left side of the Visual Builder.
Settings vary by interaction type. For Scroll interactions, choose a Trigger Type:
- Element: the current section, row, column or module
- Element by ID: a specific element by ID
- Custom Selector: an element matching a CSS selector
Use the Scope setting to define related elements, such as the current element, all matching elements, children, descendants, siblings, the parent, the next sibling, or the previous sibling.
Example: Trigger Type: Element, Scope: This Element
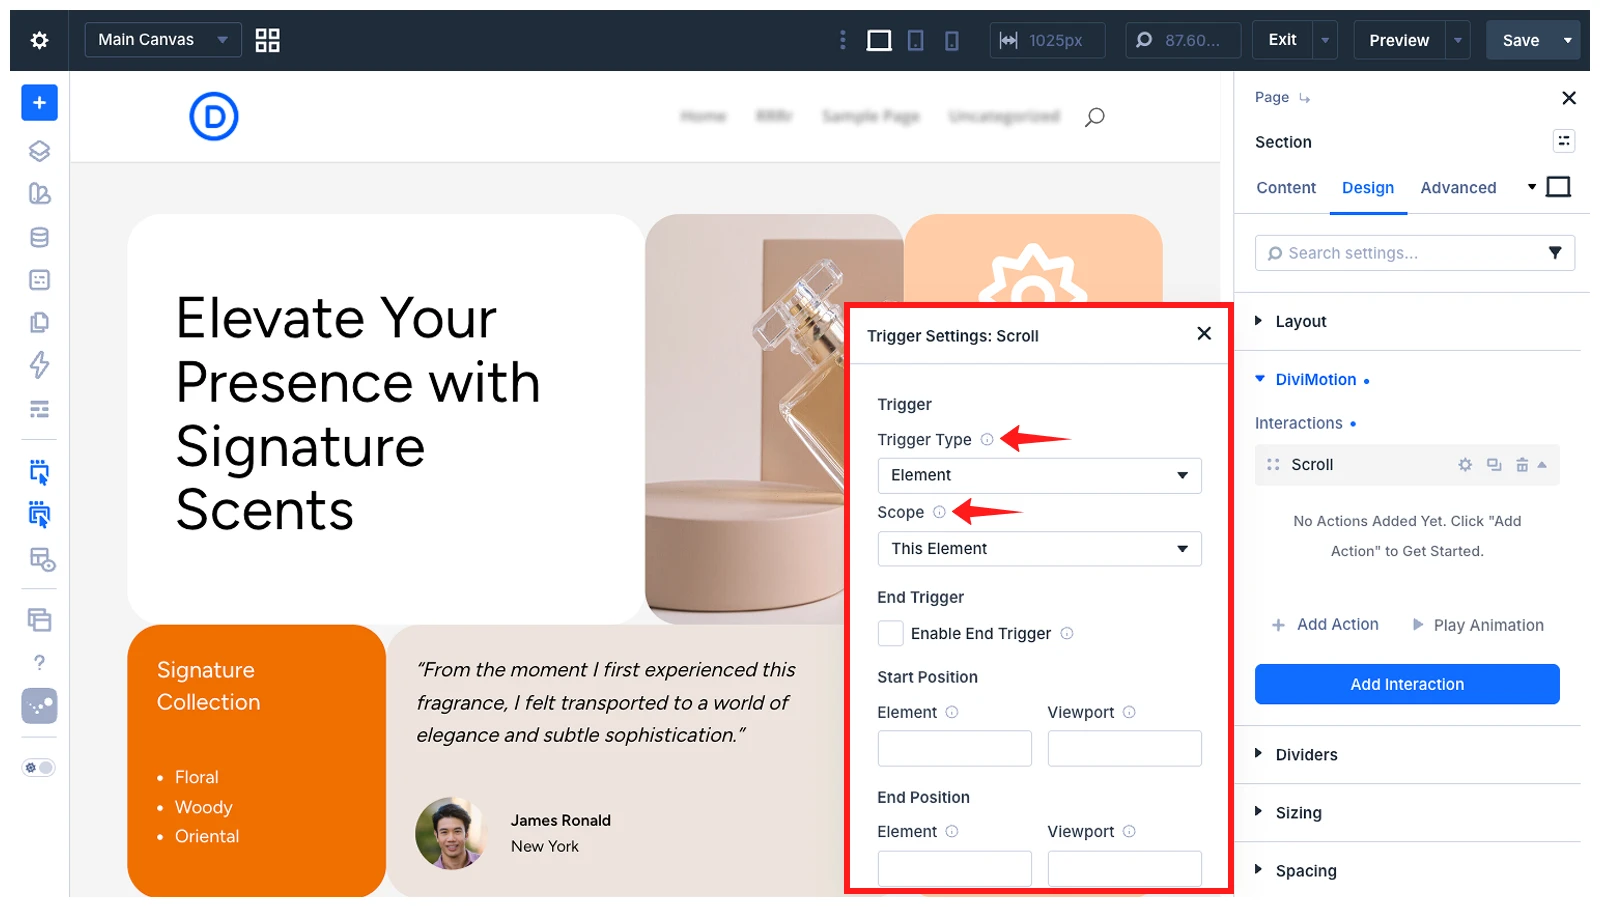
You can then configure the Start Position and End Position to control when the scroll animation begins and finishes.
3. Add an Action
This is the What part. Click + Add Action inside the Interaction Card and choose one of the following action types:
- Custom Action: Build an animation from scratch with full control.
- Action Presets: Apply a ready-made animation.
- Set Properties: Change an element’s state.
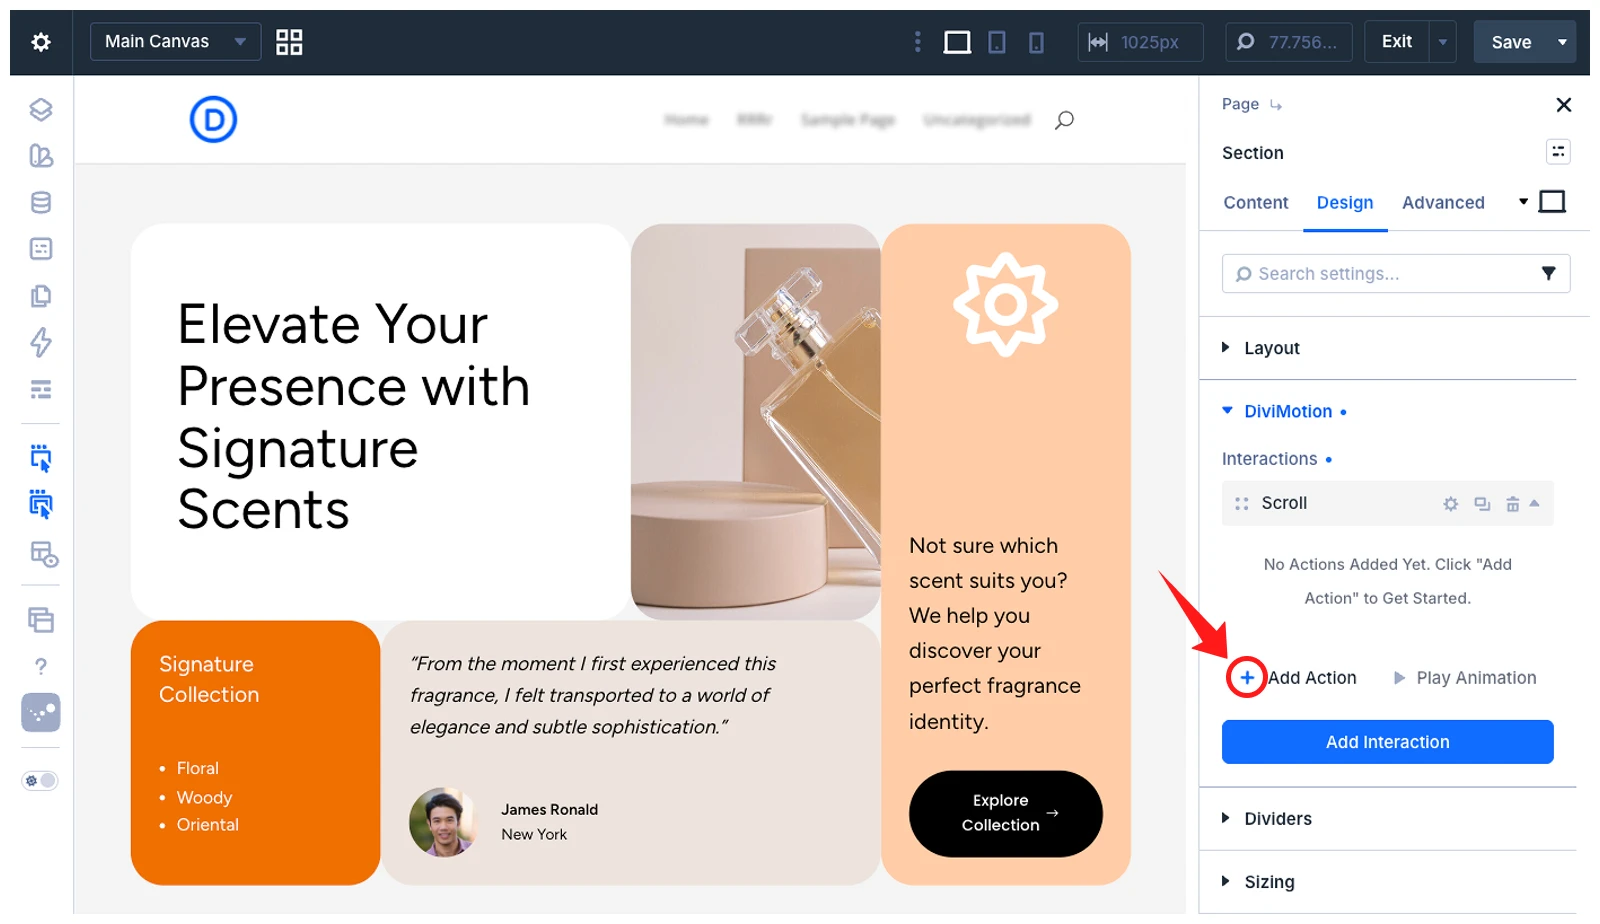
You can add multiple actions to one interaction to animate several elements or create a sequence.
3.1 Use a Custom Action
Choose Custom Action when you want complete control over the animation.
Open Action Target Settings to select the element that should animate.
By default, the action inherits the same target used by the interaction. However, you can choose a different element using:
- The current element
- An element by ID
- A custom Selector
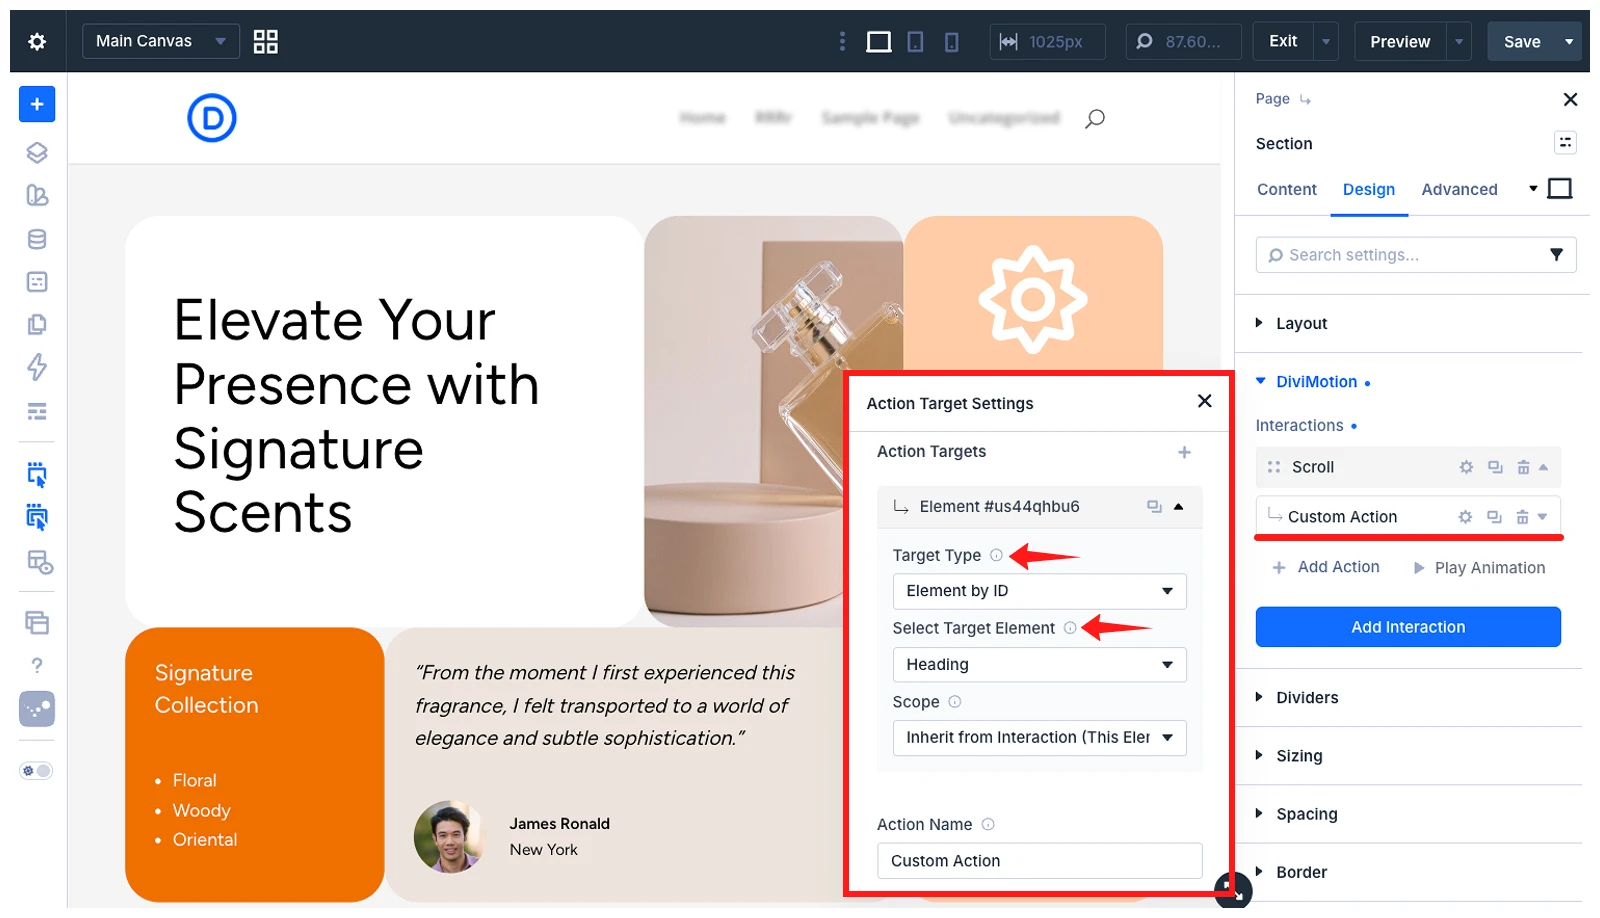
The trigger and the animation target do not have to be the same. For example, you can use a section as the scroll trigger and animate a Heading module inside it.
After selecting the Action target, configure settings such as:
- Duration
- Easing
- Stagger
- Repeat
- Animation properties
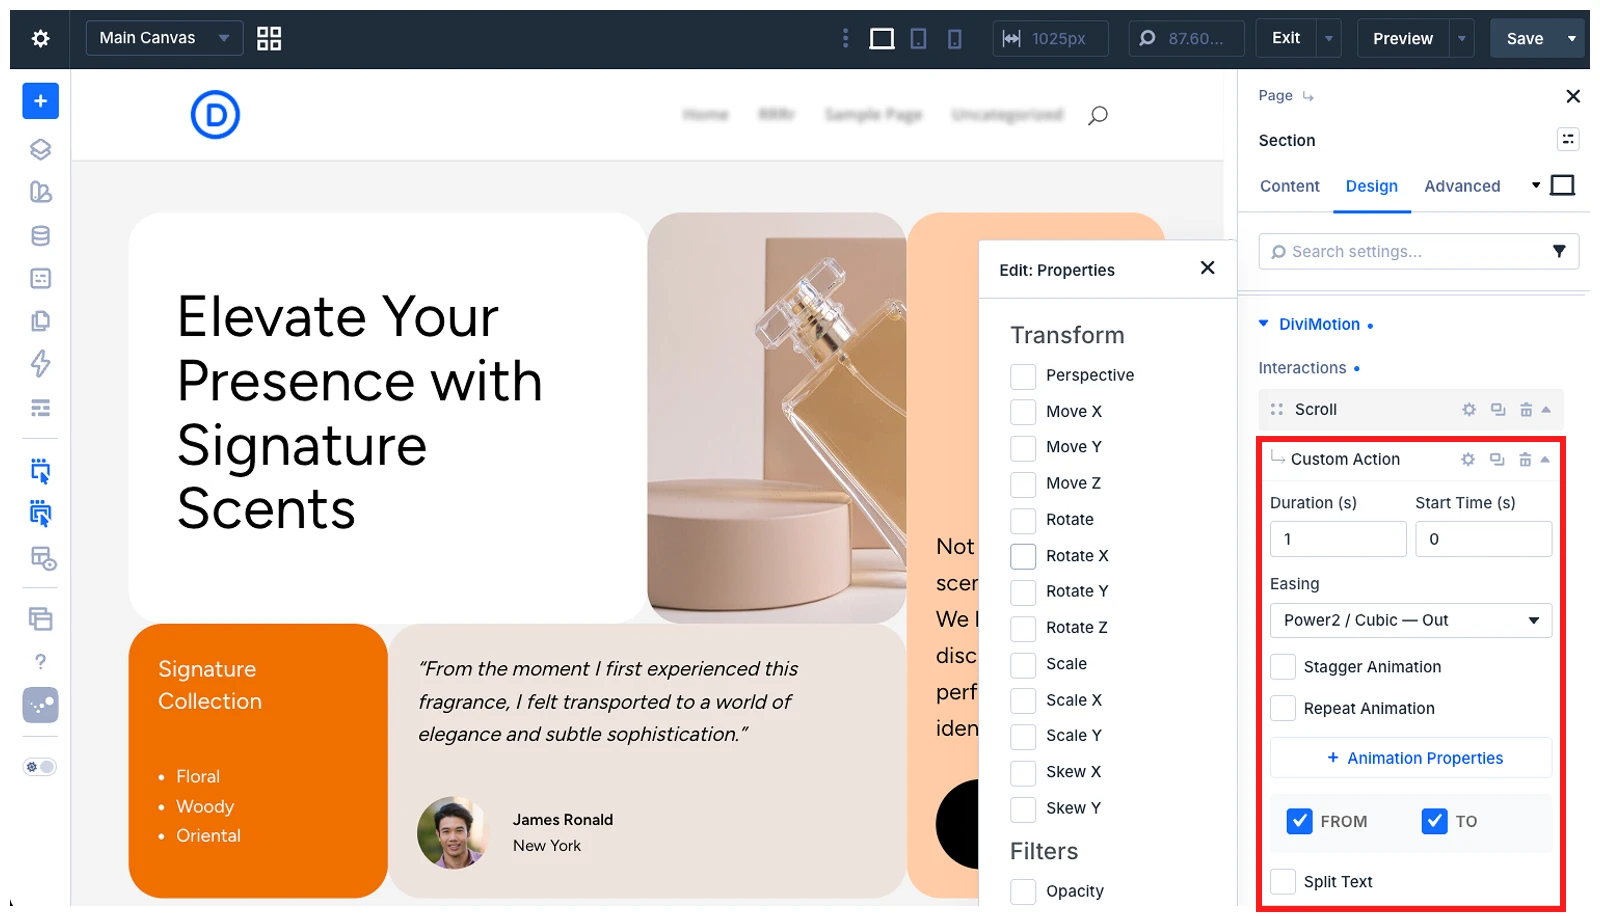
Animation properties include:
- Movement on the X, Y, and Z axes
- Opacity
- Scale
- Rotation
- Skew
- Blur and other filters
DiviMotion uses a FROM → TO system to define the starting and ending states.
For example:
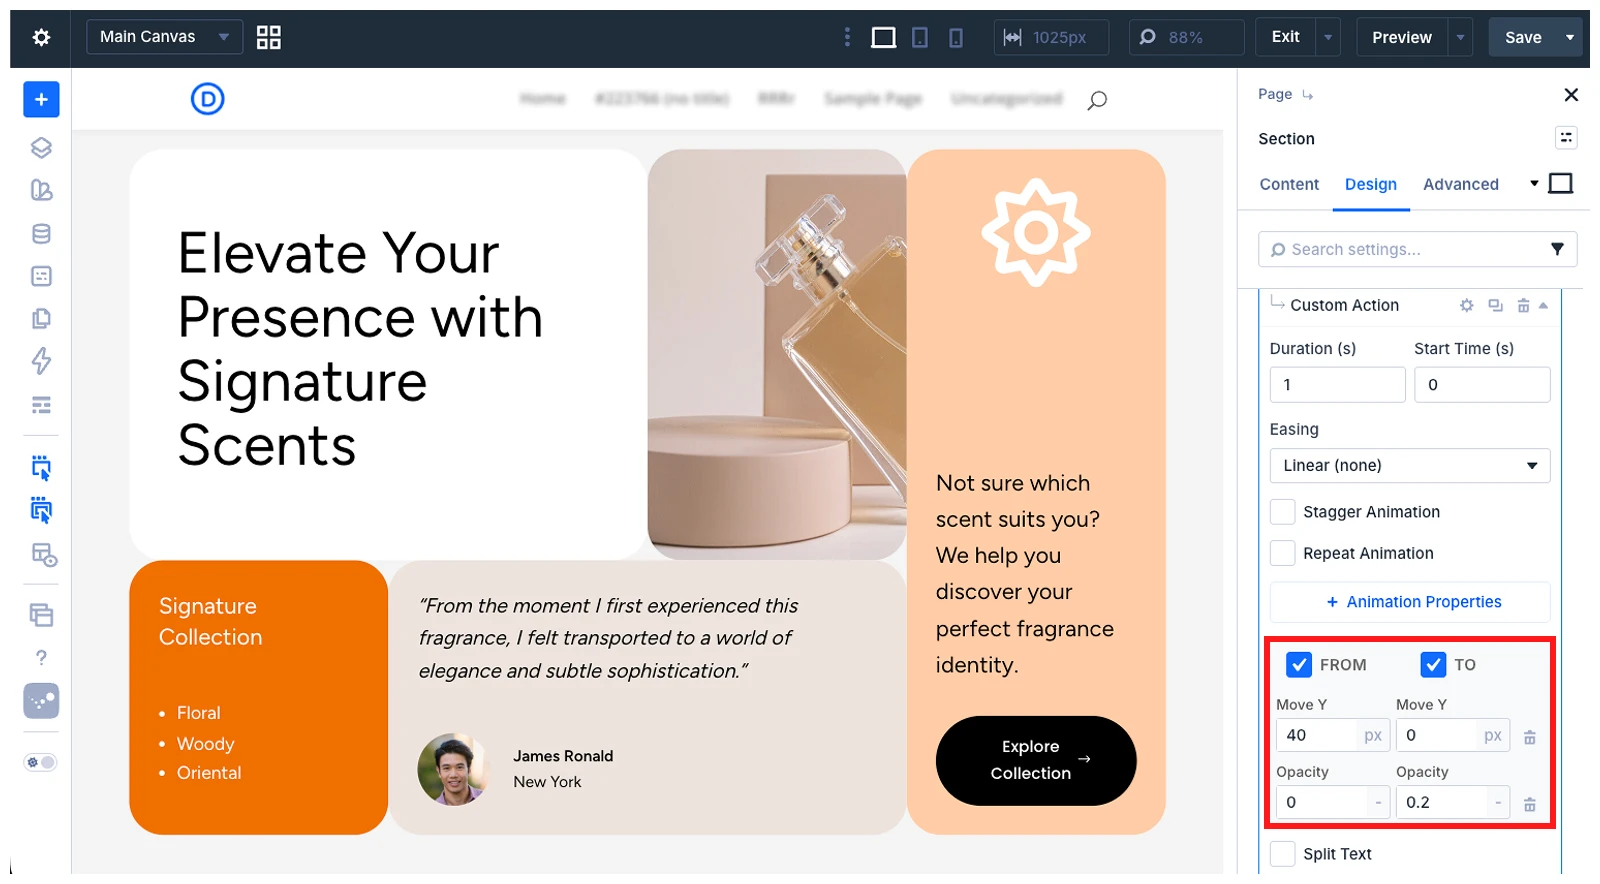
- Opacity: 0 → 0.2
- Move Y: 40px → 0px
This makes the element start 40 pixels below its final position and fade into view while moving upward.
3.2 Use an Action Preset
Choose Action Presets when you want to add an animation quickly without configuring every property manually.
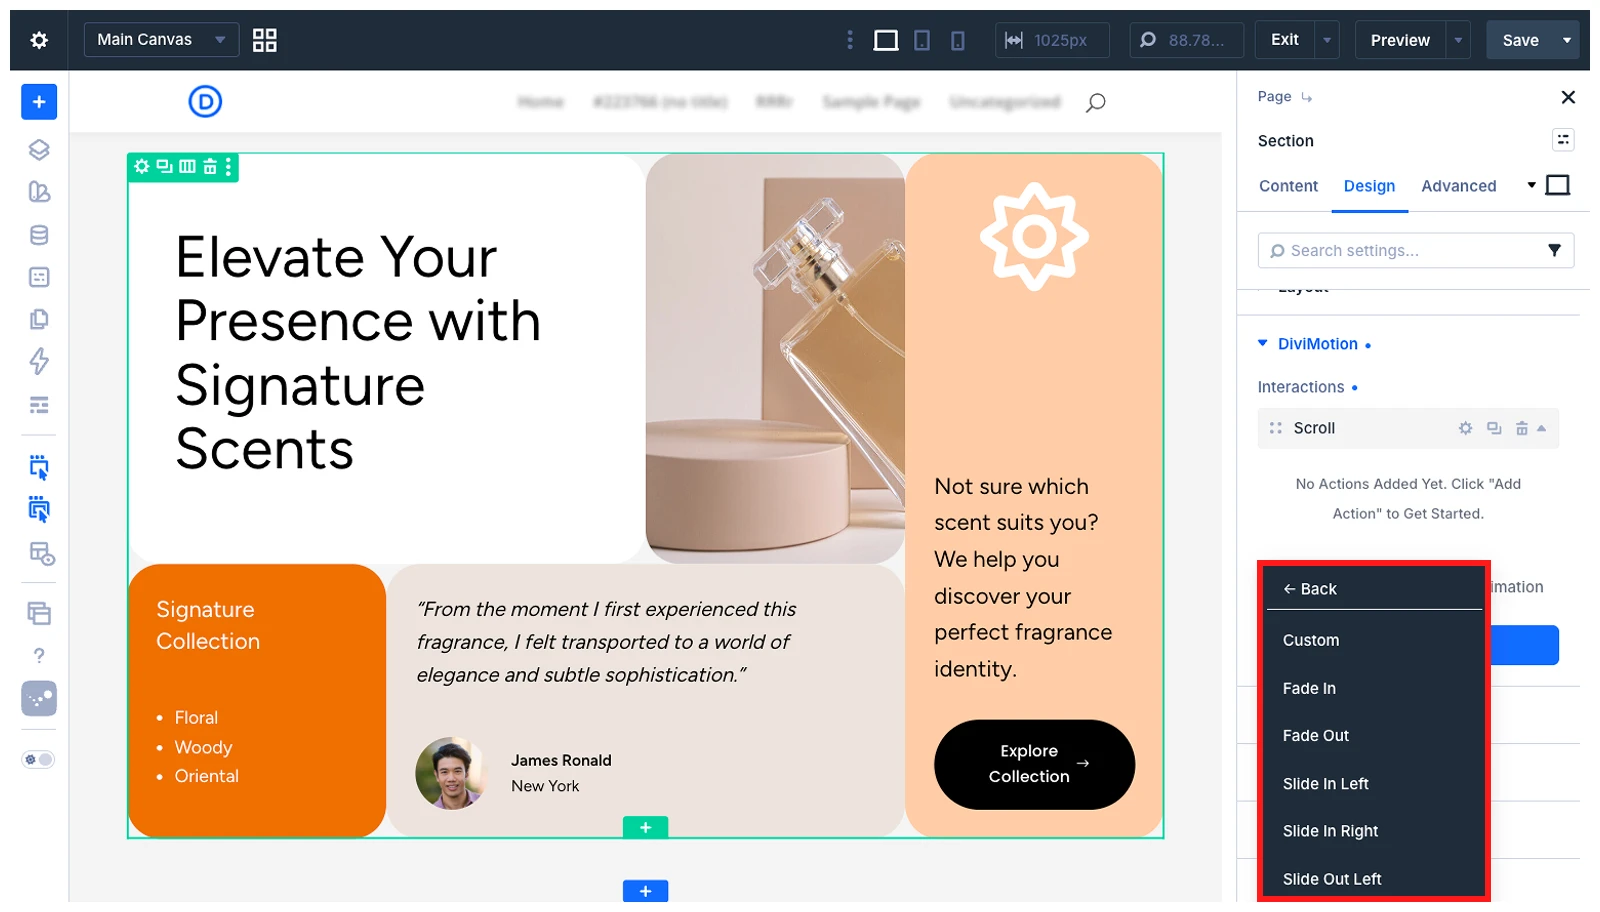
Available presets include a variety of common animation effects such as fades, slides in different directions, scaling, rotation, bouncing, and blur transitions.
Each preset includes predefined animation values that you can adjust after applying it.
3.3 Use Set Properties
Choose Set Properties to instantly apply CSS values to an element without animation.
Unlike Custom Actions or Presets, it has no duration or easing. It sets the element’s state as soon as the interaction triggers.
Use it to prepare elements before animations or control layout and behavior.
To use it:
- Click + Add Action in the Interaction Card
- Select Set Properties
- Choose CSS properties and define their values
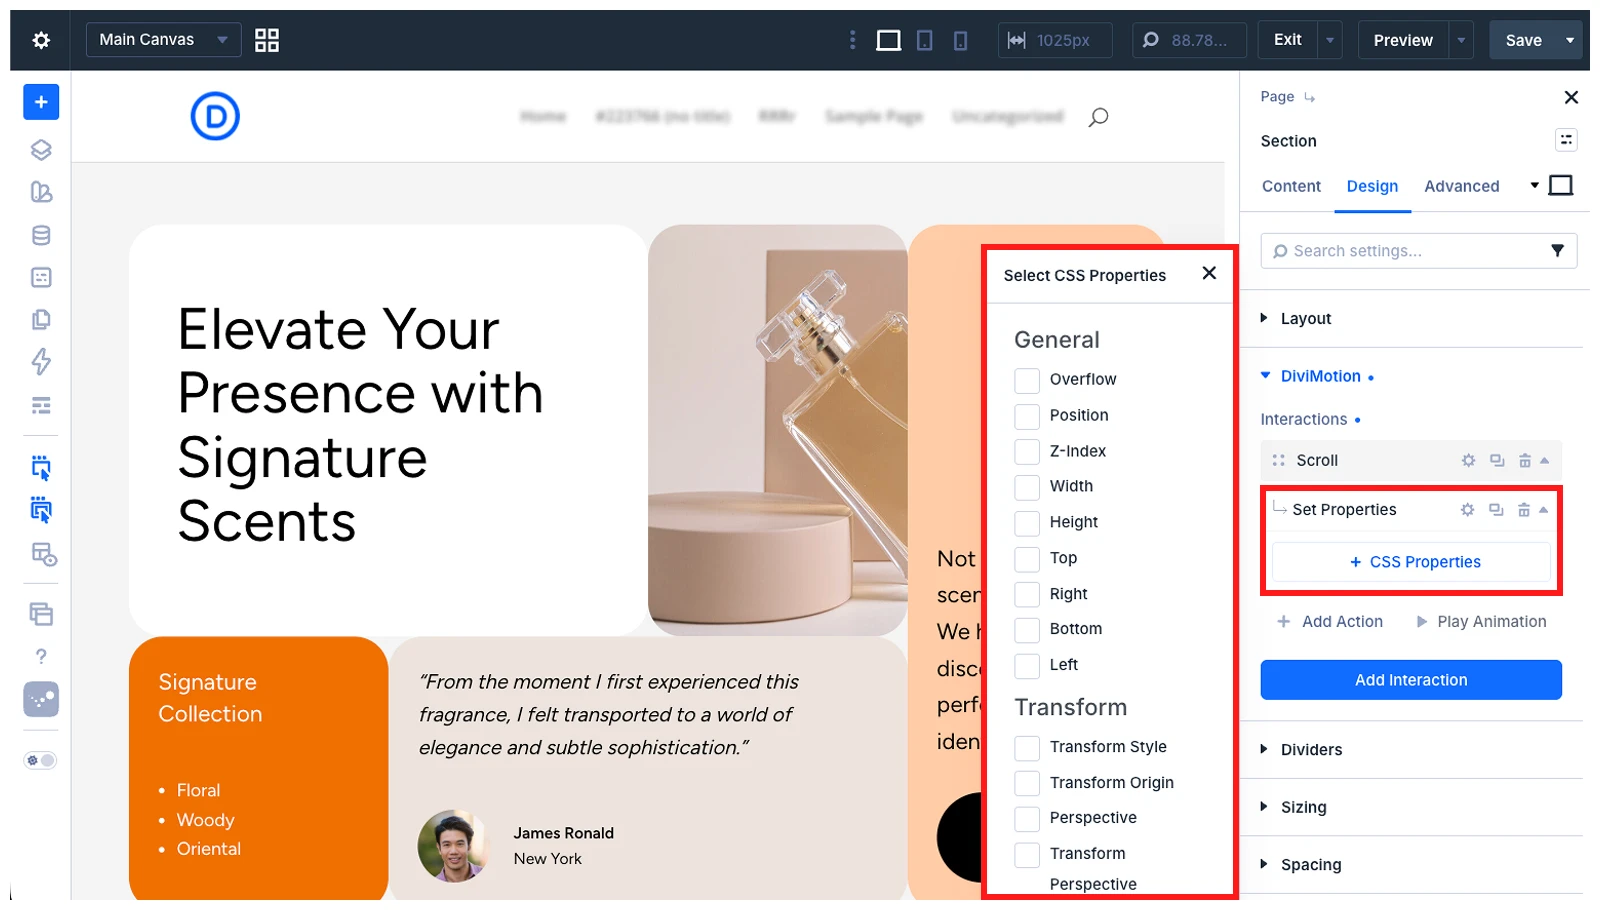
You can target the same element or another element using an ID or custom selector and even apply changes to multiple elements at once.
Available options include layout properties (position, width, overflow), transforms, opacity, and CSS classes.
The CSS Class option is especially flexible for triggering custom styles or scripts.
Method 2: Add GSAP to Divi Using the CDN Method
The CDN method lets you add GSAP to a Divi website without installing a plugin, creating a child theme, or editing the Divi theme files.
The only thing you have to do is add the scripts to the Divi Integration settings. Here is how to do it:
Step 1: Add a Custom Class to the Divi Element
First, add a custom CSS class to the Divi element you want to animate. In this example, we selected a Heading module.
- From the Module Settings, go to the Advanced tab.
- Expand Attributes > Click Add Attribute > Select Class
- Enter gsap-reveal in the Attribute Value field.
- Save the settings.
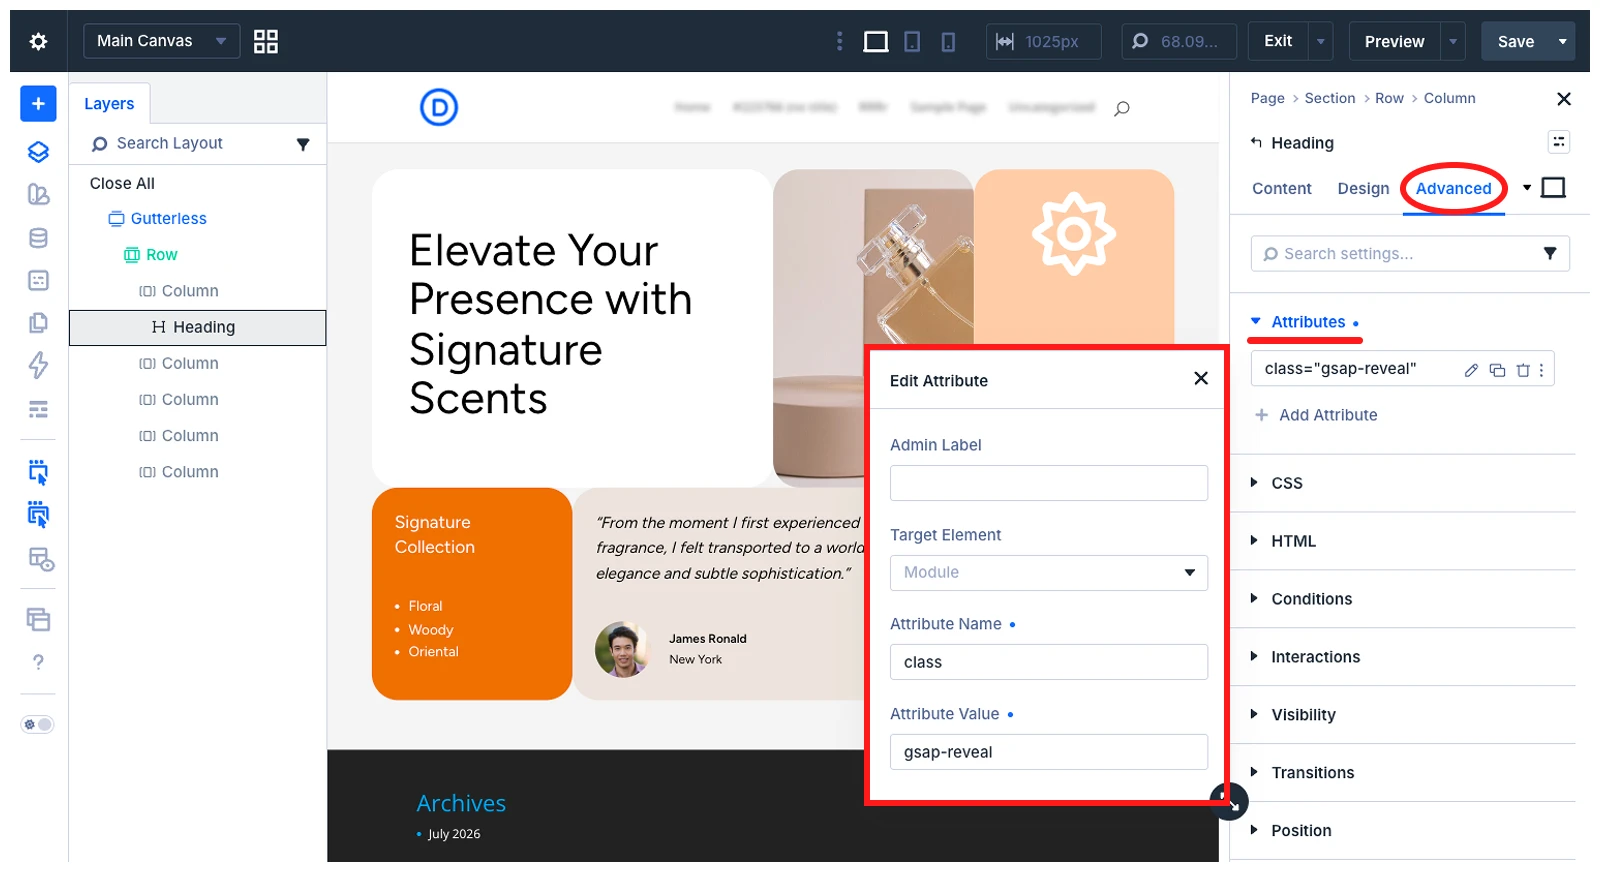
Note: You can use any class name you prefer to the Attribute value, but it must exactly match the CSS selector used in your GSAP animation script.
Step 2: Get the Required GSAP Scripts
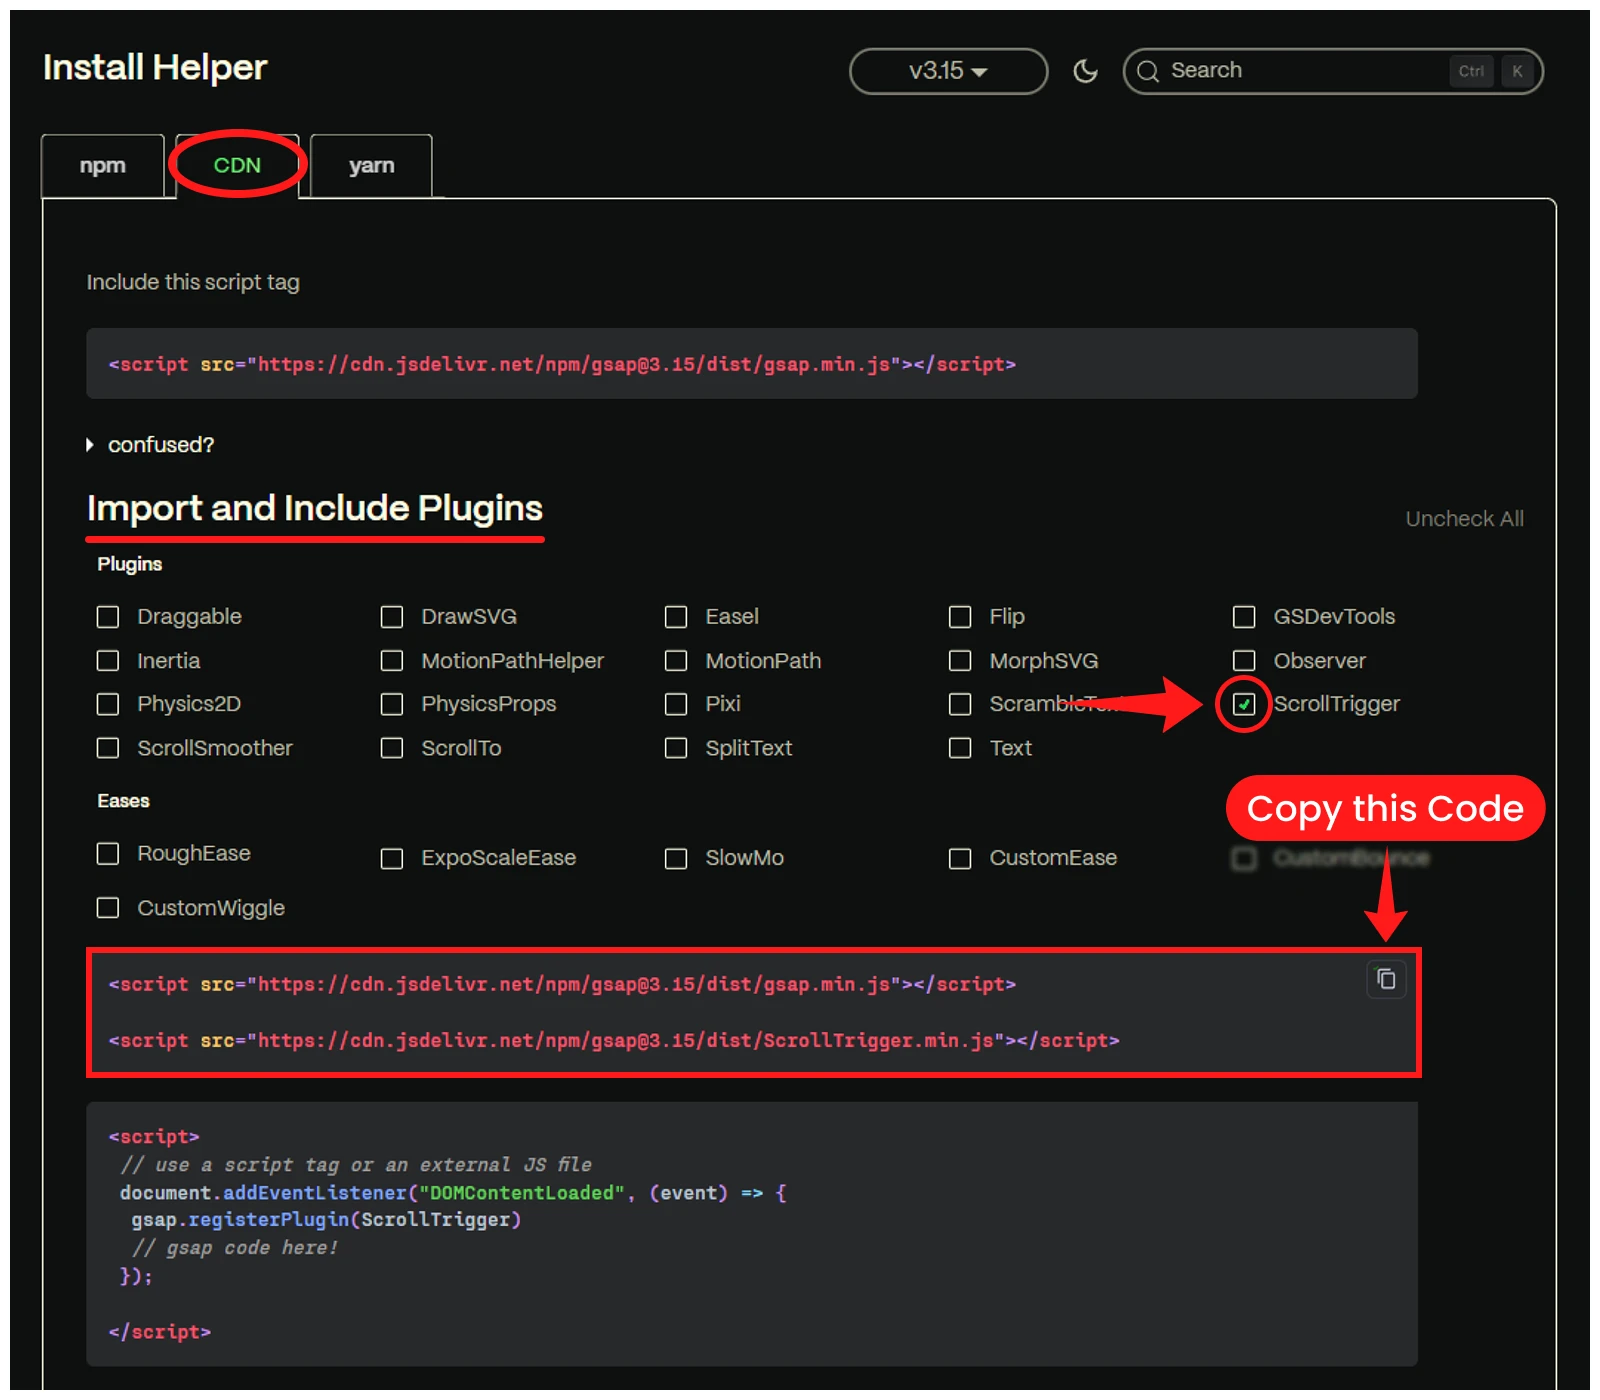
Open the official GSAP installation page and follow these steps:
- Go to the Install Helper and select the CDN tab
- Find the Import and Include Plugins section
- Select ScrollTrigger or another plugin as you prefer
- The installer will automatically generate the script tags for both GSAP Core and ScrollTrigger.
- Copy the generated script tags
Step 3: Define the GSAP Animation Behavior
Next, define how the selected Divi element should animate and when the animation should begin.
Open a text or code editor. Keep the GSAP Core and ScrollTrigger script tags at the top, then add a new <script> block below them for the custom animation.
The code should follow this order:
GSAP Core
↓
ScrollTrigger
↓
Register ScrollTrigger
↓
Run the custom animation
For this example, we created the following code:
<!-- Load GSAP Core -->
<script src="https://cdn.jsdelivr.net/npm/[email protected]/dist/gsap.min.js"></script>

<!-- Load the ScrollTrigger plugin -->
<script src="https://cdn.jsdelivr.net/npm/[email protected]/dist/ScrollTrigger.min.js"></script>

<!-- Register ScrollTrigger and apply the animation -->
<script>
document.addEventListener("DOMContentLoaded", function () {

    // Connect ScrollTrigger to GSAP Core.
    gsap.registerPlugin(ScrollTrigger);

    // Animate the Divi element with the gsap-reveal class.
    gsap.from(".gsap-reveal", {
        y: 100,
        autoAlpha: 0,
        duration: 3.5,
        ease: "power2.out",
        scrollTrigger: {
            trigger: ".gsap-reveal",
            start: "top 85%",
            once: true
        }
    });

});
</script>
The animation settings work as follows:
- y: 100 places the element 100 pixels below its final position before the animation starts
- autoAlpha: 0 starts the element with zero opacity and hidden visibility
- duration: 3.5 makes the animation run for 3.5 seconds
- ease: "power2.out" starts the movement faster and slows it smoothly near the end.
- trigger: ".gsap-reveal" uses the Divi element with the gsap-reveal class as the ScrollTrigger target
- start: "top 85%" starts the animation when the top of the element reaches 85% of the viewport height
- once: true makes the animation play only the first time the element enters the viewport.
With these settings, the element begins 100 pixels below its normal position, then moves upward and gradually fades into view over 3.5 seconds.
Step 4: Add the GSAP Code to Divi Theme Options
Next, add the complete Script to the Divi Integration settings by following these steps:
- Log in to your WordPress dashboard > Divi > Theme Options
- Select the Integration tab > Enable Header Code
- Find the Add Code to the <head> of Your Blog field
- Paste the complete GSAP code
- Click Save Changes.
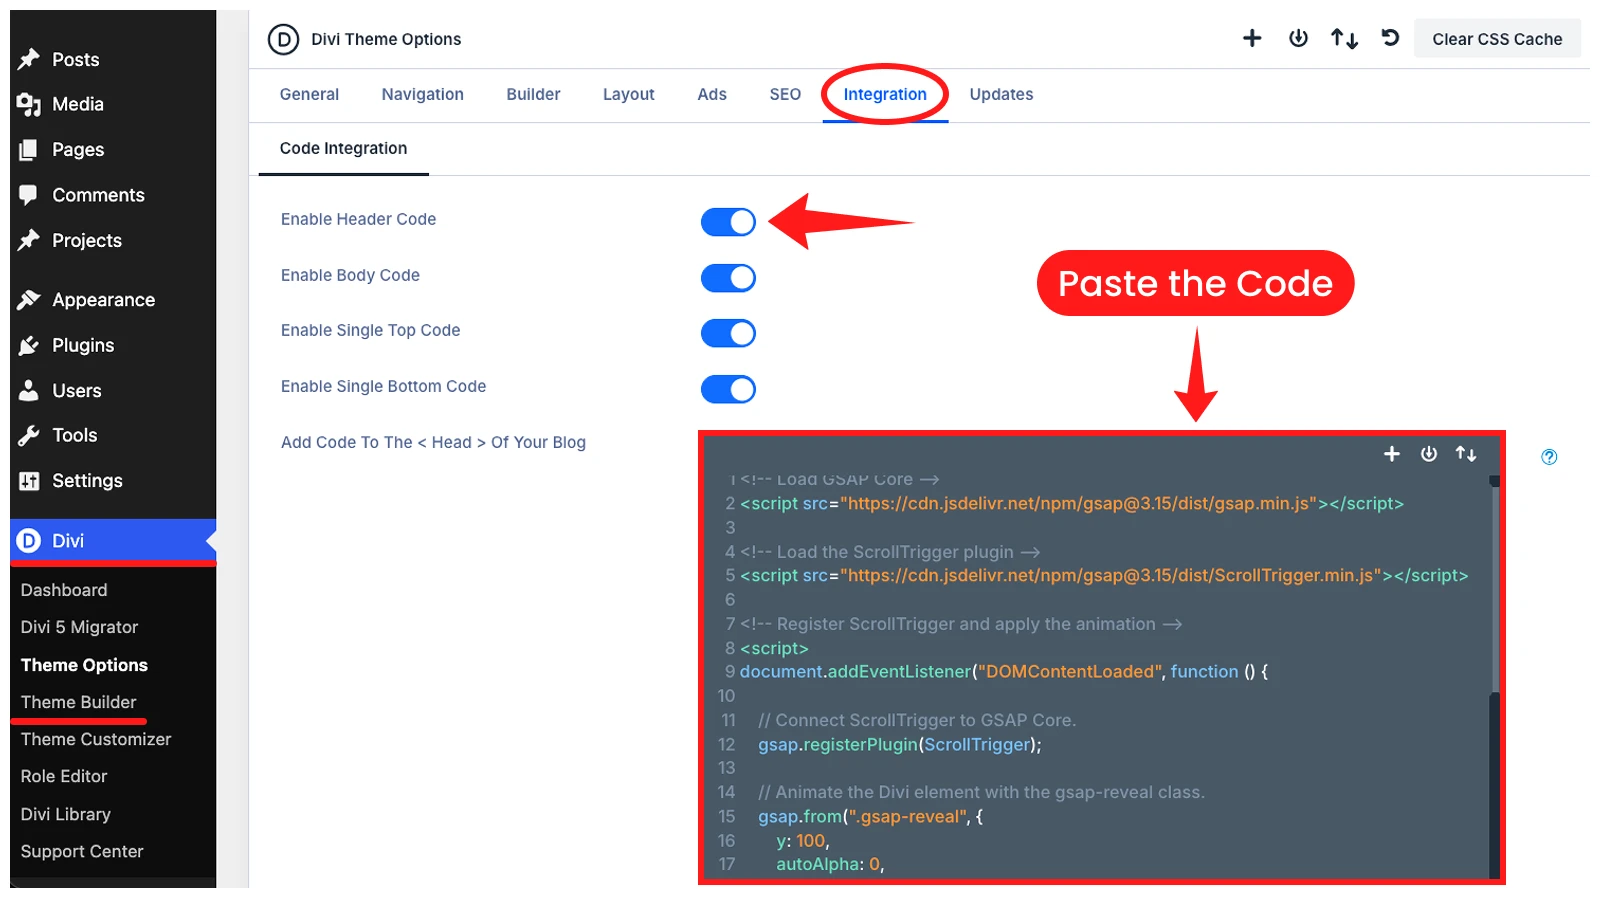
Note: This setup loads GSAP Core and ScrollTrigger across the entire website. Any Divi element using the gsap-reveal class will receive the same animation.
Step 5: Save and Test the Animation
Now that the required scripts are added, the animation is ready to target the element with the gsap-reveal class you assigned in Step 1: Add a Custom Class to the Divi Element.
Save or publish the Divi page, then test the animation:
- Open the published page in a new browser tab.
- Start scrolling from a position above the Heading module.
- Continue scrolling until the module enters the viewport.
Tips: If the animation does not appear, clear the Divi cache, clear your WordPress caching plugin’s cache if you use one, and clear your browser cache or test the page in an incognito window.
Which Method Should You Apply?
Use DiviMotion for a visual workflow inside the Divi Builder without manually loading libraries, registering plugins, writing JavaScript, or managing selectors.
Use the CDN method when you need direct access to GSAP Core and its plugins and are comfortable managing the code, script order, CSS classes, testing, and updates yourself.
For most Divi users, DiviMotion is the easier and more practical choice. The CDN method is better suited to specific custom animations that require manual control.



0 Comments