


To upload SVG (Scalable Vector Graphics) files to WordPress, you have two options: either use a plugin or enable SVG support manually with custom code.
You need to follow one of these methods as WP does not support SVG uploads by default. The reason is that SVG files are XML-based and can contain malicious code.
When you use a plugin, it will allow SVG uploads safely by sanitizing the files before uploading. With custom code, you need to allow SVG uploads manually and make sure the files are safe before using them.
In this guide, we will show you how to allow SVG upload in WordPress using both methods.
Let’s get started.
Method 1: Upload SVG Files to WordPress Using a Plugin
There are several plugins available to let you upload SVG files in WordPress, including SVG Support and Safe SVG.
For this method, we will use the SVG Support plugin because it gives you a simple way to allow SVG uploads, control who can upload them, and improve how SVG files display on your website.
Here is how to upload SVG in WordPress using a plugin:
Step 1: Install and Activate the Plugin
- Log in to your WordPress dashboard > Plugins > Add Plugins
- Search for “SVG Support” then install and activate it
Step 2: Configure SVG Support
After activation, go to Settings > SVG Support and configure the plugin settings. Here are the main options to check:
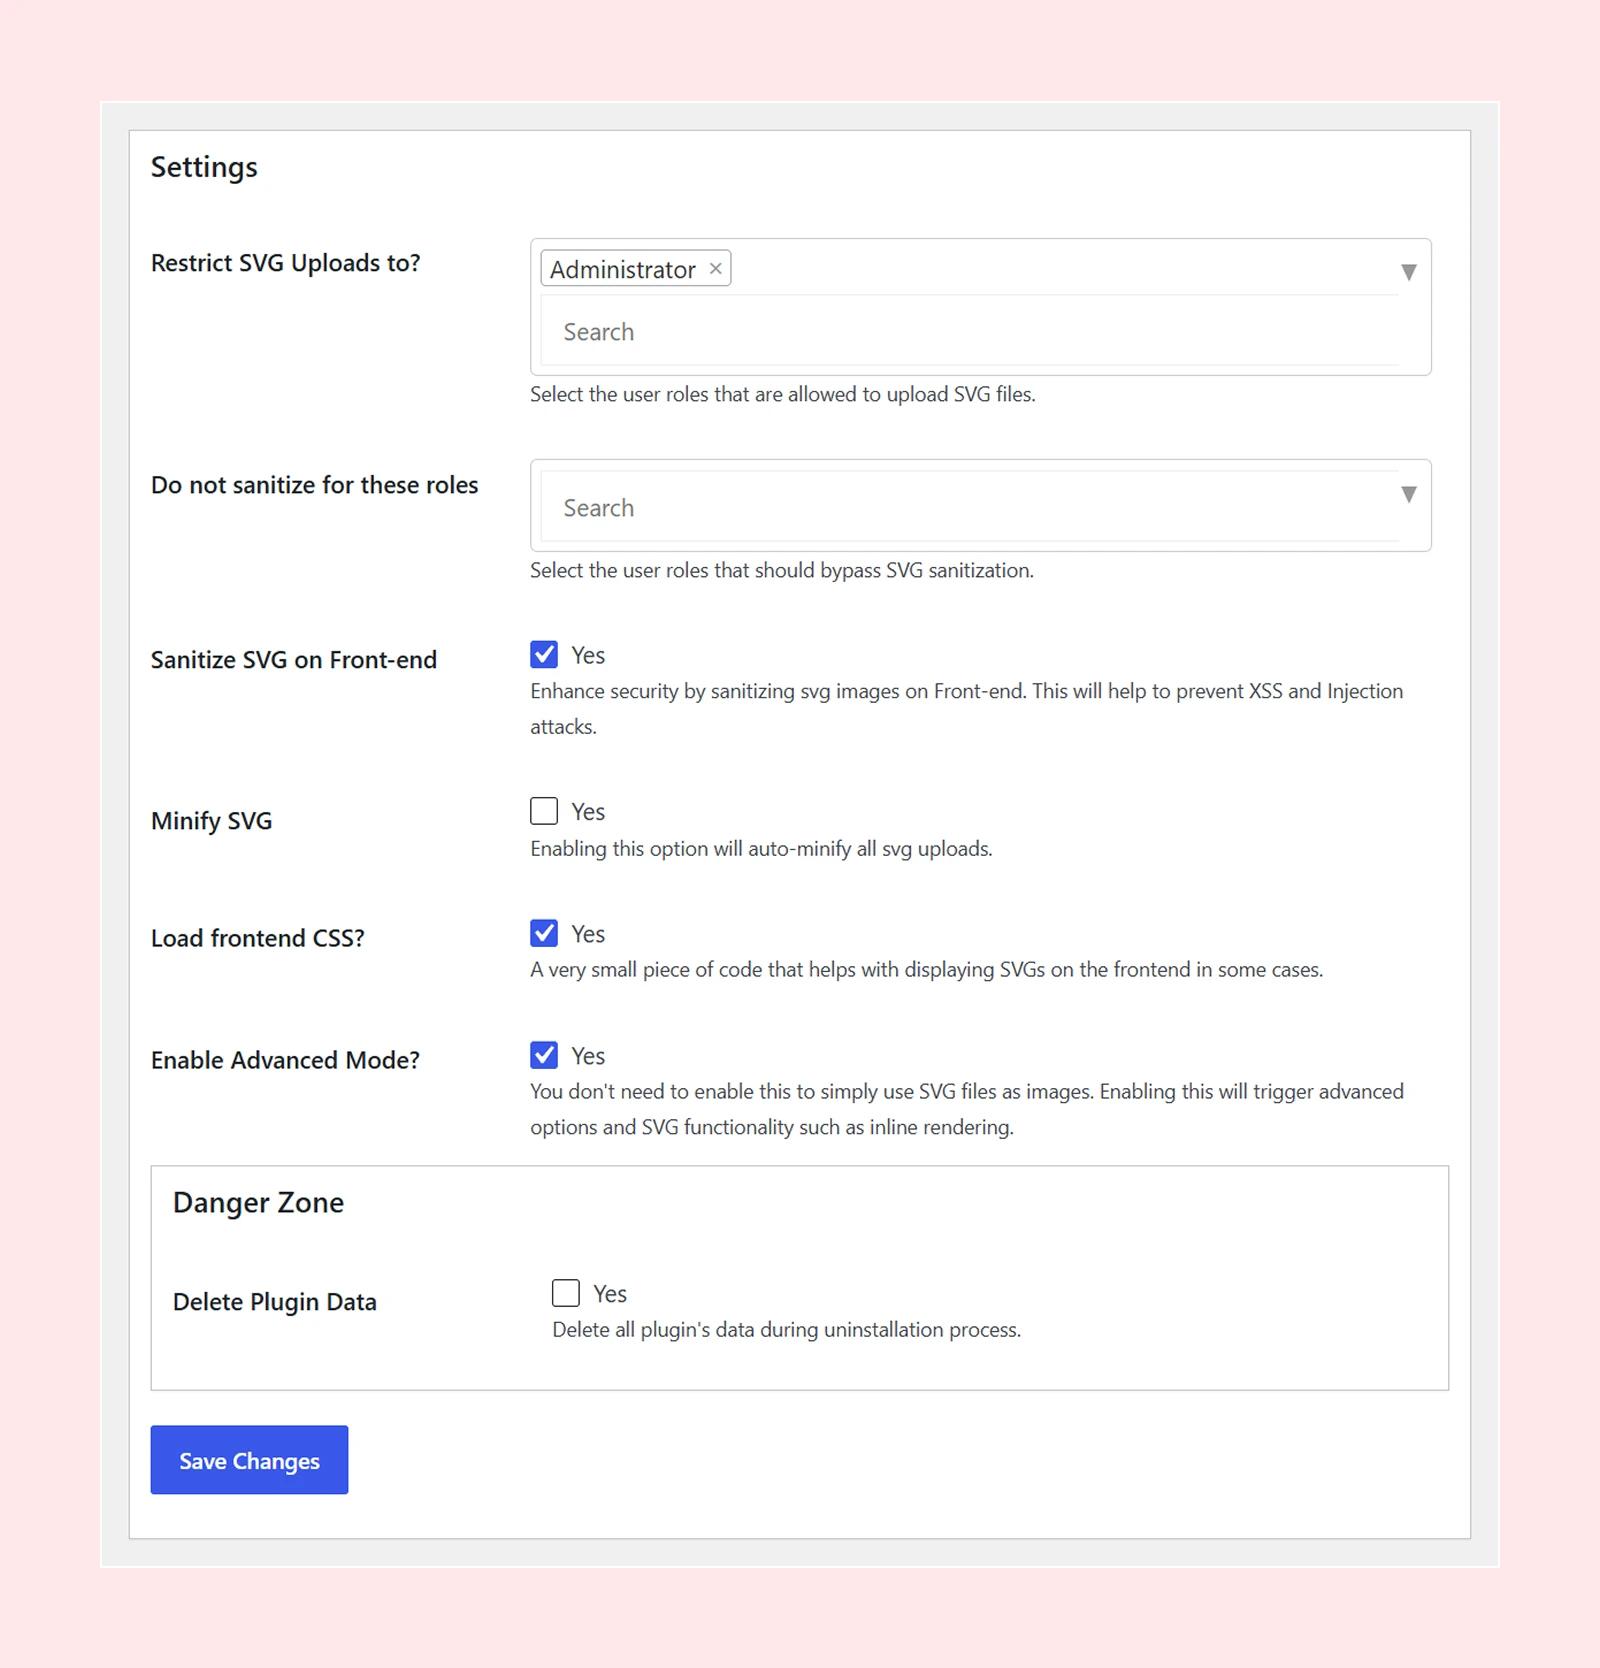
- Restrict SVG Uploads to
- Sanitize SVG on Front-end
- Minify SVG and more.
If you have made any changes, click on Save Changes. You can also keep the default settings if you only want basic SVG upload support.
Step 3: Upload Your SVG File
- Now go to Media > Add New Media File and upload your .svg file.
Once uploaded, the file will appear in your Media Library. You can then use it in your pages or posts like any other image.
Step 4: Add the SVG to Your Website
- Open the page or post where you want to use the SVG.
- Add an Image block, select the SVG file from the Media Library, and insert it into your content.
Step 5: Preview and Check the SVG
After adding the SVG, preview the page on the front end.
Note: If you are a Divi theme user, you can use DiviMotion’s Draw SVG to add and animate SVG elements. While most plugins only let you upload SVG files, DiviMotion helps you turn them into interactive animations.
Method 2: Enable SVG Uploads in WordPress Manually With Code
You can also enable SVG uploads manually by adding a code snippet to WordPress. This method is useful if you do not want to use a plugin.
However, it only allows SVG uploads and does not sanitize files automatically. So, upload SVGs only from trusted sources or use an SVG Sanitizer Test tool before adding them to WordPress.
Here is how to upload SVG to WordPress manually:
Step 1: Access Your Theme's functions.php File
- From your WordPress dashboard and go to Appearance > Theme File Editor.
- Then, open the functions.php file from your active theme.
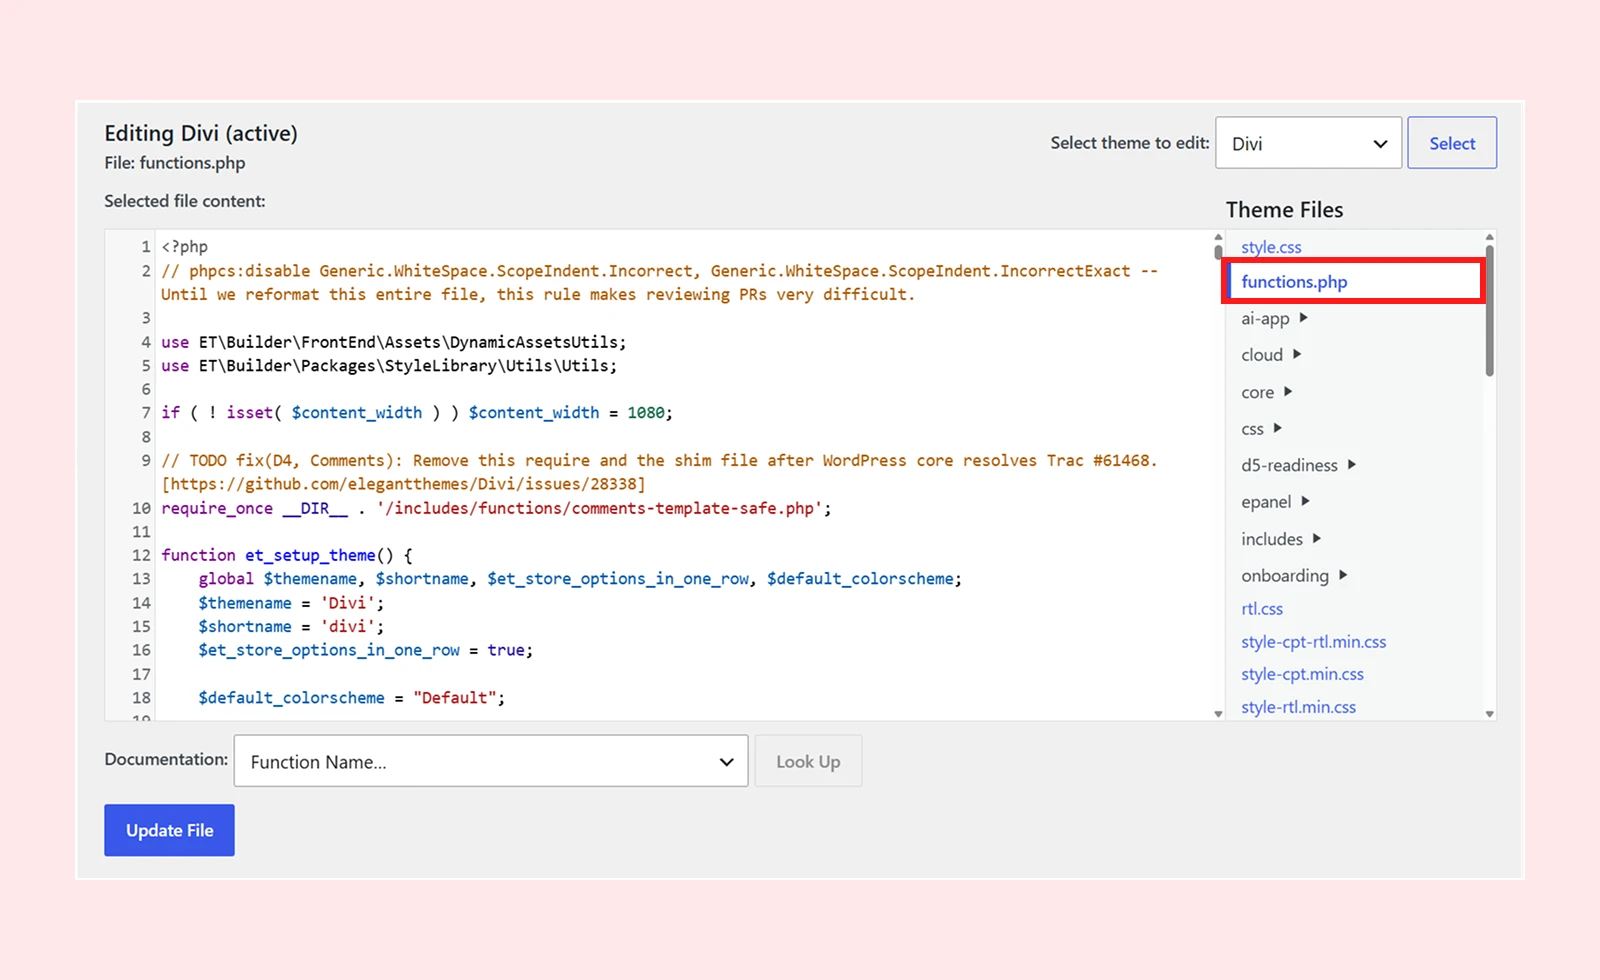
Note: You can edit the functions.php file using FTP or your hosting file manager. For a safer setup, use a child theme so your changes aren't lost after theme updates.
Step 2: Add the Code to Allow SVG Uploads
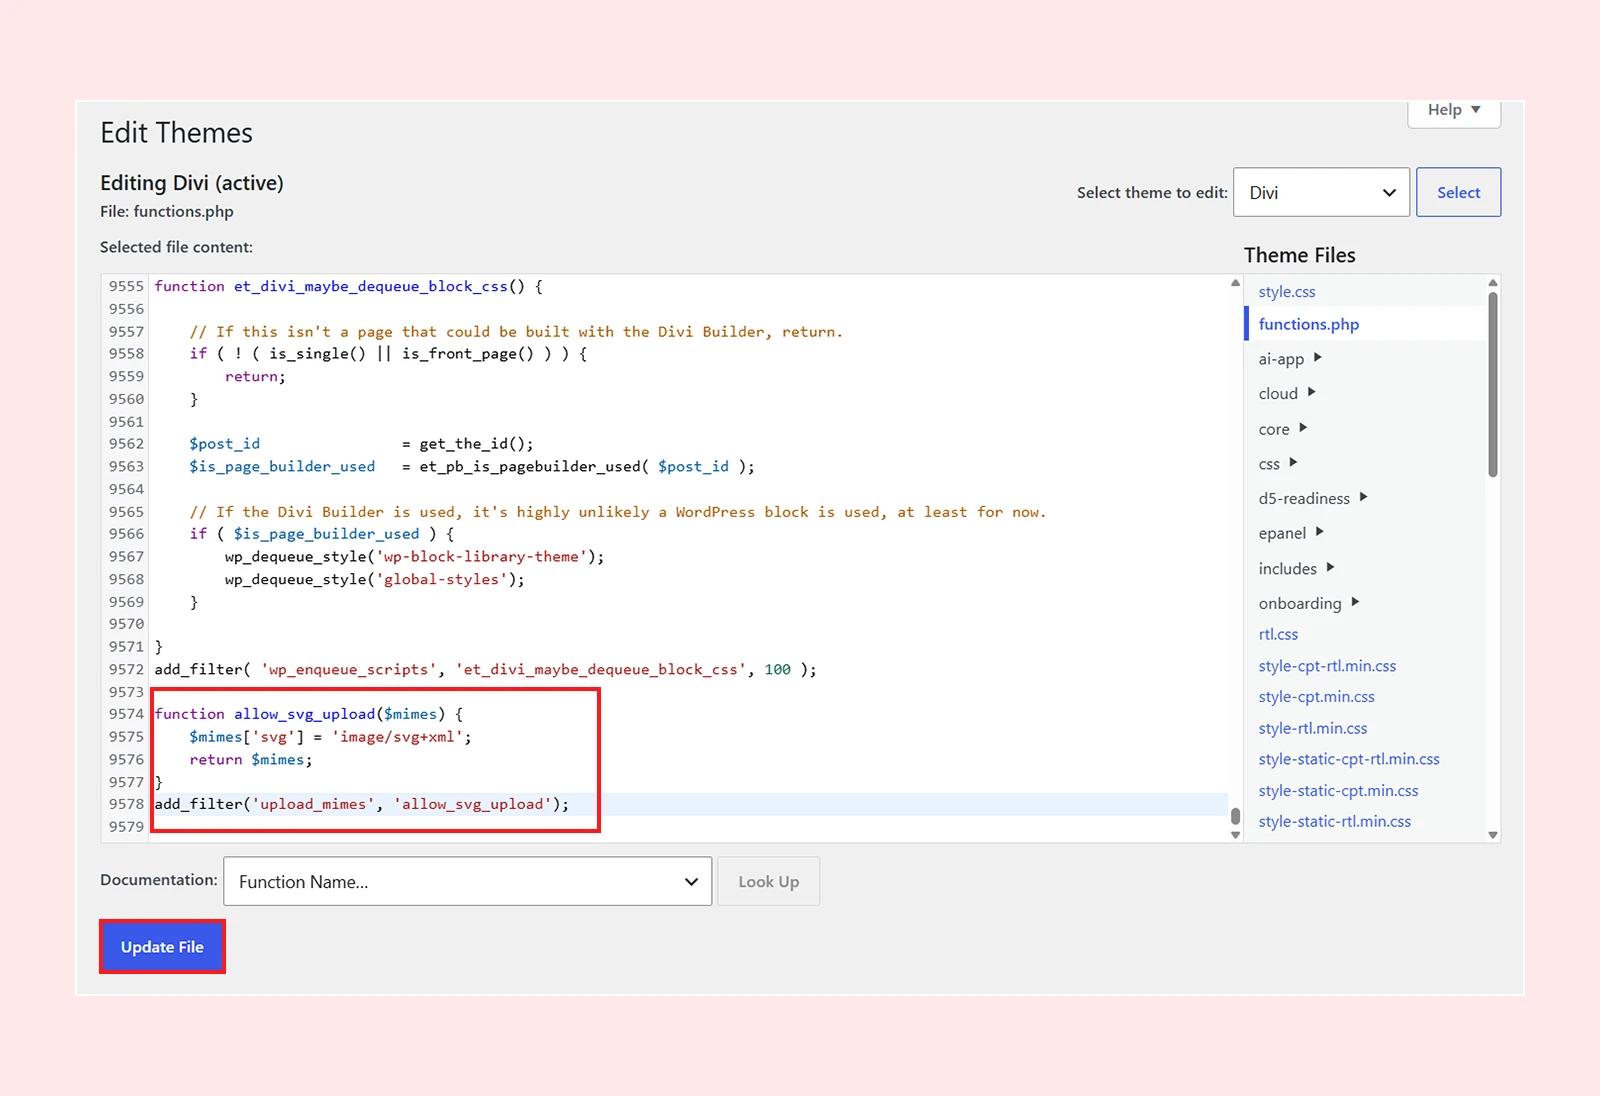
Paste this snippet at the bottom of your functions.php file:
function allow_svg_upload($mimes) {
    $mimes['svg'] = 'image/svg+xml';
    return $mimes;
}
add_filter('upload_mimes', 'allow_svg_upload');
This tells WordPress to recognize SVG as an allowed file type in the Media Library uploader.
Step 3: Upload and Test SVG File
Go to Media > Add New and try uploading an SVG file. It should now upload successfully and appear in your Media Library. Then use it just like any other image by inserting it into a post or page.
How to Animate SVG Files in WordPress
After uploading an SVG file, you can also animate it to make your design more interactive. This is useful for icons, logos, illustrations, lines, shapes, and more.
To do that manually, you need to assign a custom CSS class to your SVG image block and add keyframe animation rules through your WordPress theme’s Additional CSS customizer.
Or if you are a page builder like Divi, you can use DiviMotion. It’s an WordPress animation plugin that comes with the Draw SVG module. Here are some of the key features of DiviMotion’s Draw SVG module:
- Add SVG using code or file upload.
- Create SVG line-drawing animations.
- Customize stroke color, width, and duration.
- Add fill effects like fade, wipe, or liquid fill.
- Trigger animation on load, scroll, hover, or click.
- Animate multiple SVG paths with sequence control.
- Loop or reverse the animation with yoyo.
Common SVG Upload Errors and How to Fix Them
Only knowing how to add svg to wordpress is not enough, as you may also run into common upload errors. Here are some of the most common ones:
- SVG Uploads but Does Not Display: This usually happens when the SVG is missing dimensions or contains invalid markup. Re-export the SVG with proper width and height values, or set its size with CSS if needed.
- SVG Looks Different After Upload: Missing fonts, external styles, or unsupported SVG features can change how the file appears. Convert text to outlines, embed any required styles, and keep the SVG as simple as possible before exporting.
- Some Users Cannot Upload SVG: SVG upload permissions may be limited to specific user roles. Check your SVG plugin settings and grant upload access only to trusted users.
FAQ
Does WordPress support SVG files?
WordPress does not allow SVG uploads natively because they can contain unsafe code. This is to protect your website from potential security risks such as malicious scripts embedded within SVG files.
How to enable SVG in Elementor?
To enable SVGs in Elementor, go to Elementor > Settings > Advanced and turn on "Enable Unfiltered File Uploads," then upload your SVG through the Image widget or Media Library.
How to enable SVG in Divi?
Divi 5 introduced an SVG module that lets you upload and display SVG files directly inside your Divi layouts.
How to add SVG logo in WordPress?
Enable SVG upload with a plugin or custom code, then go to Appearance > Customize > Site Identity and upload your SVG logo.
Is it safe to upload SVG files to WordPress?
Yes, if you use SVG files from trusted sources and sanitize them before uploading. For better safety, use an SVG plugin with sanitization support.
Final Thoughts: Which Method Should You Choose?
Now you know how to enable SVG upload in WordPress using both plugin and custom code. Throughout this guide, we showed both methods with step by step instructions.
For most users, using a plugin is the safest and easiest option because it allows SVG uploads and helps sanitize the files. But if you prefer a lightweight setup and know how to handle code safely, the manual method can also work.
Just make sure you upload SVGs only from trusted sources, sanitize them before use, and test how they appear on your website.





0 Comments