


You can use Divi’s built-in animation, interaction, and scroll effect features, but they offer only basic motion effects.
For more advanced animations, you can use a plugin like DiviMotion or add custom code. DiviMotion provides GSAP-powered controls, while custom code lets you build animations with libraries such as GSAP, Motion and more.
In this guide, we will show you how to create animated website with Divi using both methods.
Let’s get started.
Method 1: Create an Animated Website with Plugin
To create an animated website with a plugin, first decide what type of animation you want to add. If you want GSAP animations, try DiviMotion. Also, you can use a plugin like Animator to add CSS-based animations.
Since GSAP is one of the most flexible options for advanced animations, we are going to use DiviMotion to show you the complete process.
Step 1: Install and Activate DiviMotion
- First, purchase and download the DiviMotion plugin.
- Then, install and activate it like any other premium WordPress plugin.
- Next, navigate to DiviMotion Dashboard > Integration and enable your required integrations. For this guide, we will use ScrollTrigger.
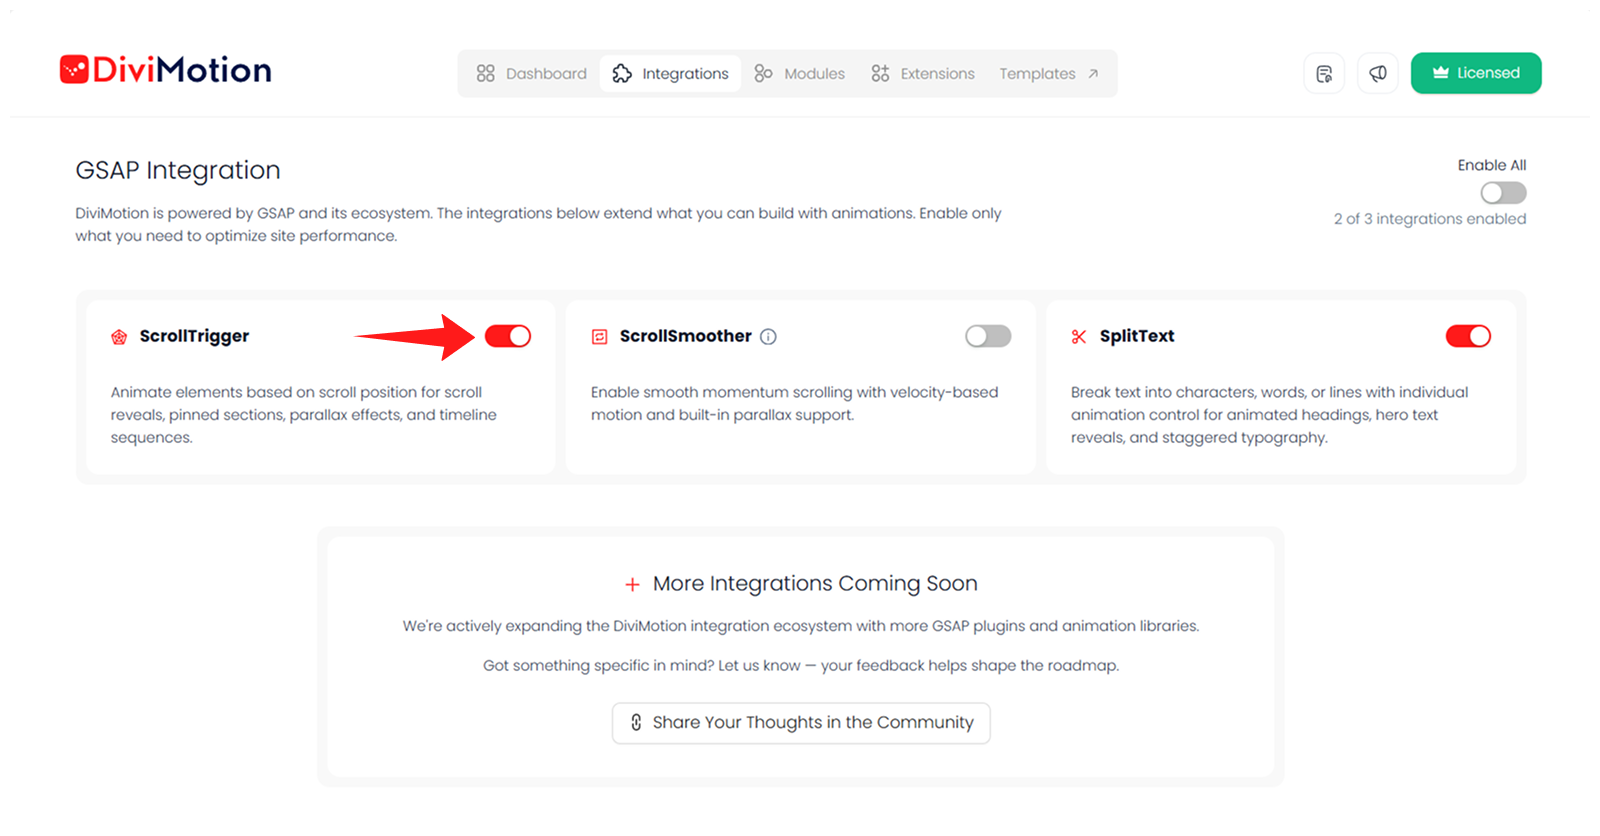
Note: DiviMotion is built specifically for Divi 5 and does not support Divi 4.
Step 2: Create the Page Layout
Open the page you want to animate using the Divi Visual Builder. Add and design the required sections, rows, columns, and modules before applying animations.
To show you how to add animation, we will create two sections initially:
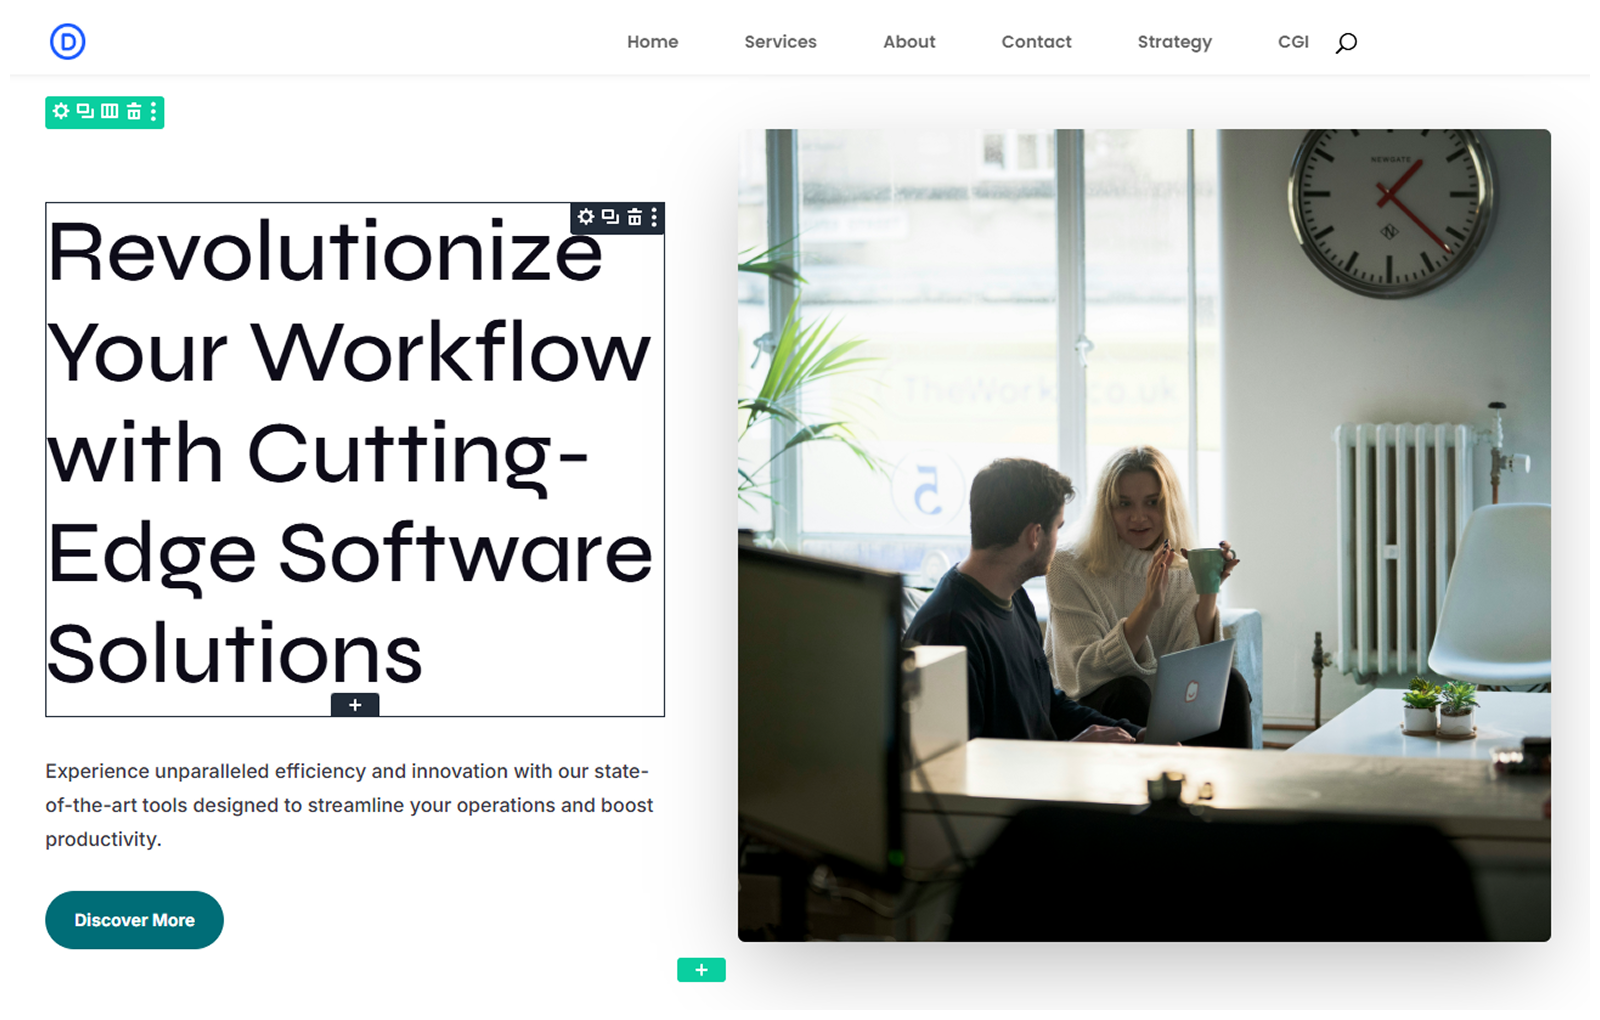
- A hero section with a heading, description, button, and image
- A feature section below it. In the feature section, we include these:
- Add a row with three columns.
- Place one Blurb module inside each column.
- Add the feature content and complete the design.
- Give the row a clear Admin Label, such as Feature Row.
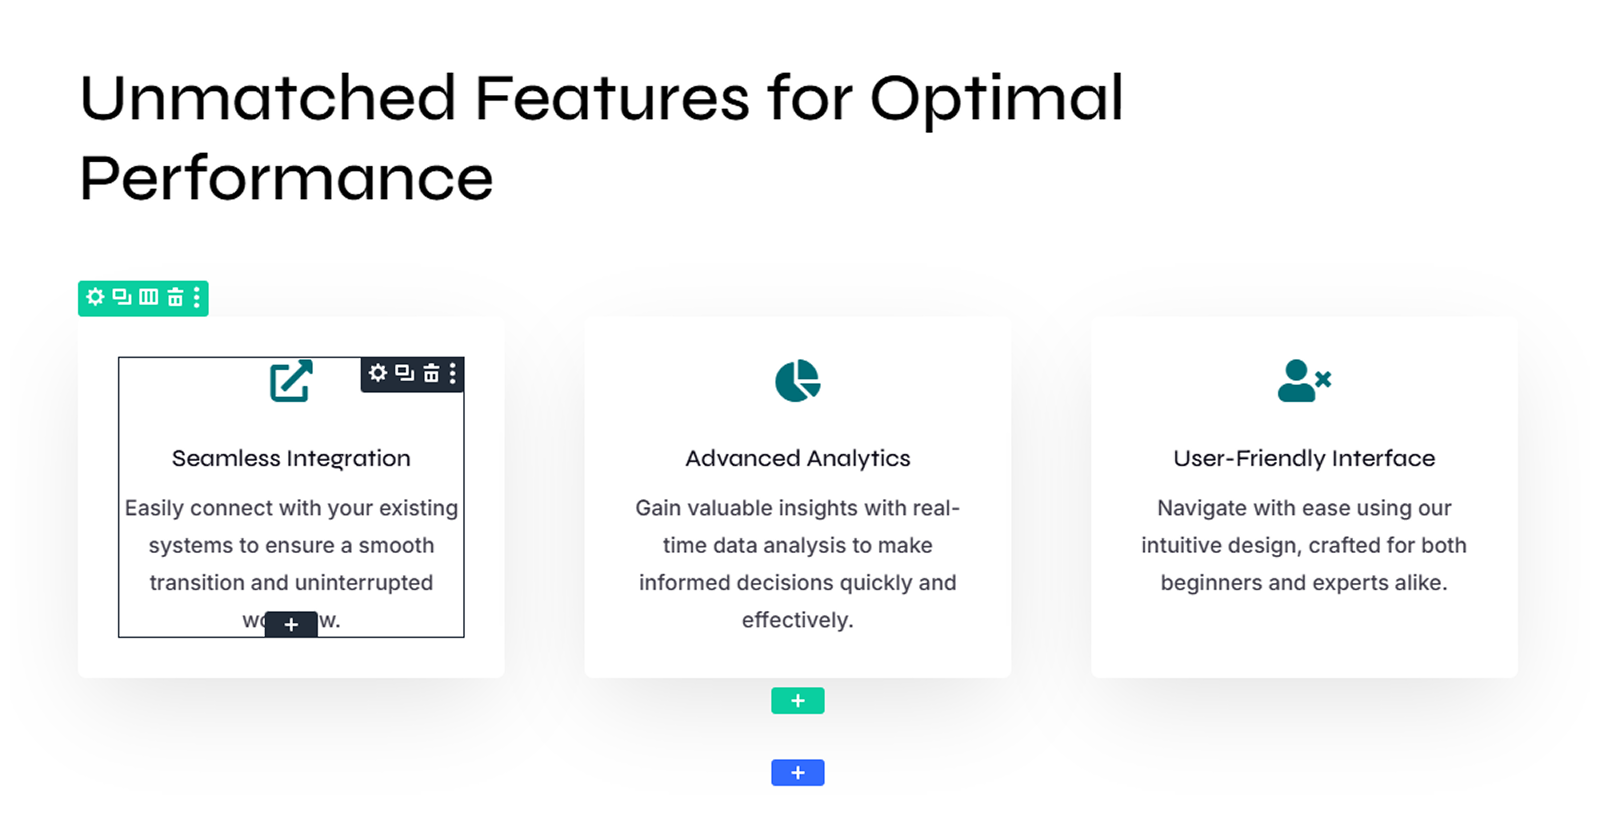
The hero section creates enough space above the feature section to test the scroll animation properly.
Step 3: Add and Configure Trigger (Interaction)
Once the page layout is ready, add an interaction to determine when the animation begins. DiviMotion provides four interaction types:
- Scroll
- Hover
- Click
- Load
We will use the Scroll interaction to animate the feature section as it enters the viewport. Here is what we did:
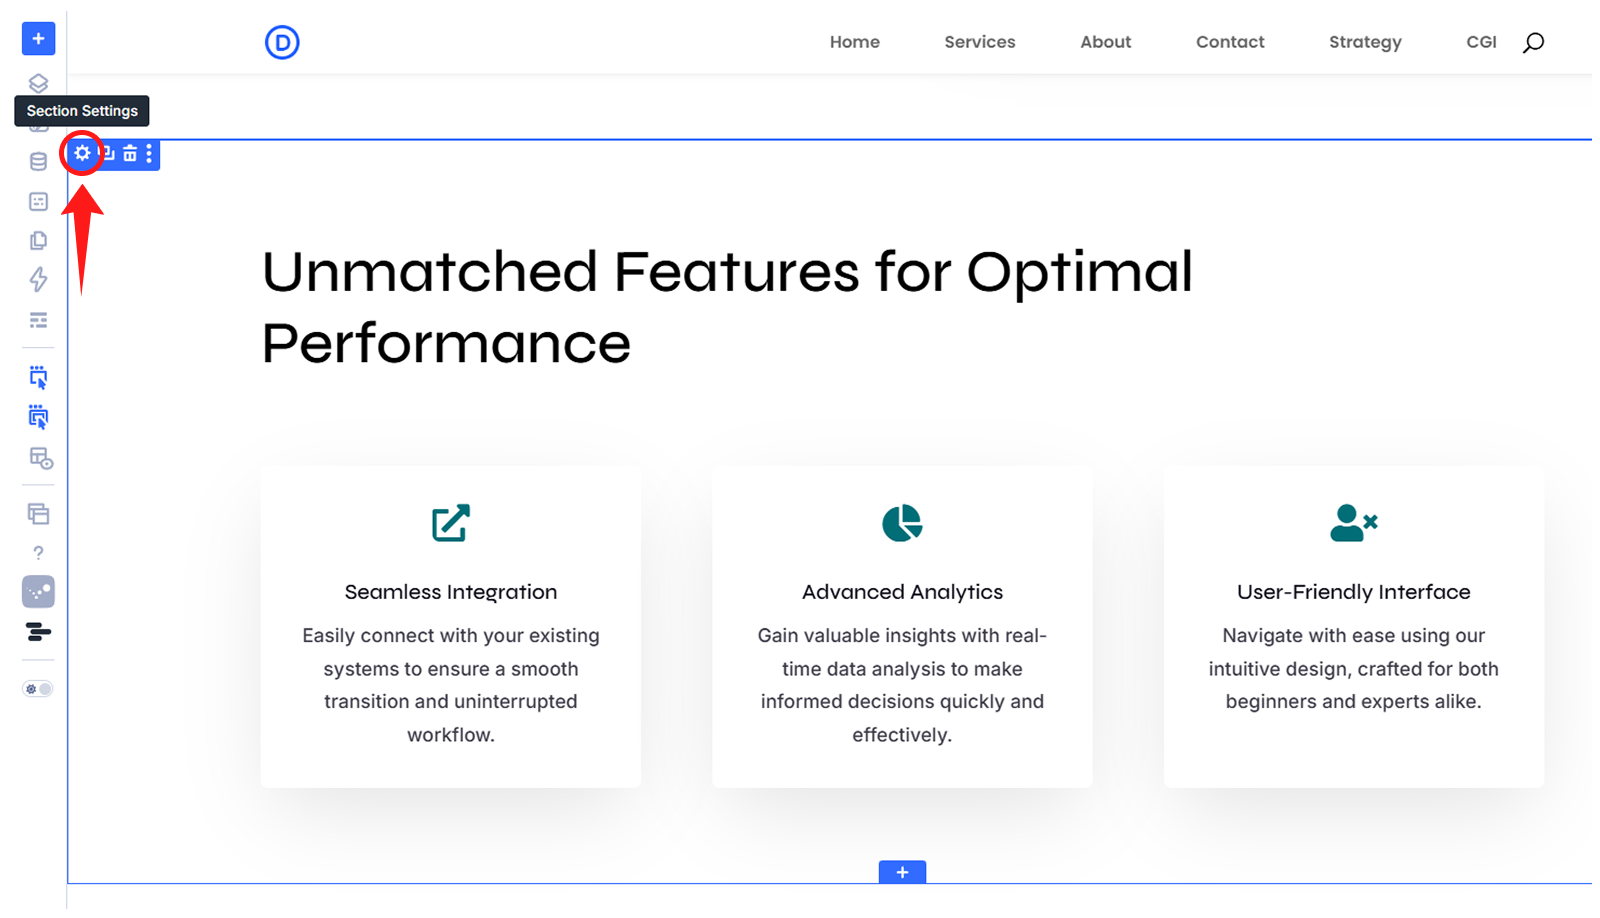
- Click on the settings gear icon of the feature section (DiviMotion lets you set interaction from section, row, columns and modules.)
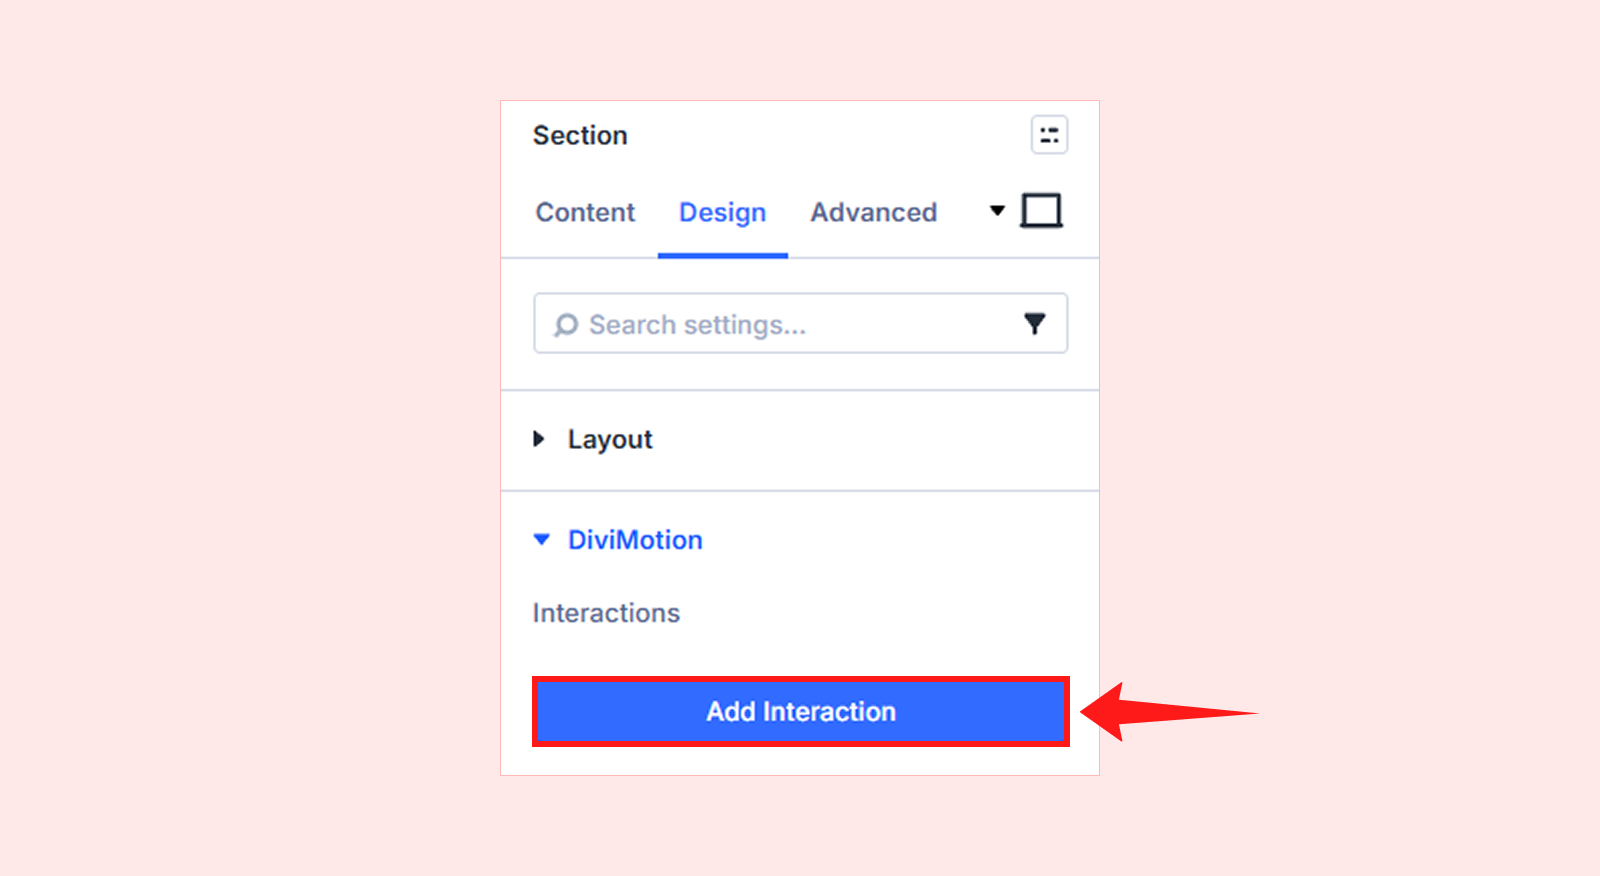
- Then navigate to Design tab > DiviMotion > Add Interaction
- Select On Scroll, which will bring up the settings panel for configuring the scroll trigger. We configured the following settings:
- Start Position, Element: Top
- Start Position, Viewport: 70%
- End Position, Element: Bottom
- End Position, Viewport: Bottom
- Scrub on Scroll: Enabled
- Smooth: 1 second
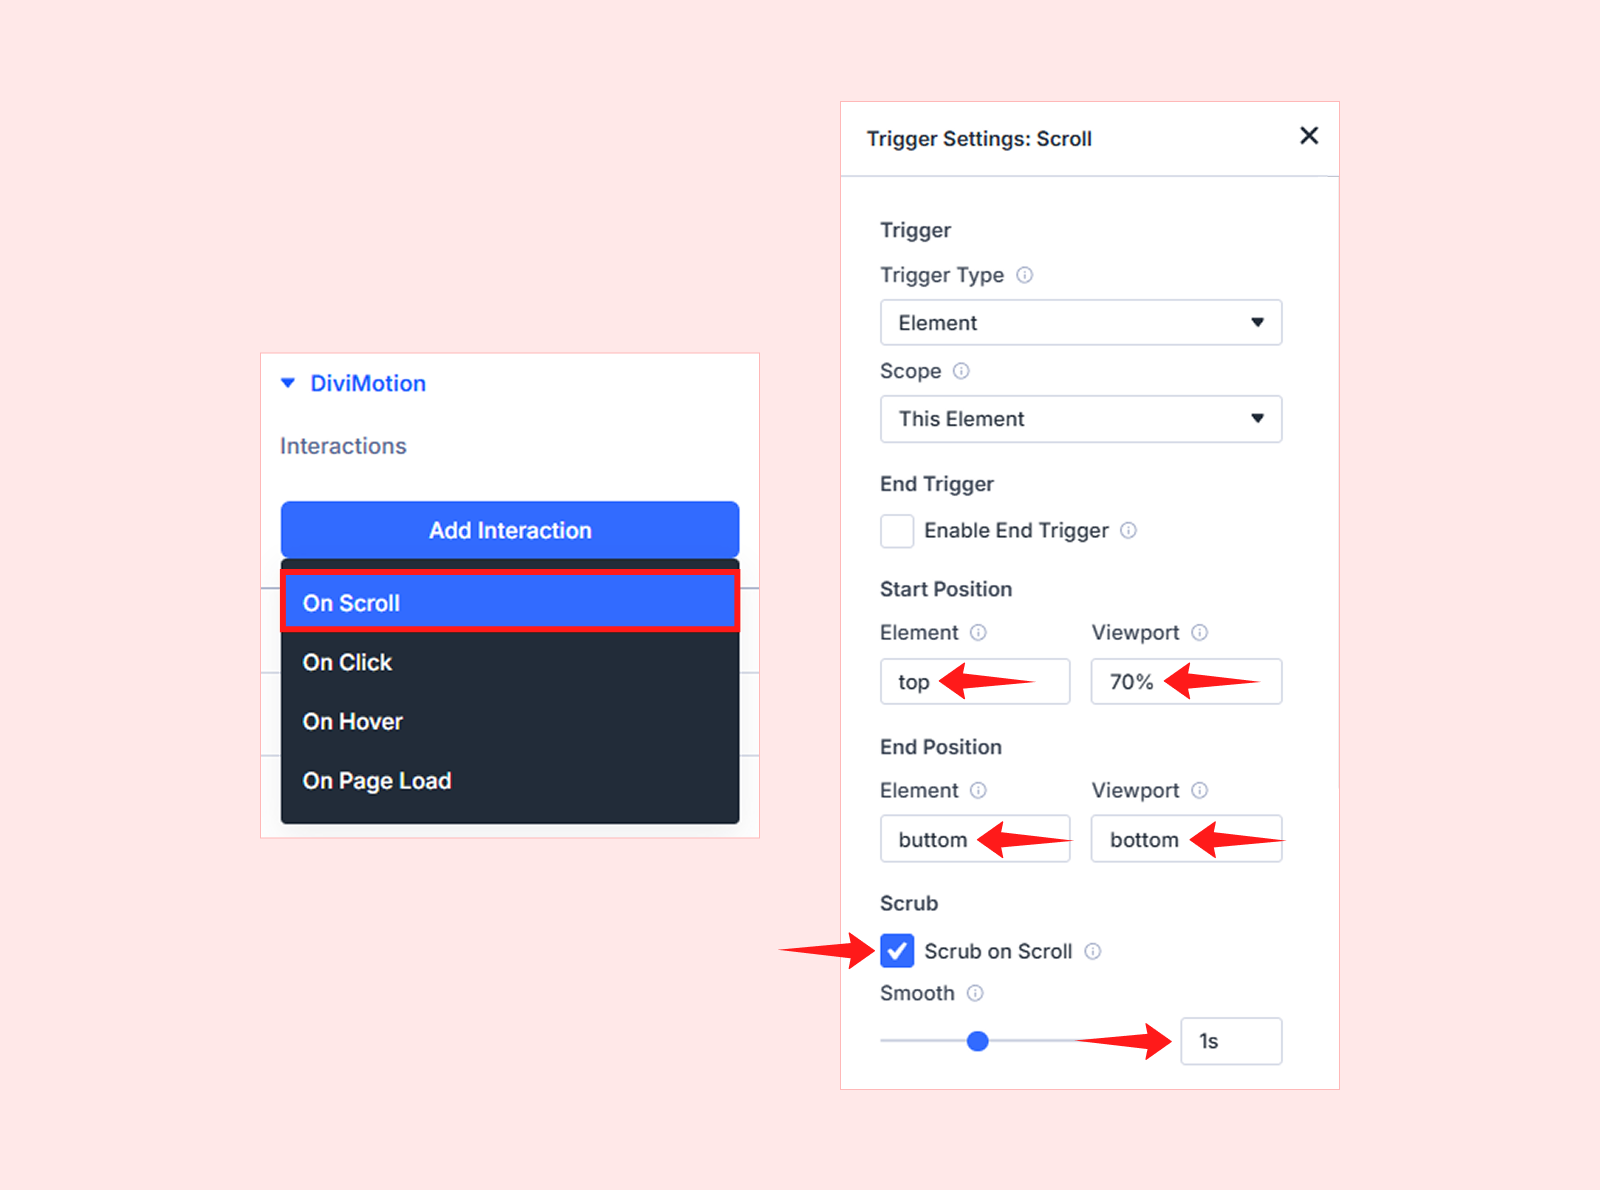
These settings make the animation begin when the top of the feature section reaches 70% of the viewport. The animation progress then follows the visitor’s scrolling.
Note: Based on your selected interaction type, you will see different trigger-specific settings.
Step 4: Add an Animation Action
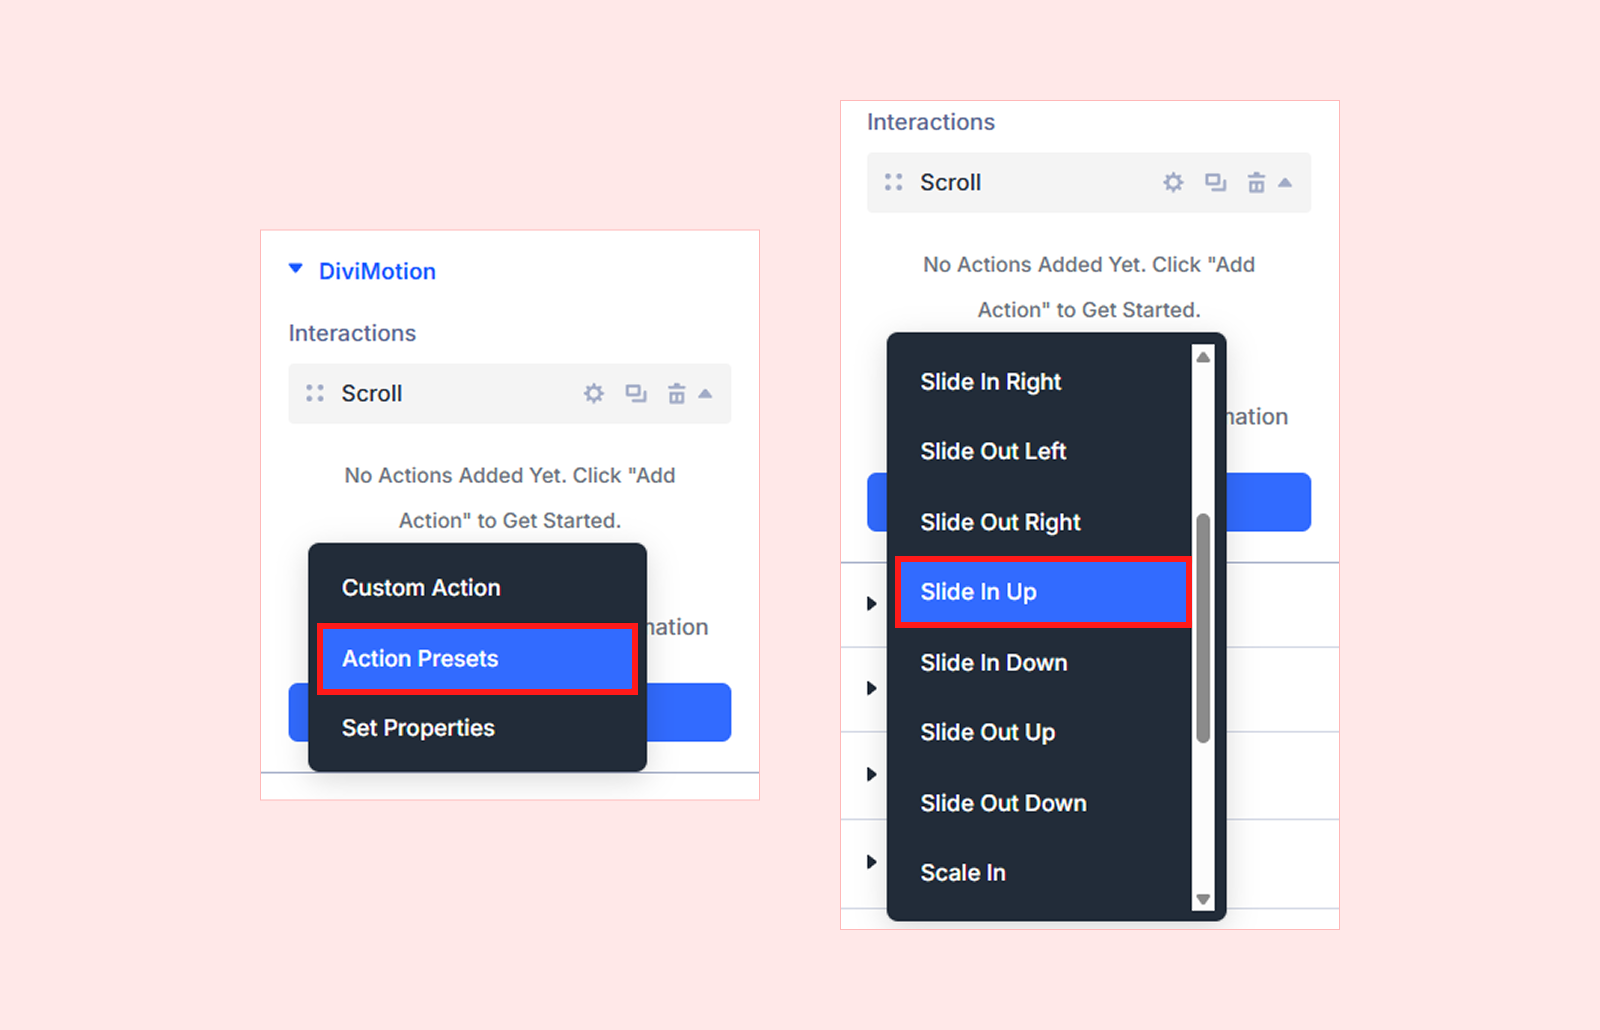
After configuring the trigger, click + Add Action inside the interaction card. DiviMotion offers three action types:
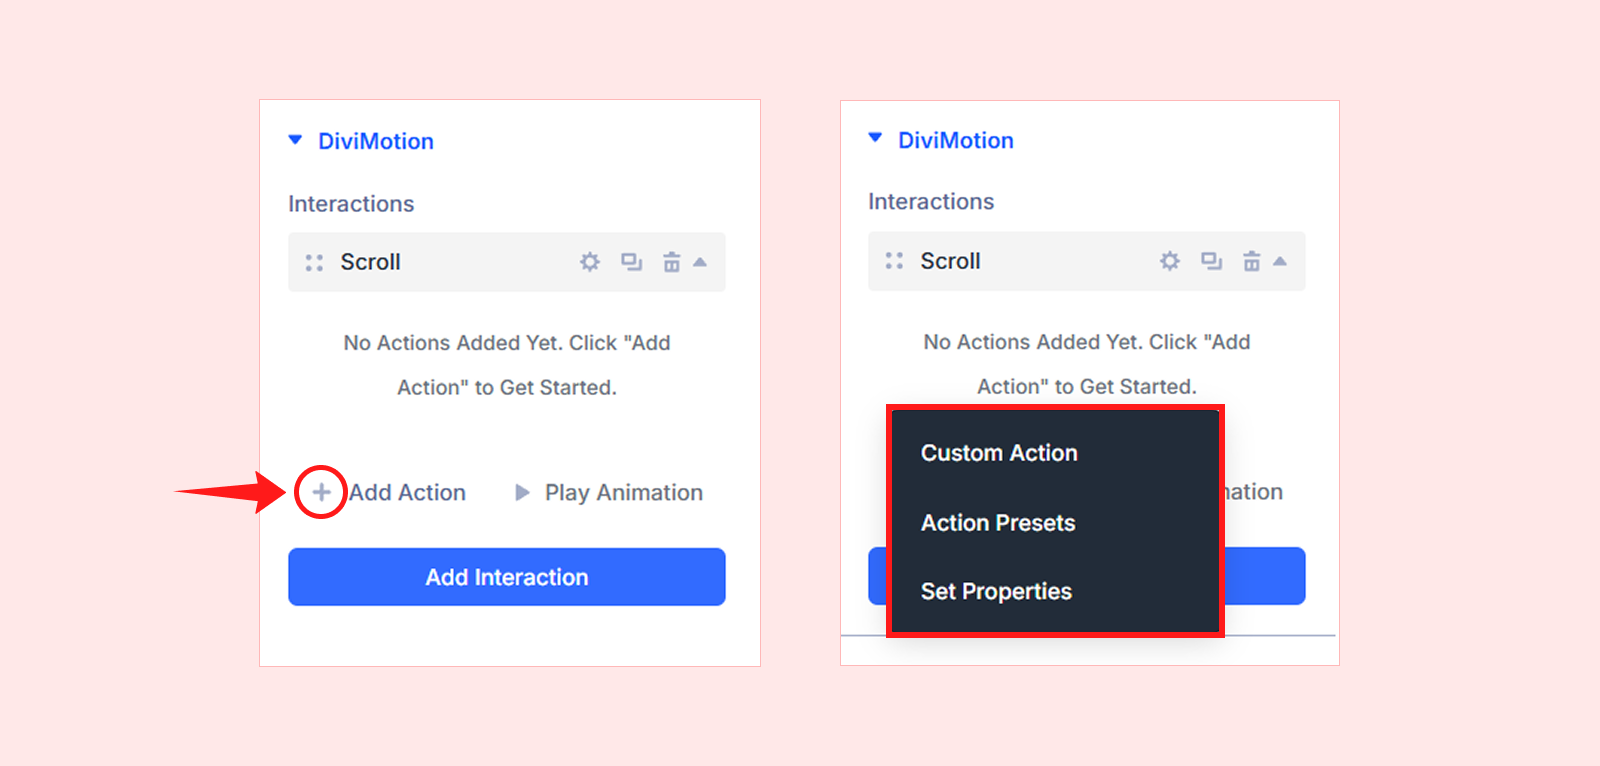
- Action Presets: Apply a ready-made animation.
- Custom Action: Build an animation using custom properties, timing, and easing.
- Set Properties: Apply an immediate property change without animation.
We will use an Action Preset to animate our created feature section. Here is what we did:
- Click on “Action Presets” and select “Slide In Up”
- Then click on Inherit and make the following changes:
- Target Type: Element by ID
- Select Target Element: Feature Row (Always rename the element you want to target using the Admin Label so you can identify it easily in the target list.)
- Scope: Children
- Action Name: Slide In Up
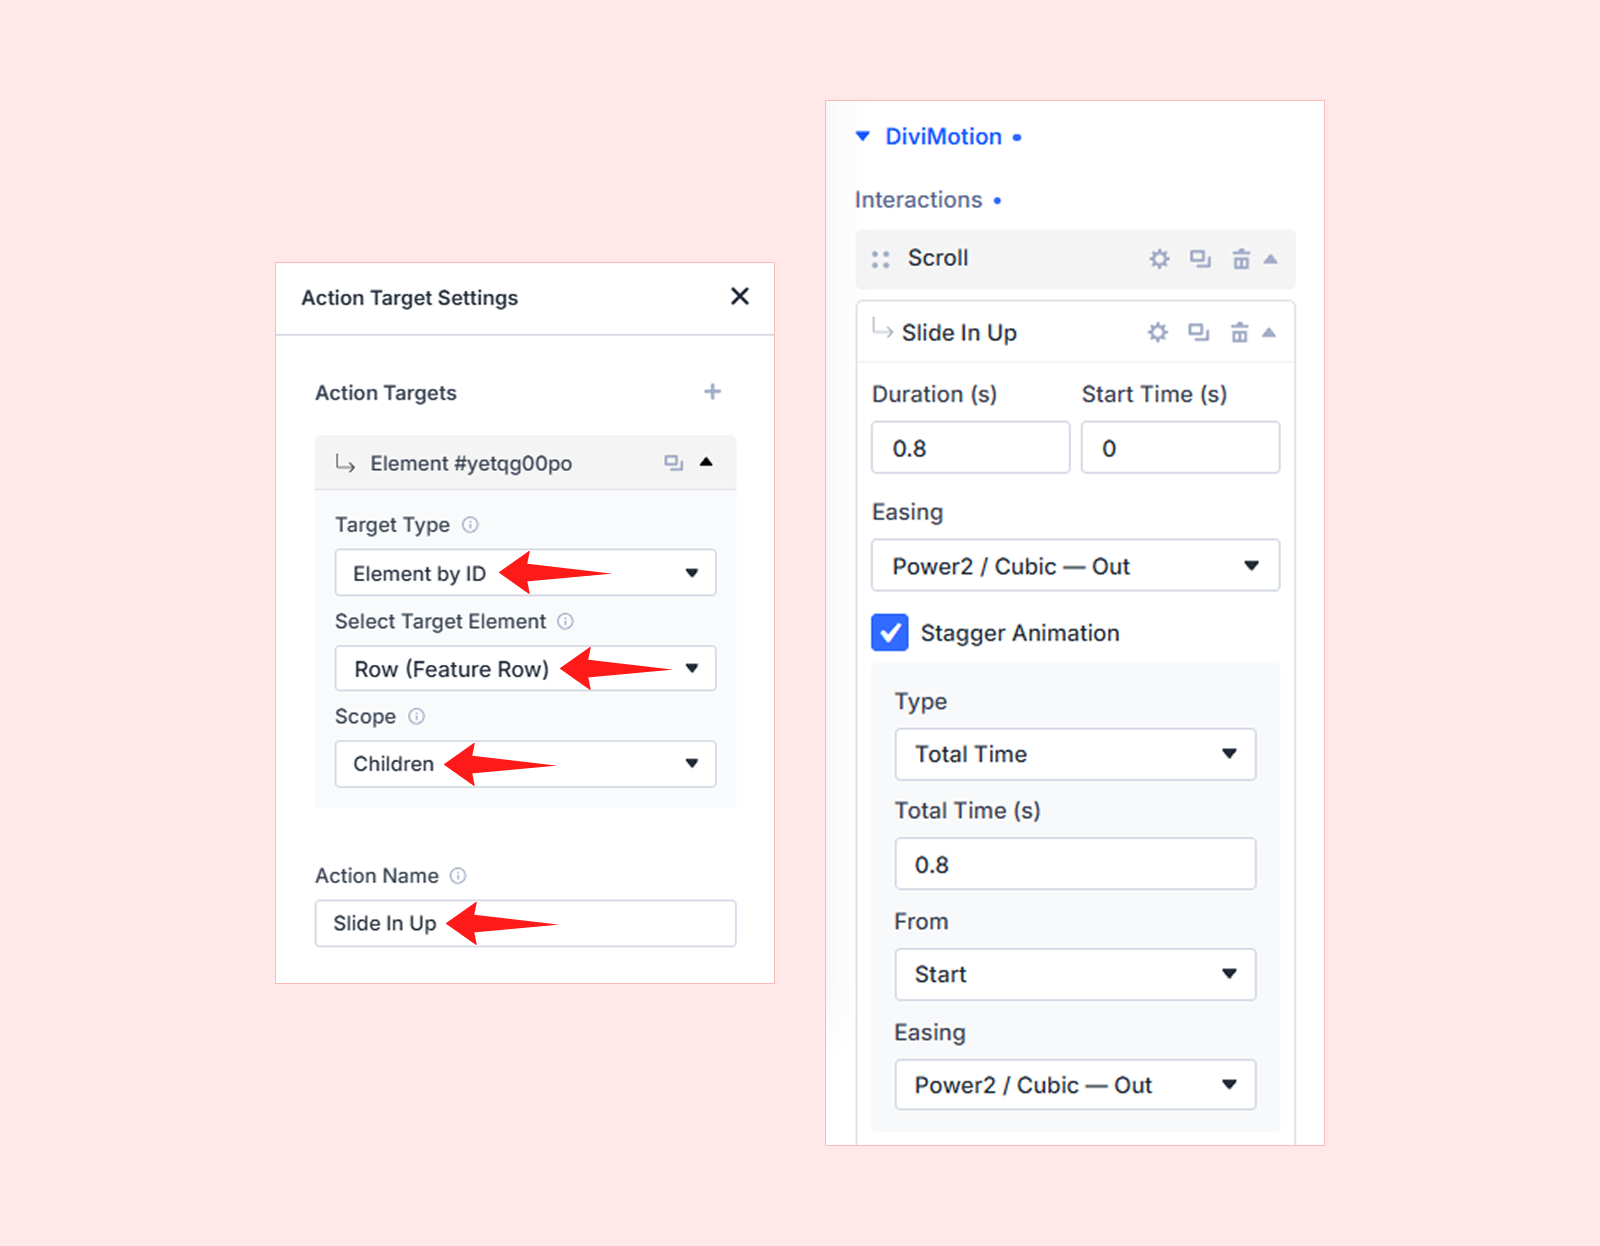
We are targeting the row’s immediate child elements, and this setup will animate the three columns that hold the Blurb modules.
Next, adjust the preset settings from the Action Controls panel:
- Stagger Animation: Enabled
- Total Time: 0.8 seconds
- From, Move Y: 200px
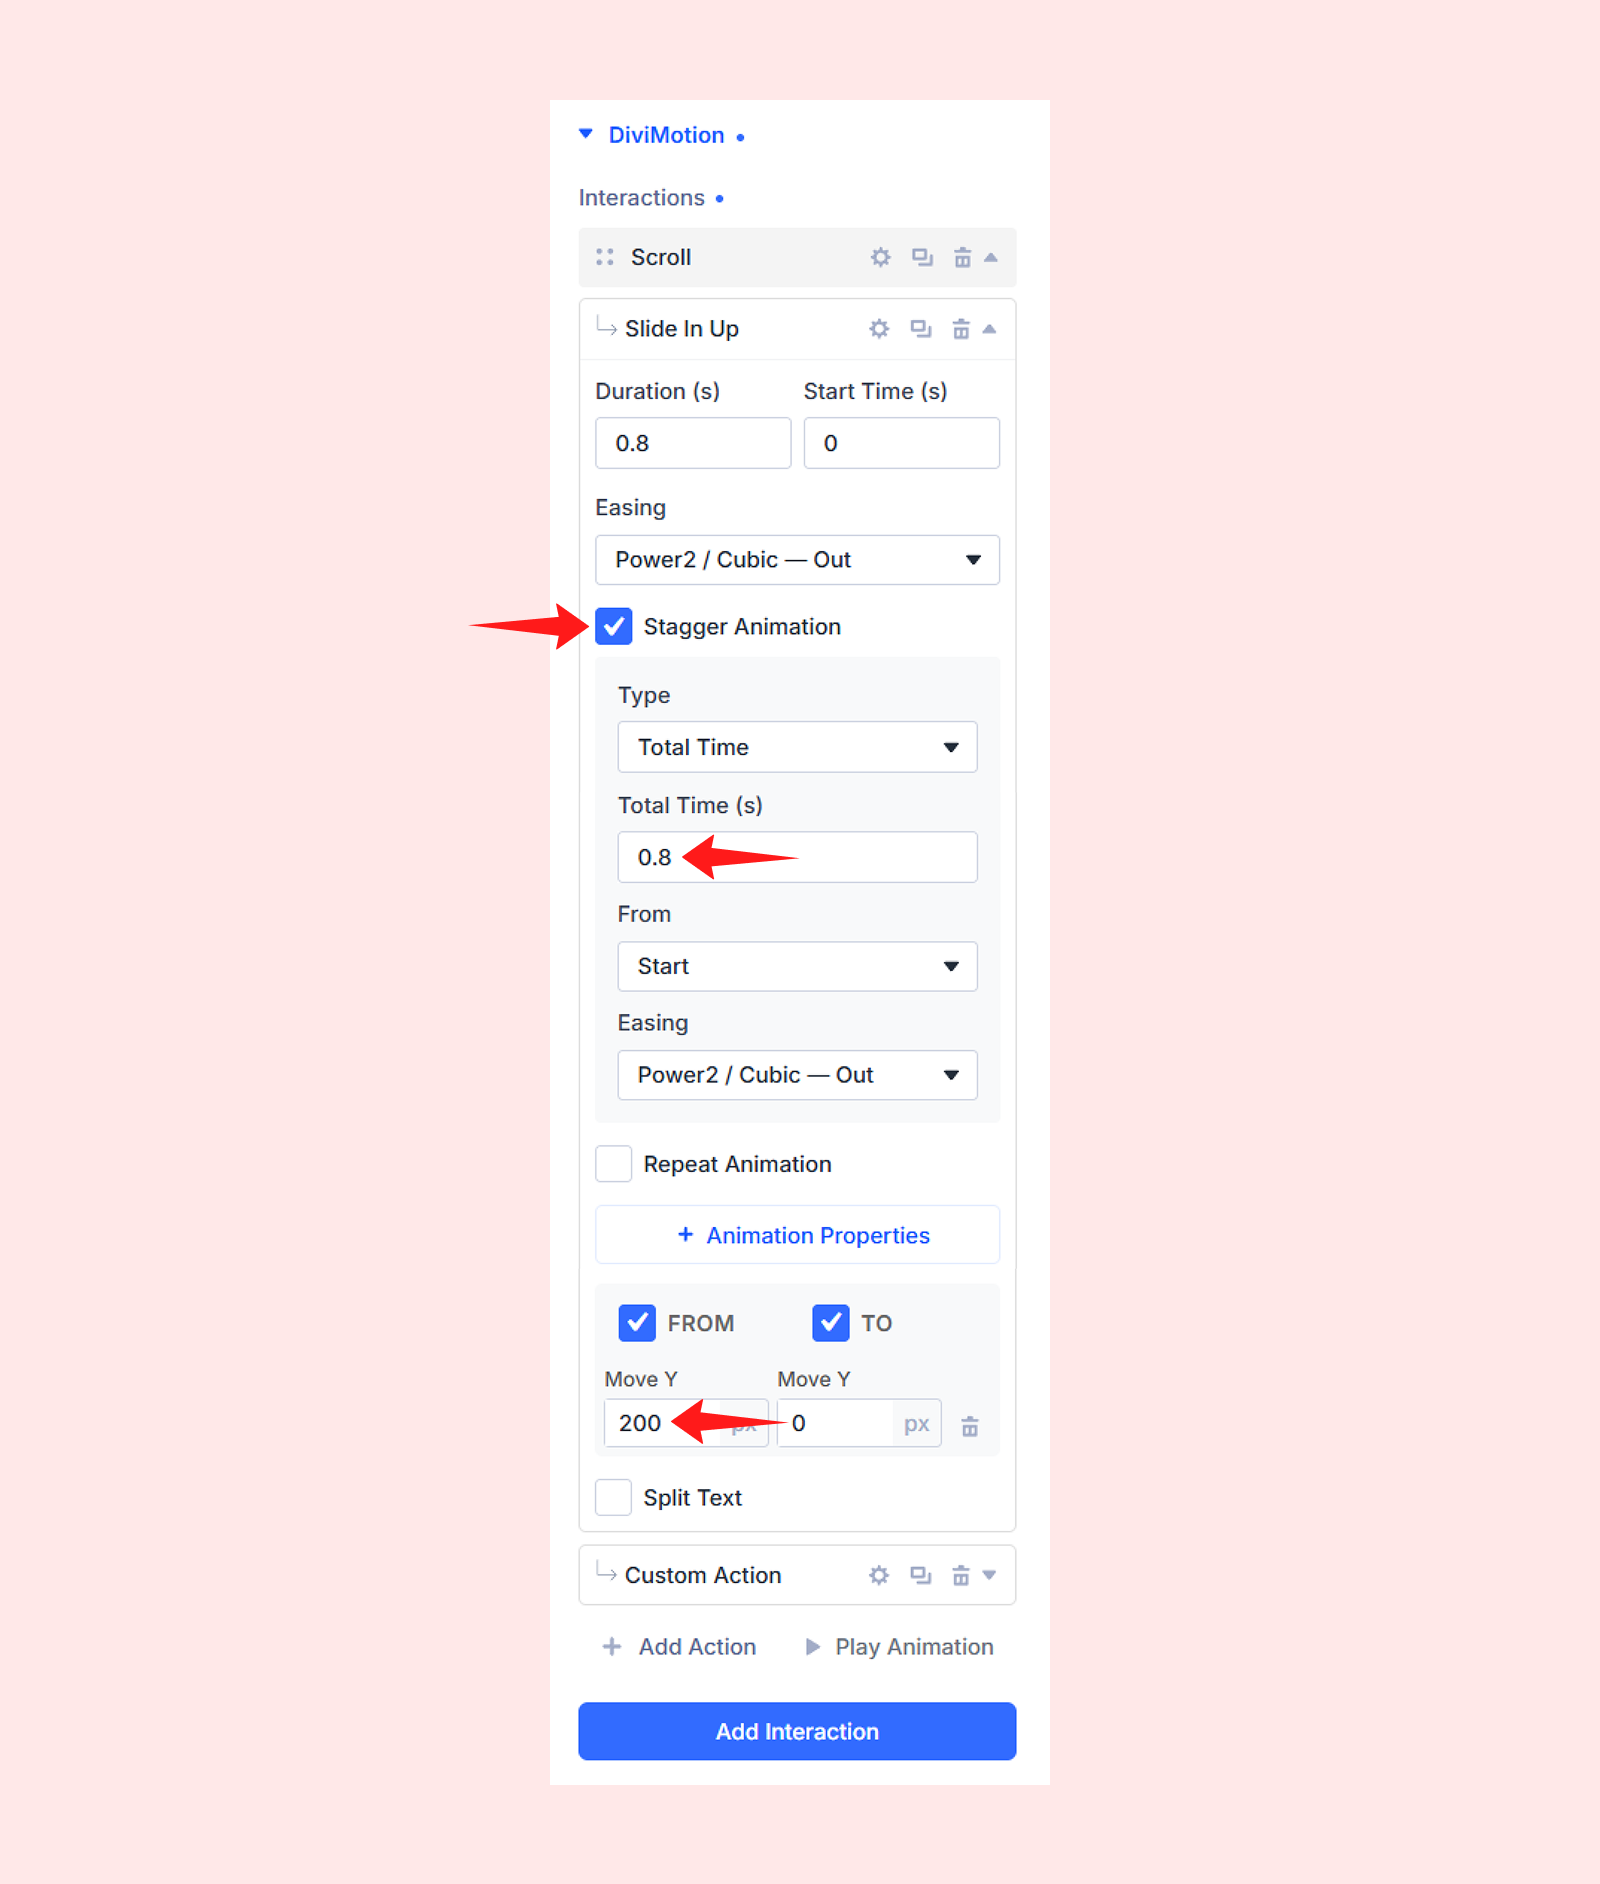
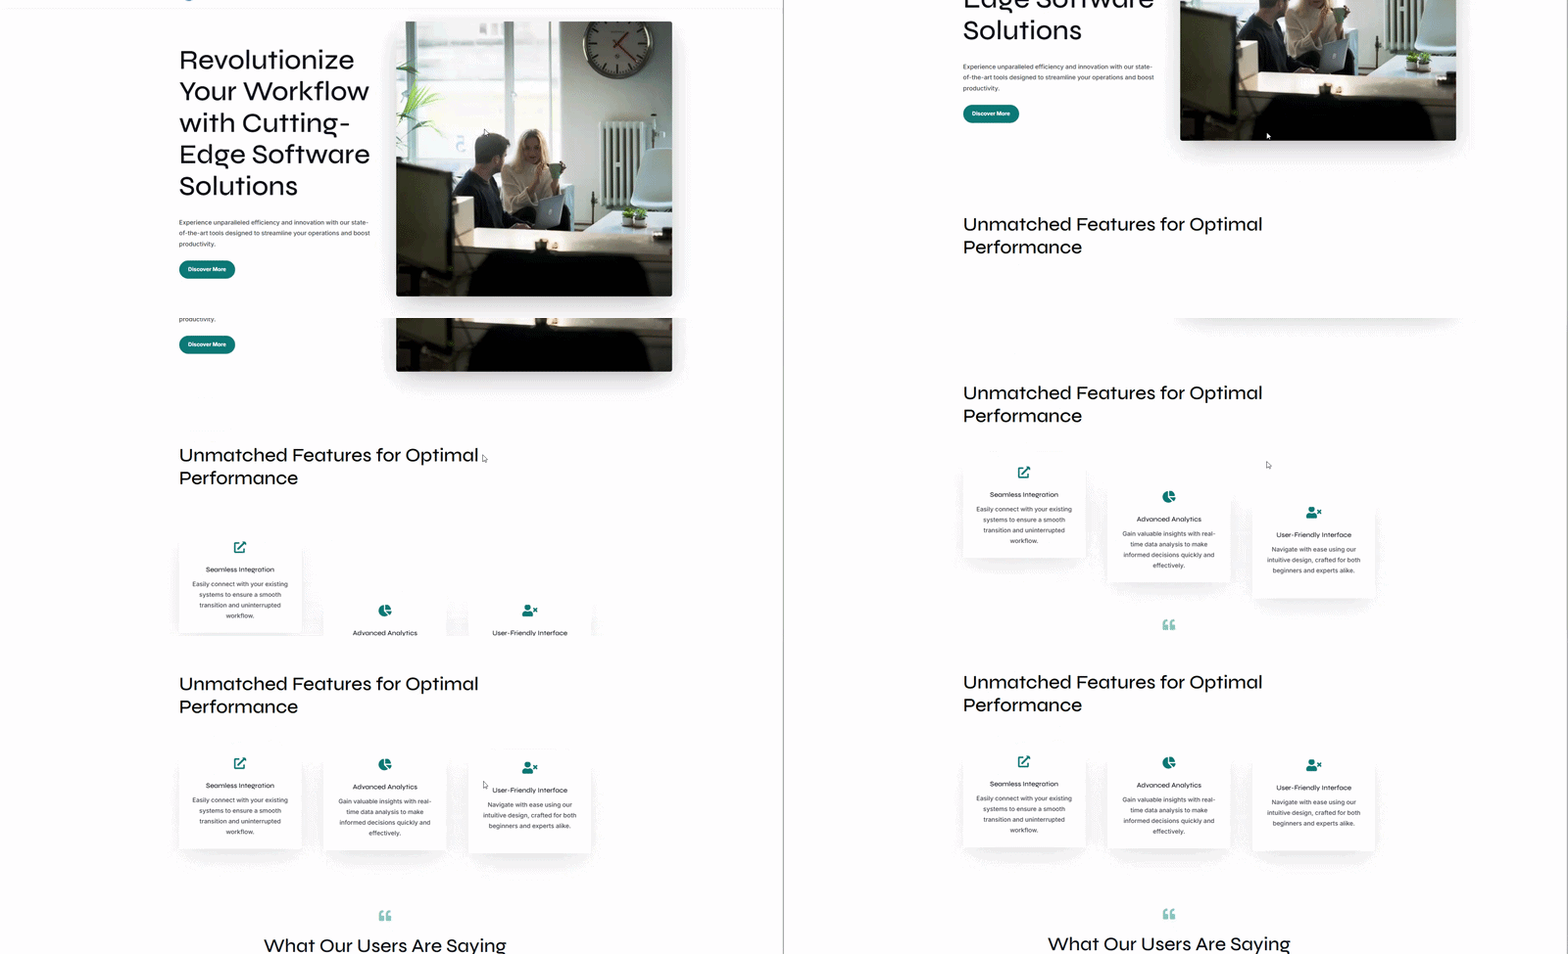
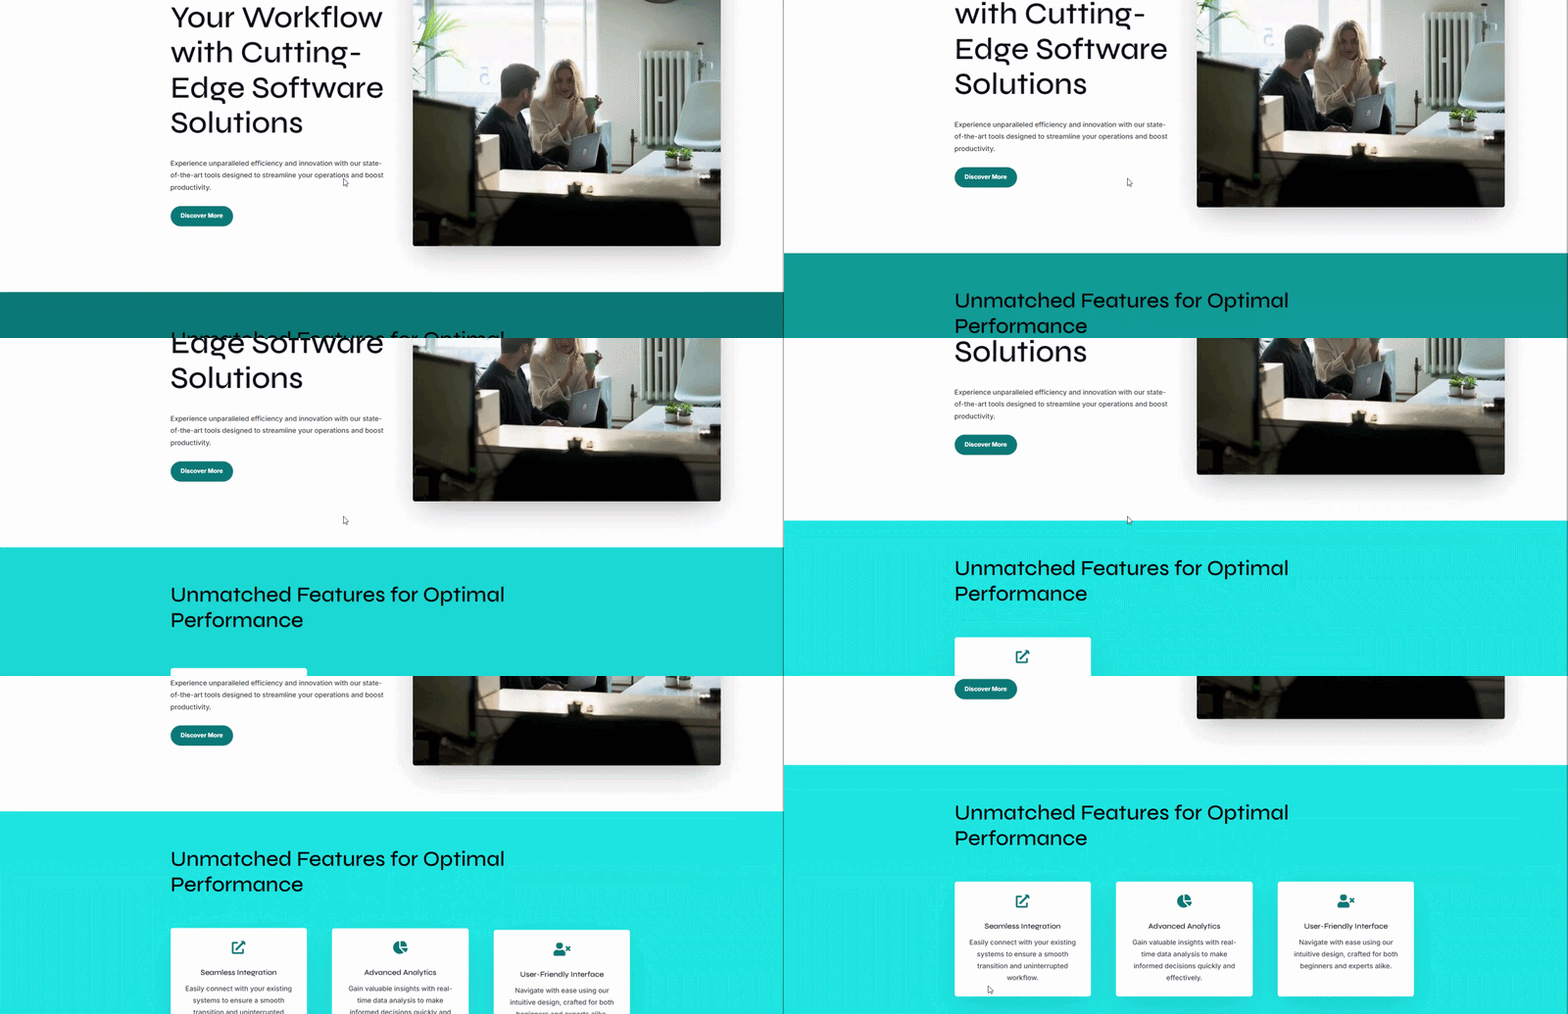
The three feature columns will now move upward one after another as the visitor scrolls. Something like:
Step 5: Combine Multiple Actions in One Interaction
A single interaction can contain multiple actions. That means, you combine movement, color, opacity, scale, and other effects in the same animation.
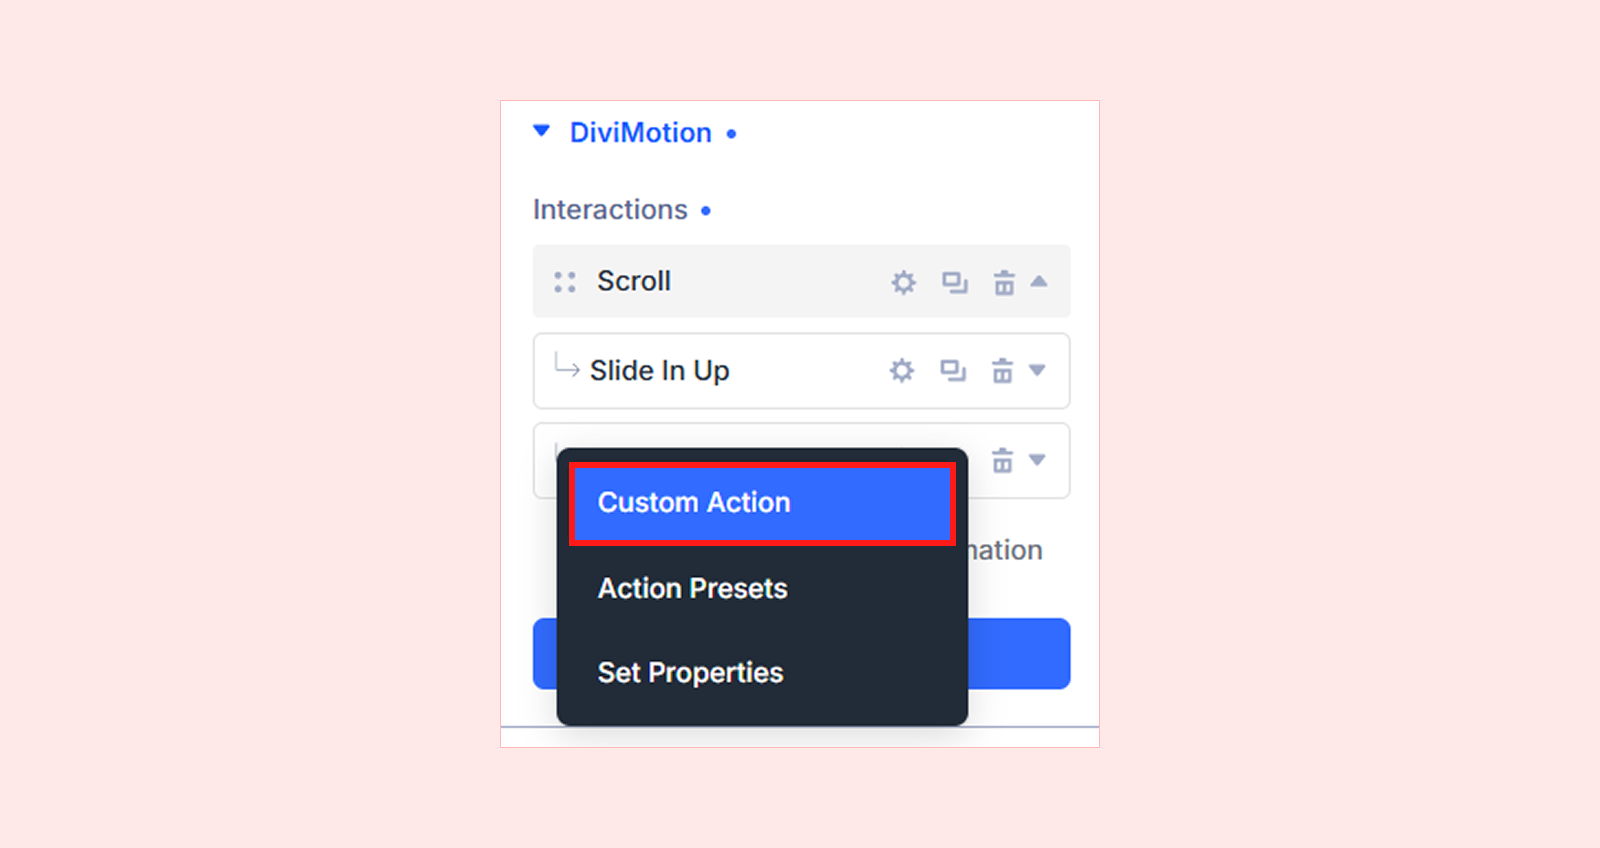
We will add a Custom Action below the existing Slide In Up preset. For this one, we will be targeting the full section to change the background color. Here is what we did:
- Click + Add Action inside the same Scroll interaction and select Custom Action.
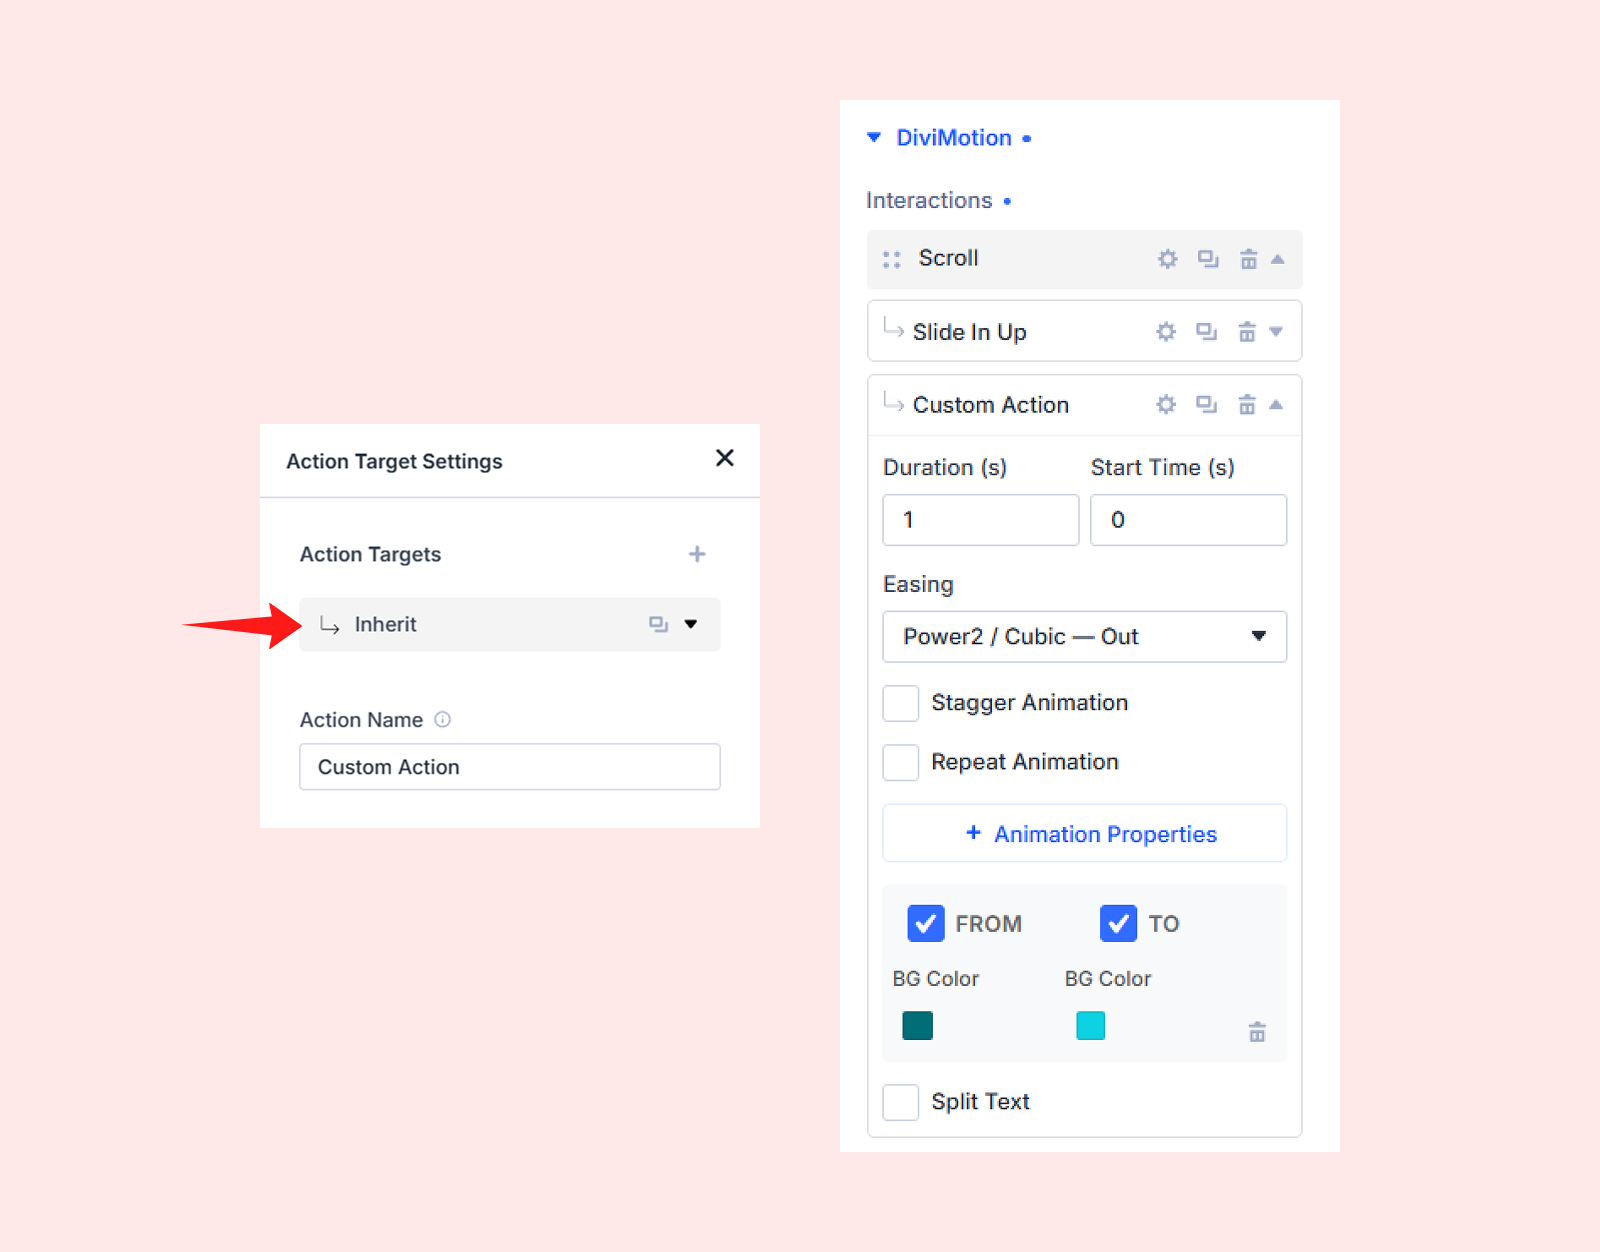
- Keep the Action Target set to Inherit so the color change applies to the complete feature section.
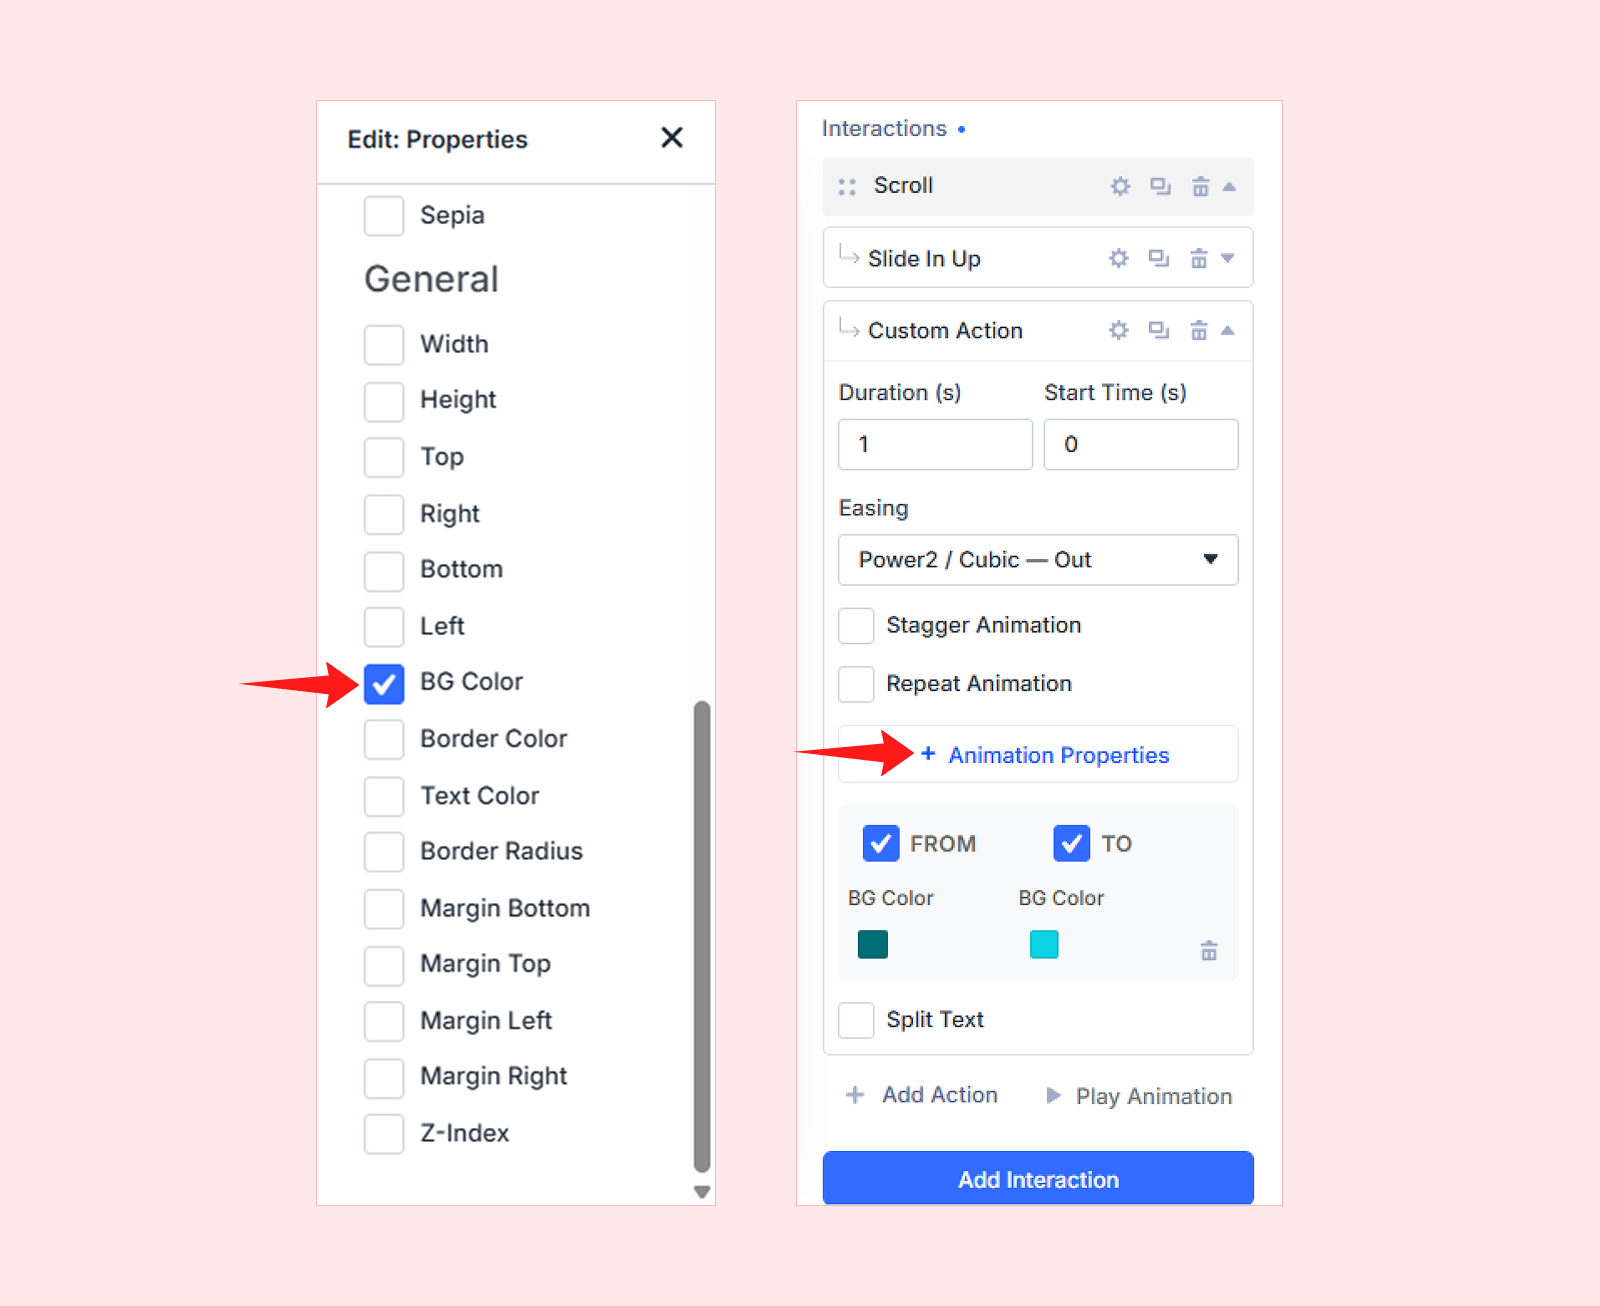
- Now open Animation Properties from the action settings panel and select BG Color.
- Configure the colors:
- From: #006d77
- To: #0cd2e4
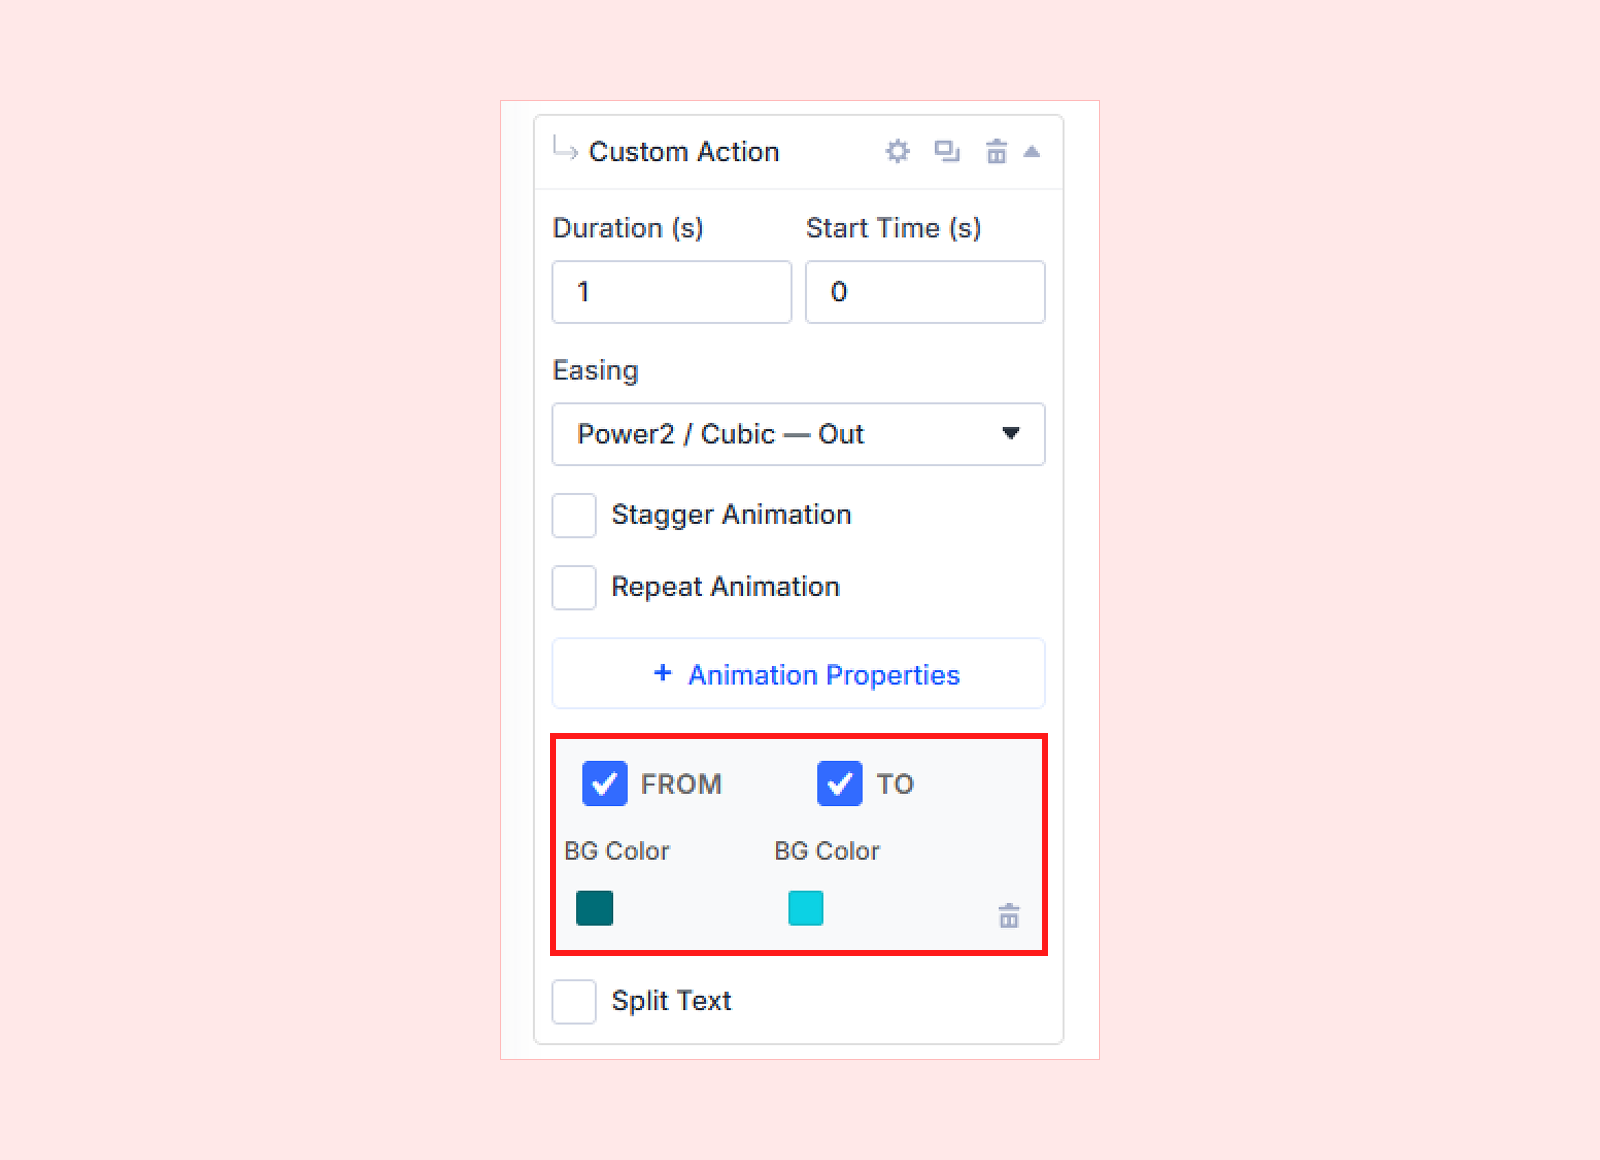
When the custom action is triggered, it changes the background color of the feature section to highlight the interaction, and the preset makes the feature columns move upward. Something like:
Step 6: Apply Animations Across the Website
Once you are comfortable animating one section, repeat the same trigger-and-action process across other important areas of your website. Some useful combinations are:
- On Load: Animate hero headings, buttons, and images when the page opens.
- On Scroll: Reveal service sections, feature blocks, and testimonials.
- On Hover: Add subtle movement to cards, buttons, and images.
- On Click: Trigger menus, popups, tabs, and hidden content.
Step 7: Preview and Publish
Save your changes and test the page on the front end. Check the animation on desktop, tablet, and mobile. Simplify or disable complex scroll animations on smaller devices if needed using DiviMotion’s device-specific controls. Once everything works correctly, publish the page.
Note: We also have a complete guide on creating vertical and horizontal scroll effects in Divi.
Method 2: Create an Animated Website with Custom Code
You can create website animations using CSS, JavaScript libraries, or WebGL. Libraries like GSAP, Motion, and Anime.js offer greater flexibility when it comes to building more advanced and interactive effects.
Among them, GSAP is one of the most flexible options for creating smooth, advanced animations with precise control. In fact, GSAP powers a large number of web animations across the internet.
For this without a plugin method, we will also use GSAP to create a scroll-triggered animation with custom code.
Step 1: Get the Required GSAP Scripts
First, get the GSAP Core and ScrollTrigger scripts from the official GSAP installation page. Follow these steps:
- Open the official GSAP installation page
- Scroll down to the Install Helper section and click on the CDN tab
- Under Import and Include Plugins, choose the plugins you need. For this example, select ScrollTrigger
- The installer will automatically include both GSAP Core and ScrollTrigger scripts
- Copy the full generated code (including both script tags)
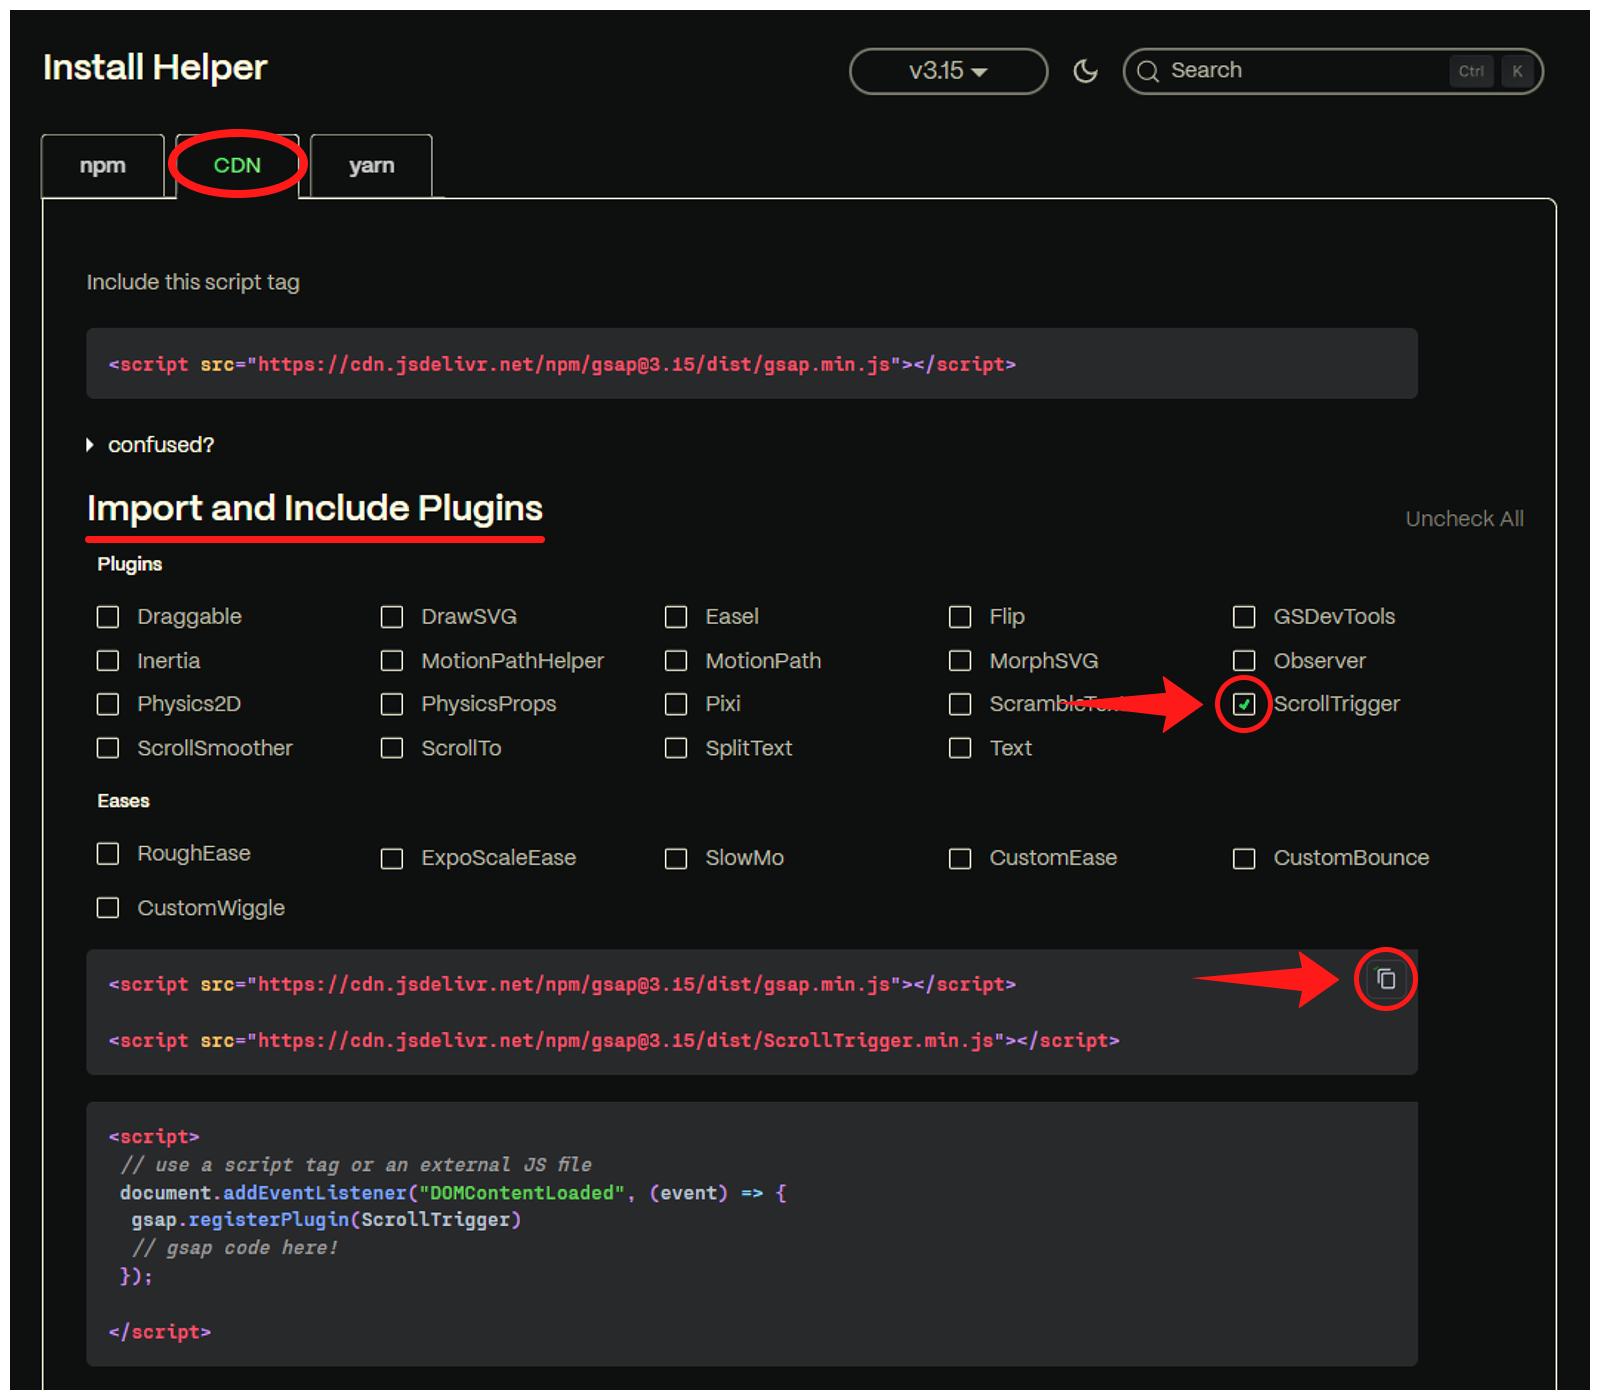
The Install Helper will include: GSAP Core and ScrollTrigger
Step 2: Define the GSAP Animation Behavior
Next, create the code that controls which elements will animate, how they will move, and when the animation will begin.
Open a text or code editor. Paste the copied GSAP Core and ScrollTrigger scripts, then add another <script> tag below them for your custom animation code.
Your animation code should include:
- Target selector: Specify the class or ID of the Divi element you want to animate, such as .gsap-reveal class.
- Animation properties: Define the movement, opacity, duration, and easing.
- Scroll trigger: Set which element triggers the animation and when it begins in the viewport.
- Playback behavior: Decide whether the animation should replay or run only once.
- Page-load wrapper: Run the code after the page content has loaded to ensure the target elements are available.
Now we will copy the code and use it in the next step. And when you create your script, it should look like this:
<!-- Load GSAP Core -->
<script src="https://cdn.jsdelivr.net/npm/[email protected]/dist/gsap.min.js"></script>

<!-- Load the ScrollTrigger plugin -->
<script src="https://cdn.jsdelivr.net/npm/[email protected]/dist/ScrollTrigger.min.js"></script>

<!-- Code block to create scroll-triggered animation -->
<script>
document.addEventListener("DOMContentLoaded", function () {

    // Register ScrollTrigger with GSAP
    gsap.registerPlugin(ScrollTrigger);

    // Animate every element with the gsap-reveal class
    gsap.utils.toArray(".gsap-reveal").forEach(function (element) {

        gsap.from(element, {
            y: 100,
            autoAlpha: 0,
            duration: 1.5,
            ease: "power2.out",

            scrollTrigger: {
                trigger: element,
                start: "top 85%",
                once: true
            }
        });

    });

});
</script>
<!-- Code block to create scroll-triggered animation -->
This code makes each gsap-reveal element start 100 pixels lower and invisible. When it reaches 85% of the viewport, it moves to its original position and fades in over 1.5 seconds. The animation plays once.
Note: You can modify this code or use your own GSAP animation. Use the CDN scripts from the GSAP Install Helper if they are different from the ones shown here.
Step 3: Add the Complete Code to Divi
Once the scripts and animation code are ready, add them to your Divi website. From the WordPress dashboard:
- Go to Divi > Theme Options > Integration.
- Enable Add code to the <head> of your blog if it is disabled.
- Paste the complete code into the field and click Save Changes.
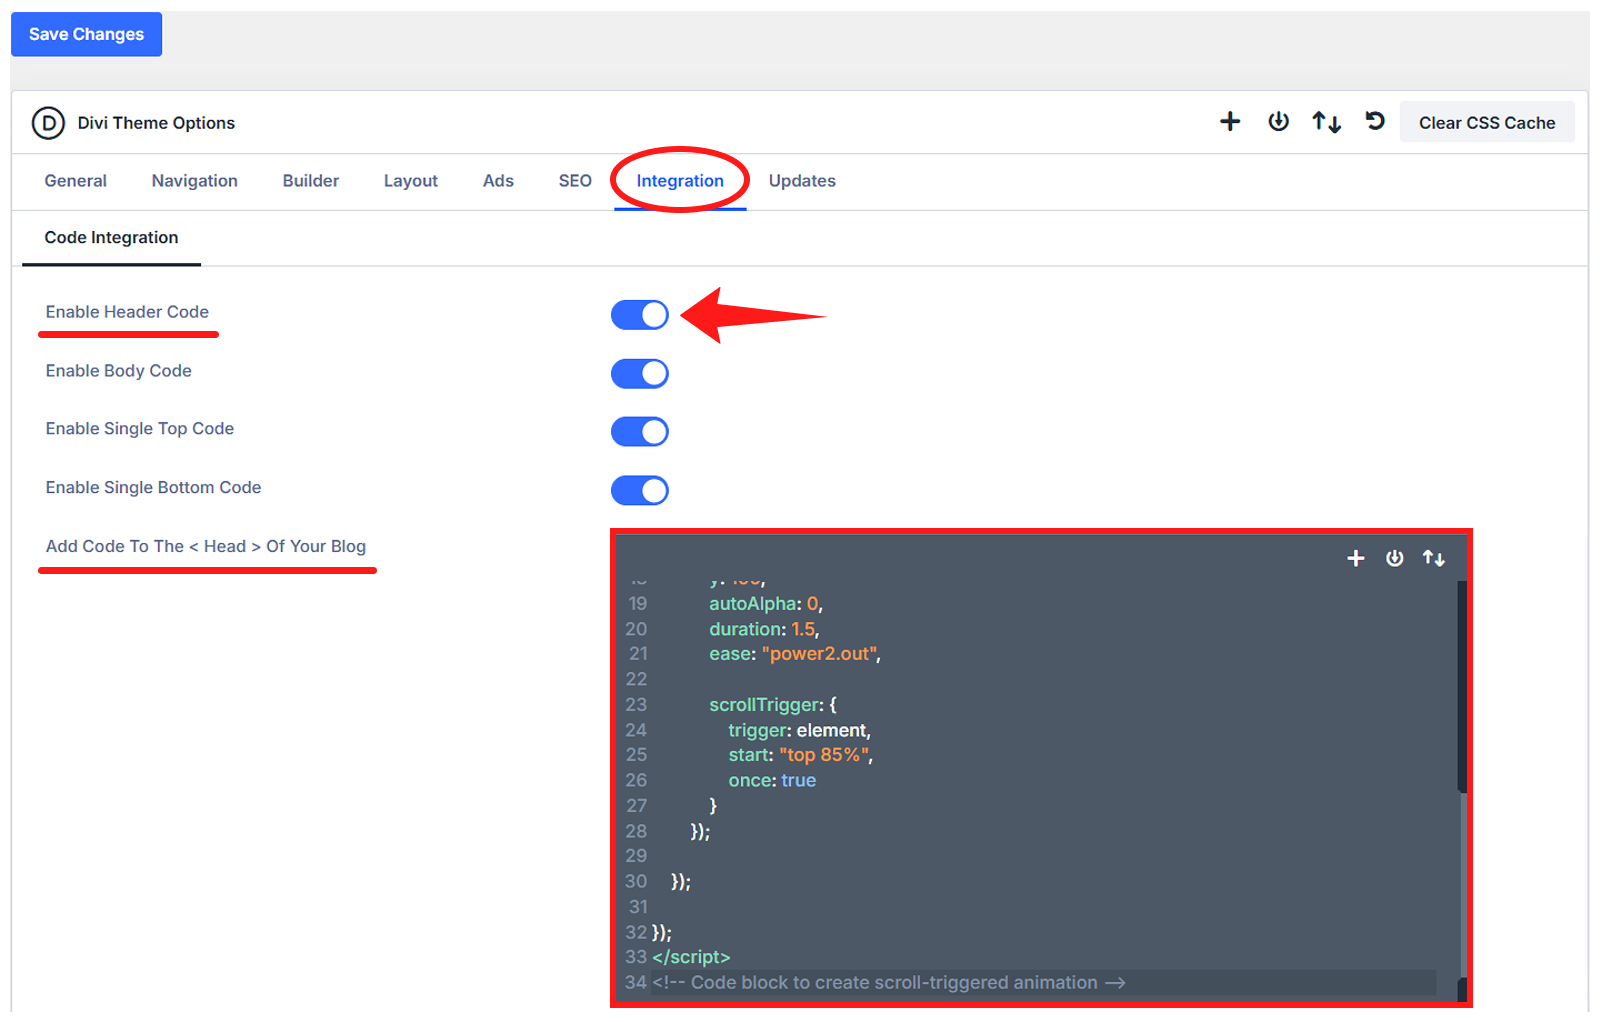
Make sure the code follows this order: GSAP Core script > ScrollTrigger script > Custom animation script. This ensures all necessary scripts are properly loaded across your website. Now, you can apply the animation to any Divi element by assigning it the gsap-reveal class.
Step 4: Add the Target Class to a Divi Element
- Open the page using the Divi Visual Builder.
- Select the element (for example Text module) you want to animate.
- Go to Advanced > Attributes > Attribute > Class
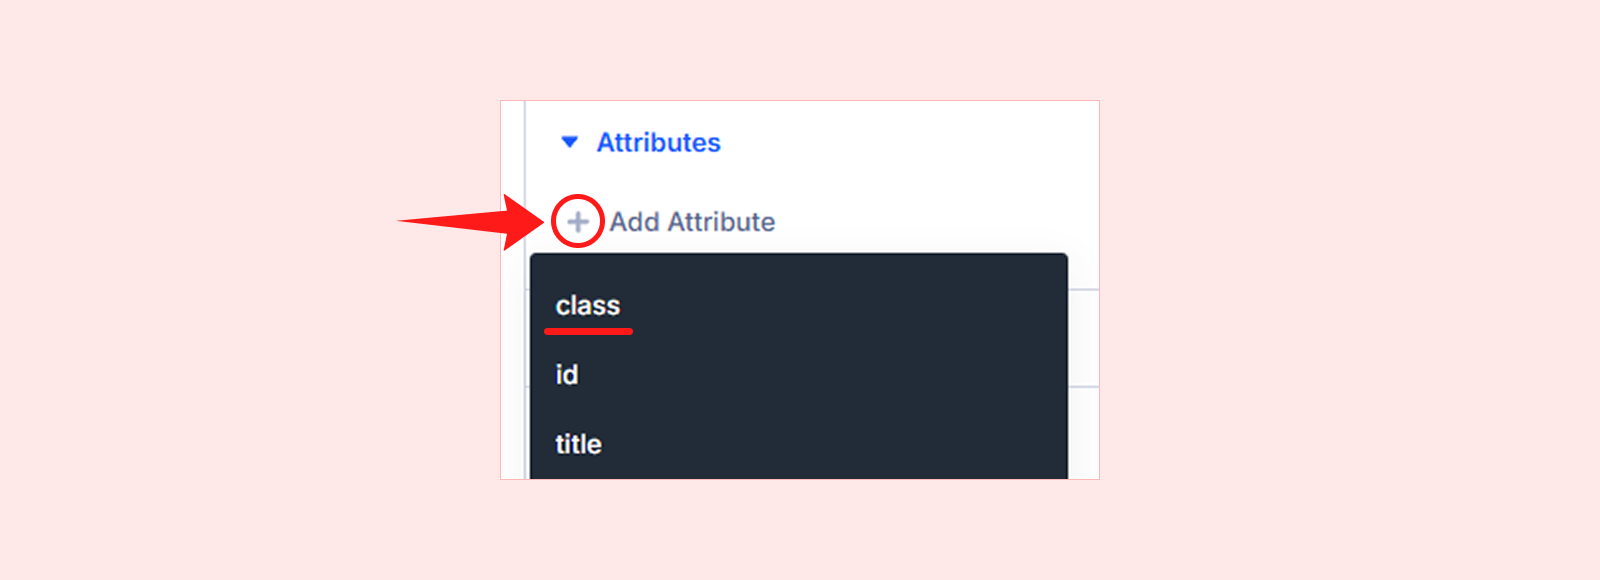
- Enter “gsap-reveal” in the Attribute Value field.
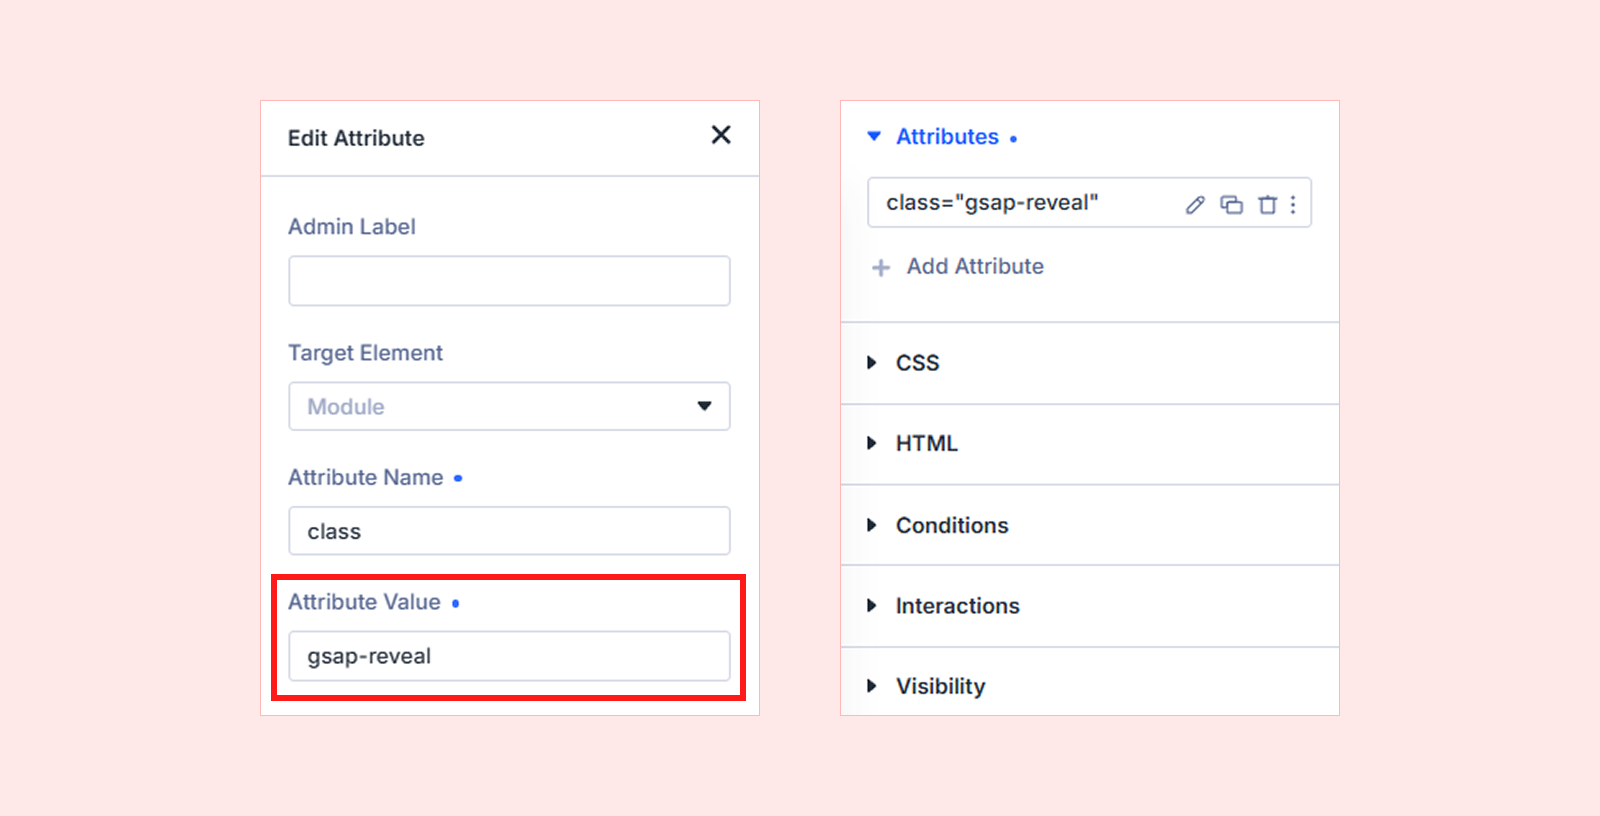
- Save the module settings and update or publish the page.
After applying the class, your Divi element should move upward and fade into view when it reaches 85% of the viewport.
Note: You can assign the same class to other Divi sections, rows, columns, or modules to apply the same effect to them.
Step 5: Create More GSAP Animations
A fully animated website usually needs different effects for different elements. You can create them by assigning a unique class to each animation type and adding separate GSAP code for that class.
To add another animation:
- Decide which effect you want to create.
- Create or customize the required GSAP code.
- Add the new code inside your existing custom animation <script> block.
- Assign the corresponding class to the Divi elements you want to animate.
- Save the changes and test the effect on the front end.
Repeat this process across different sections, rows, columns, and modules based on the animation each part of your website needs.
Note: You do not need to load GSAP Core again for every effect.
Final Thoughts
Now you know how to create animated websites with Divi with and without plugins. Throughout this guide, we focused on GSAP for both methods because it offers flexible controls and support for advanced animation effects.
You can also consider other options, such as Motion, Anime.js, CSS animations, or Three.js, depending on the effects and level of control you need. It completely depends on the type of animation you want to create.
If you have any questions or need help choosing the right animation method, let us know in the comments below.


0 Comments