


To make your Divi elements move horizontally, you can use Divi’s built-in Scroll Effects feature. Just select Horizontal Motion, define the viewport range and trigger, and you are done.
It sounds simple, and so is the result, as you can only create basic horizontal motion effects with it.
However, if you want to create advanced horizontal scrolling animations, such as continuous horizontal movement or full scroll-driven layouts, you will need a plugin like DiviMotion.
It is a GSAP-powered WordPress plugin that uses tools like ScrollTrigger and ScrollSmoother.
In this guide, we will show you how to add horizontal scrolling effects to Divi websites using both built-in settings and the plugin method.
Let's get started.
Our Created Horizontal Scrolling Section Preview
Have a look at the horizontal scroll section we will create in this tutorial:
Required Setup
Before starting, make sure you have the following:
- The latest version of Divi 5
- DiviMotion installed and activated
Method 1: Add Horizontal Scrolling Effect with DiviMotion
DiviMotion gives you two easy approaches to create a horizontal scrolling section in Divi:
- Use a ready-made template
- Use the Horizontal Scroll extension
We will cover both approaches step by step.
Approach 1: Create a Horizontal Scrolling Effect with a Template
DiviMotion includes ready-made horizontal scroll templates for its users. You can download a template, import it, and replace the demo content with your own.
Here is how to do it:
Step 1: Download a Template
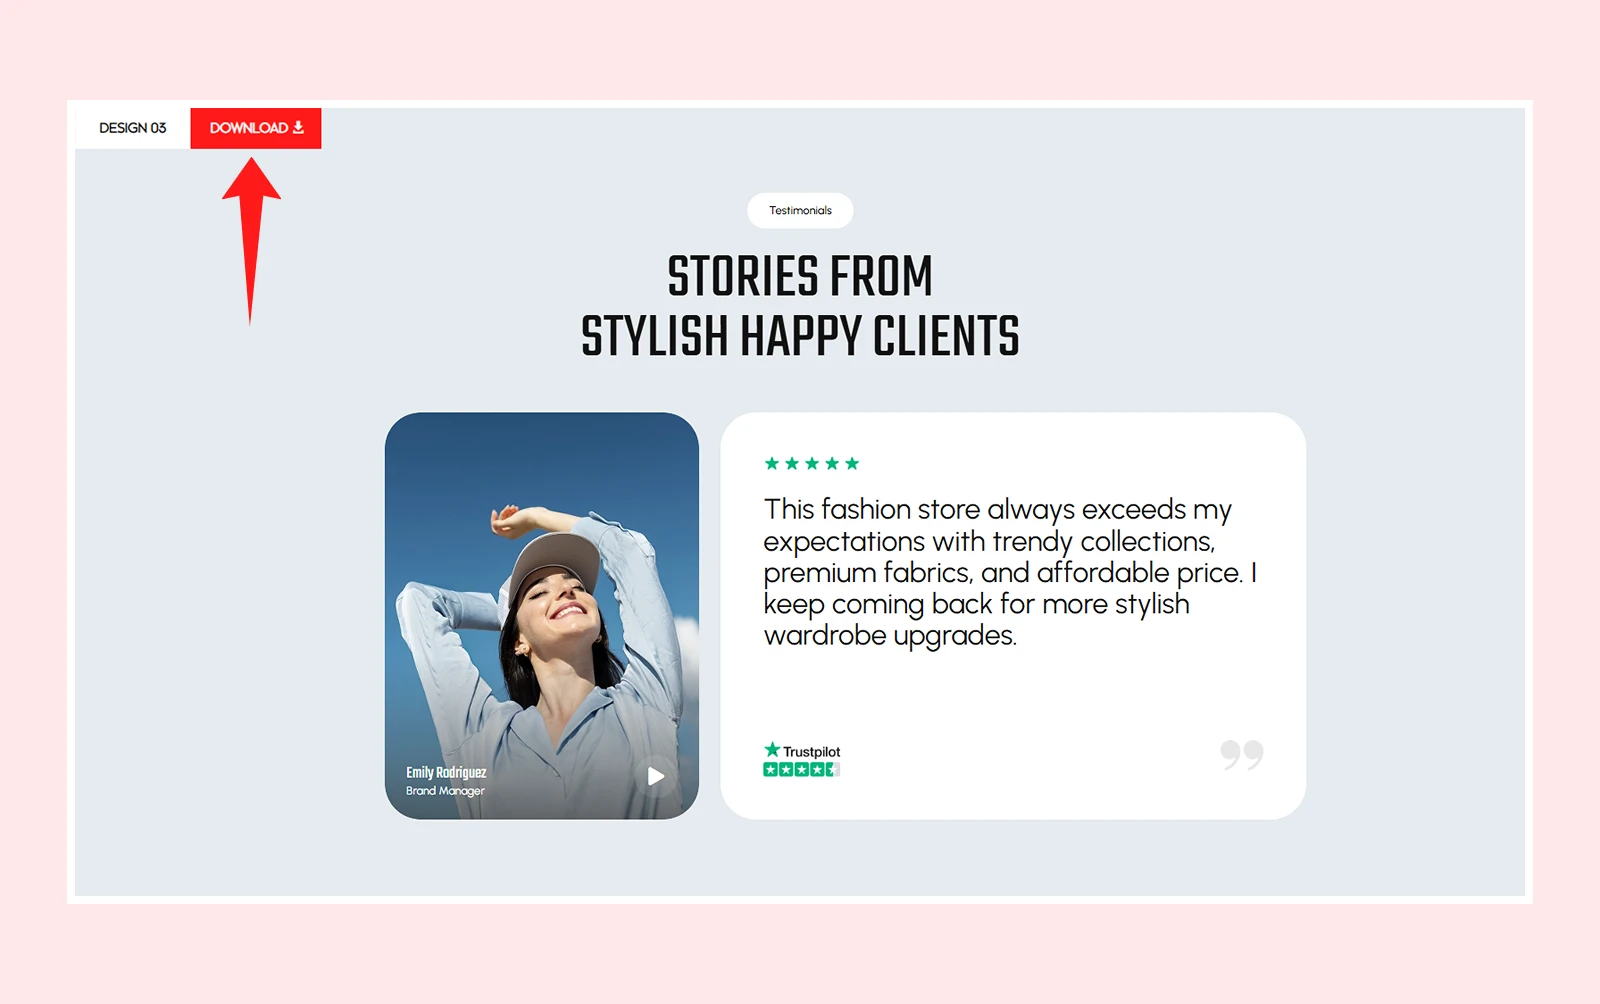
- Visit the DiviMotion Horizontal Scroll examples page and browse the demos.
- Find one you like and click Download.
Step 2: Import the Template into Divi
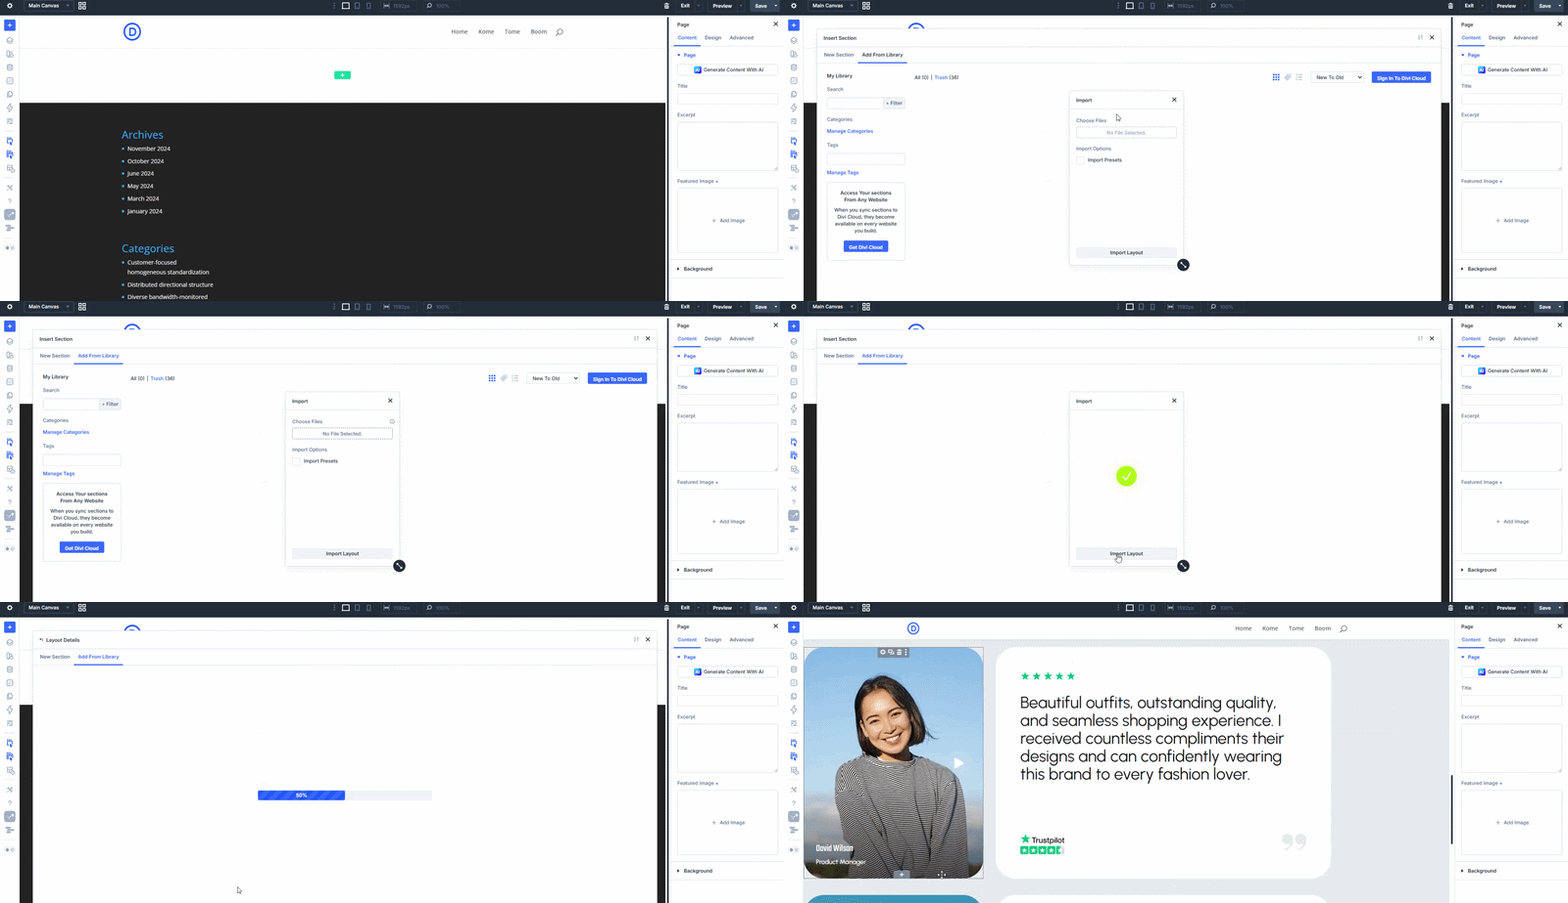
- Open your page with the Divi Visual Builder.
- Click the + icon at the bottom of the page canvas to add a new section.
- Select Add From Library > Import.
- Upload the downloaded layout file, check Import Presets, and click Import Layout Section.
- Once imported, select the layout from the library and click Use This Section.
Note: You can also import the layout directly into the Divi Library.
Step 3: Customize the content
Now replace the demo content with your own images, icons, titles, descriptions, and other elements.
Step 4: Adjust the scroll settings
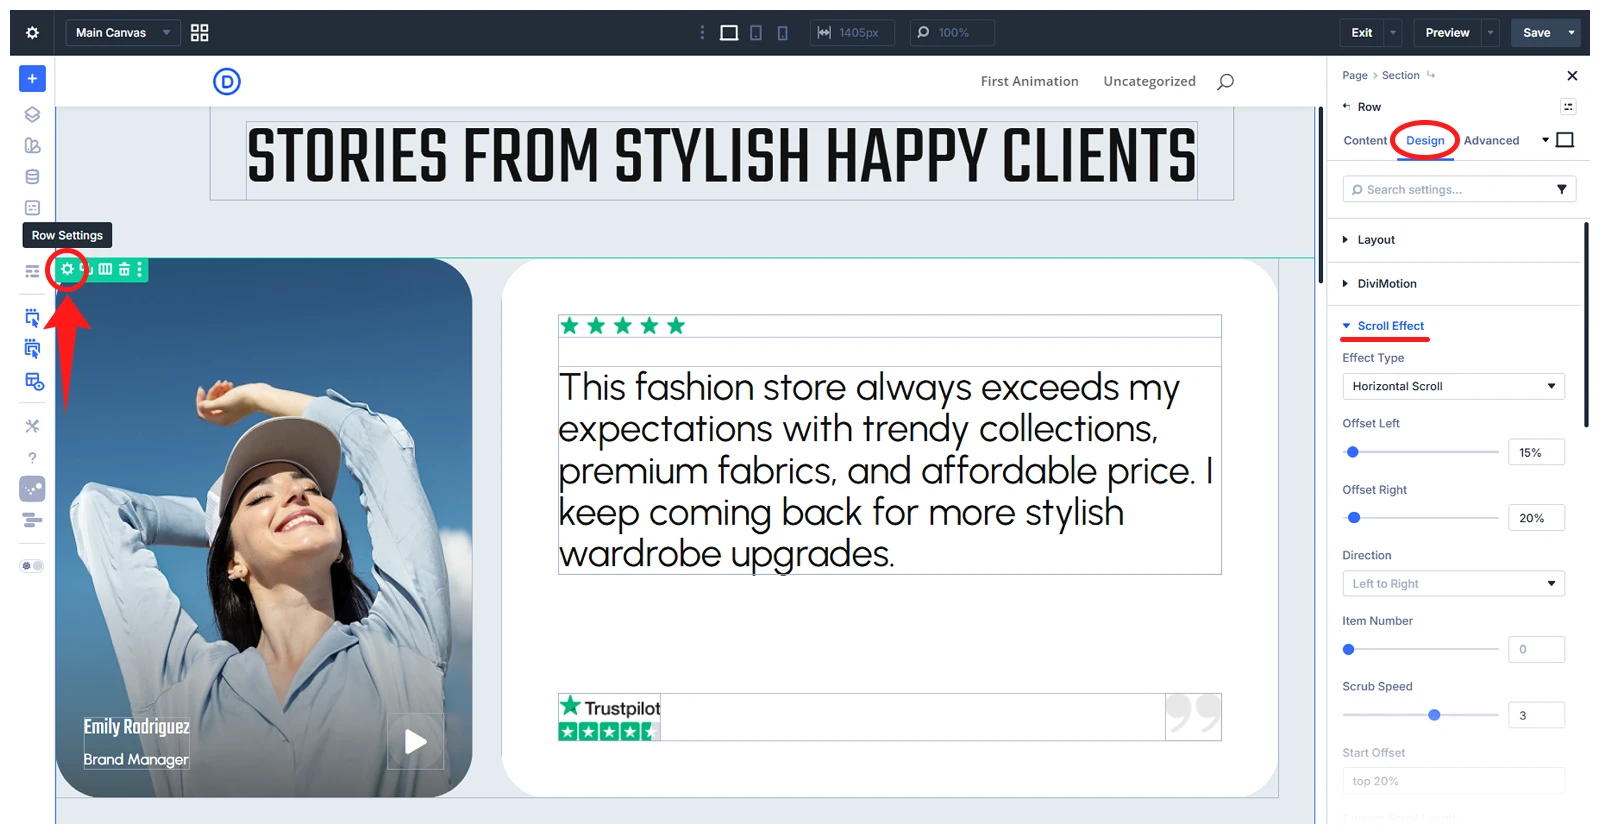
Click the section, row, column or module where the animation is applied. Then go to: Design > Scroll Effect and adjust the horizontal scroll behavior based on your design needs.
Step 5: Preview and Save
After adjusting the scroll settings, save the page and preview it on the front end.
Approach 2: Create a Horizontal Scrolling Effect from Scratch
Here we will recreate the same horizontal scrolling section from scratch so you can understand how DiviMotion works.
Let’s get started:
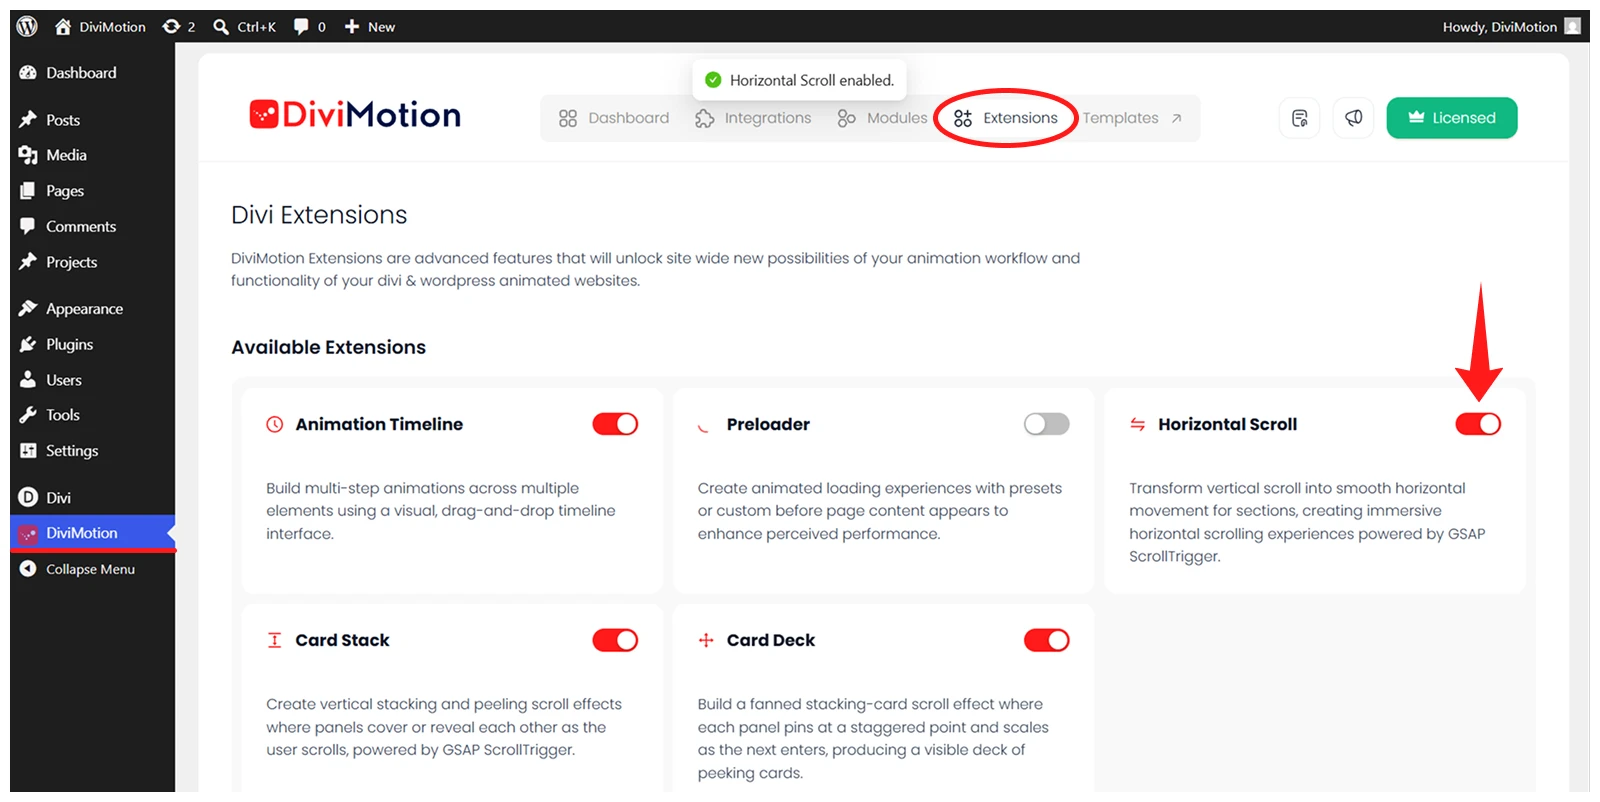
Step 1: Activate the Horizontal Scroll Extension
Before creating the effect, you need to enable the Horizontal Scroll extension. The feature is disabled by default.
To enable it:
- From your WordPress dashboard, click on DiviMotion > Extension.
- Enable the Horizontal Scroll extension.
Step 2: Build the Section Layout & Add Content
- Open your page in the Divi Visual Builder
- Click on add new section button (+) to add row and column (Our design has a single row with 4 columns and they act as horizontal scroll items.)
- Inside each column, add the content modules. (Our design has text, icons, images, and group modules for each column.)
- Now customize the section, row, columns, and modules to match your design.
To understand the exact settings used in the demo layout, download and import it to any page. Then open it in the Divi Visual Builder and inspect the configuration directly.
Note: You don’t need to create a new section from scratch every time. You can also apply horizontal scroll effects to any existing section, row, or column.
Step 3: Enable Horizontal Scroll Animation
Before enabling the effect, keep in mind that DiviMotion applies horizontal scroll animations only to parent-level elements, such as sections, rows, and columns.
To enable the animation:
- Select the section, row, or column that contains your horizontal scroll content
- Go to Design > Scroll Effects
- Select Horizontal Scroll
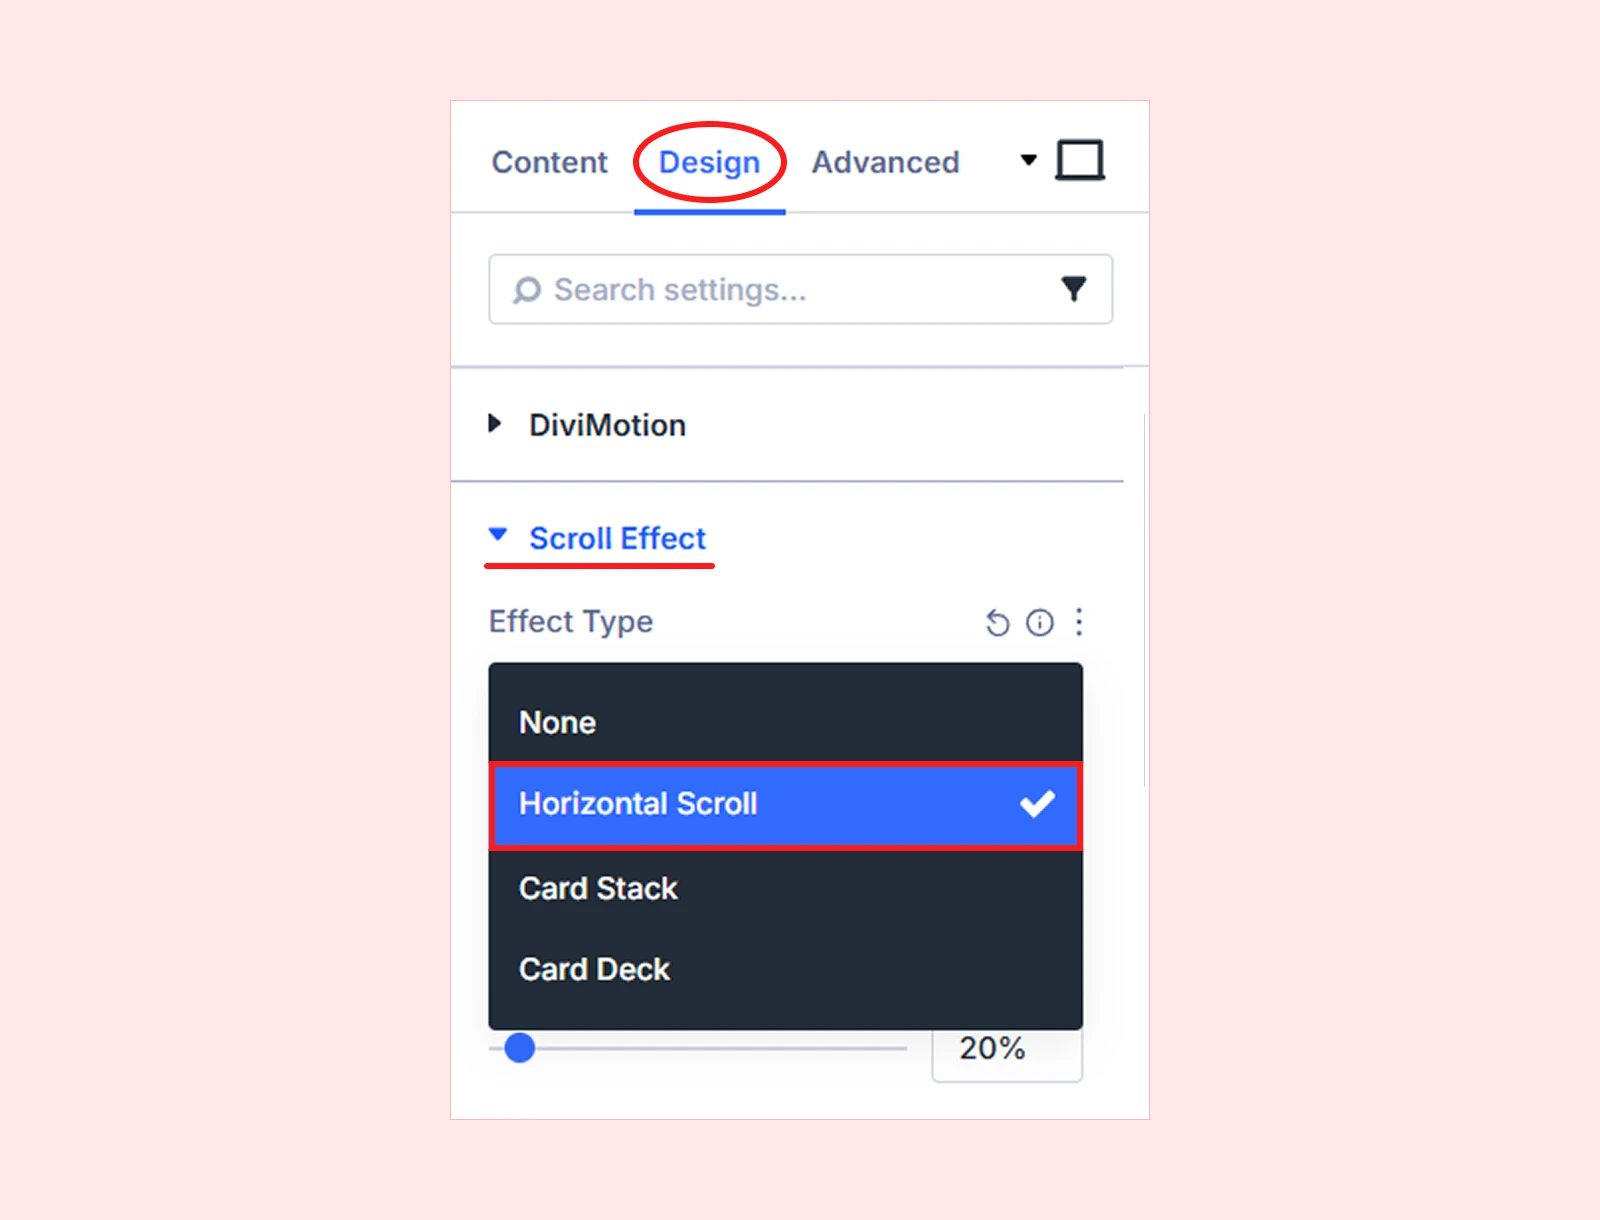
Once enabled, you can configure the animation settings in the next step.
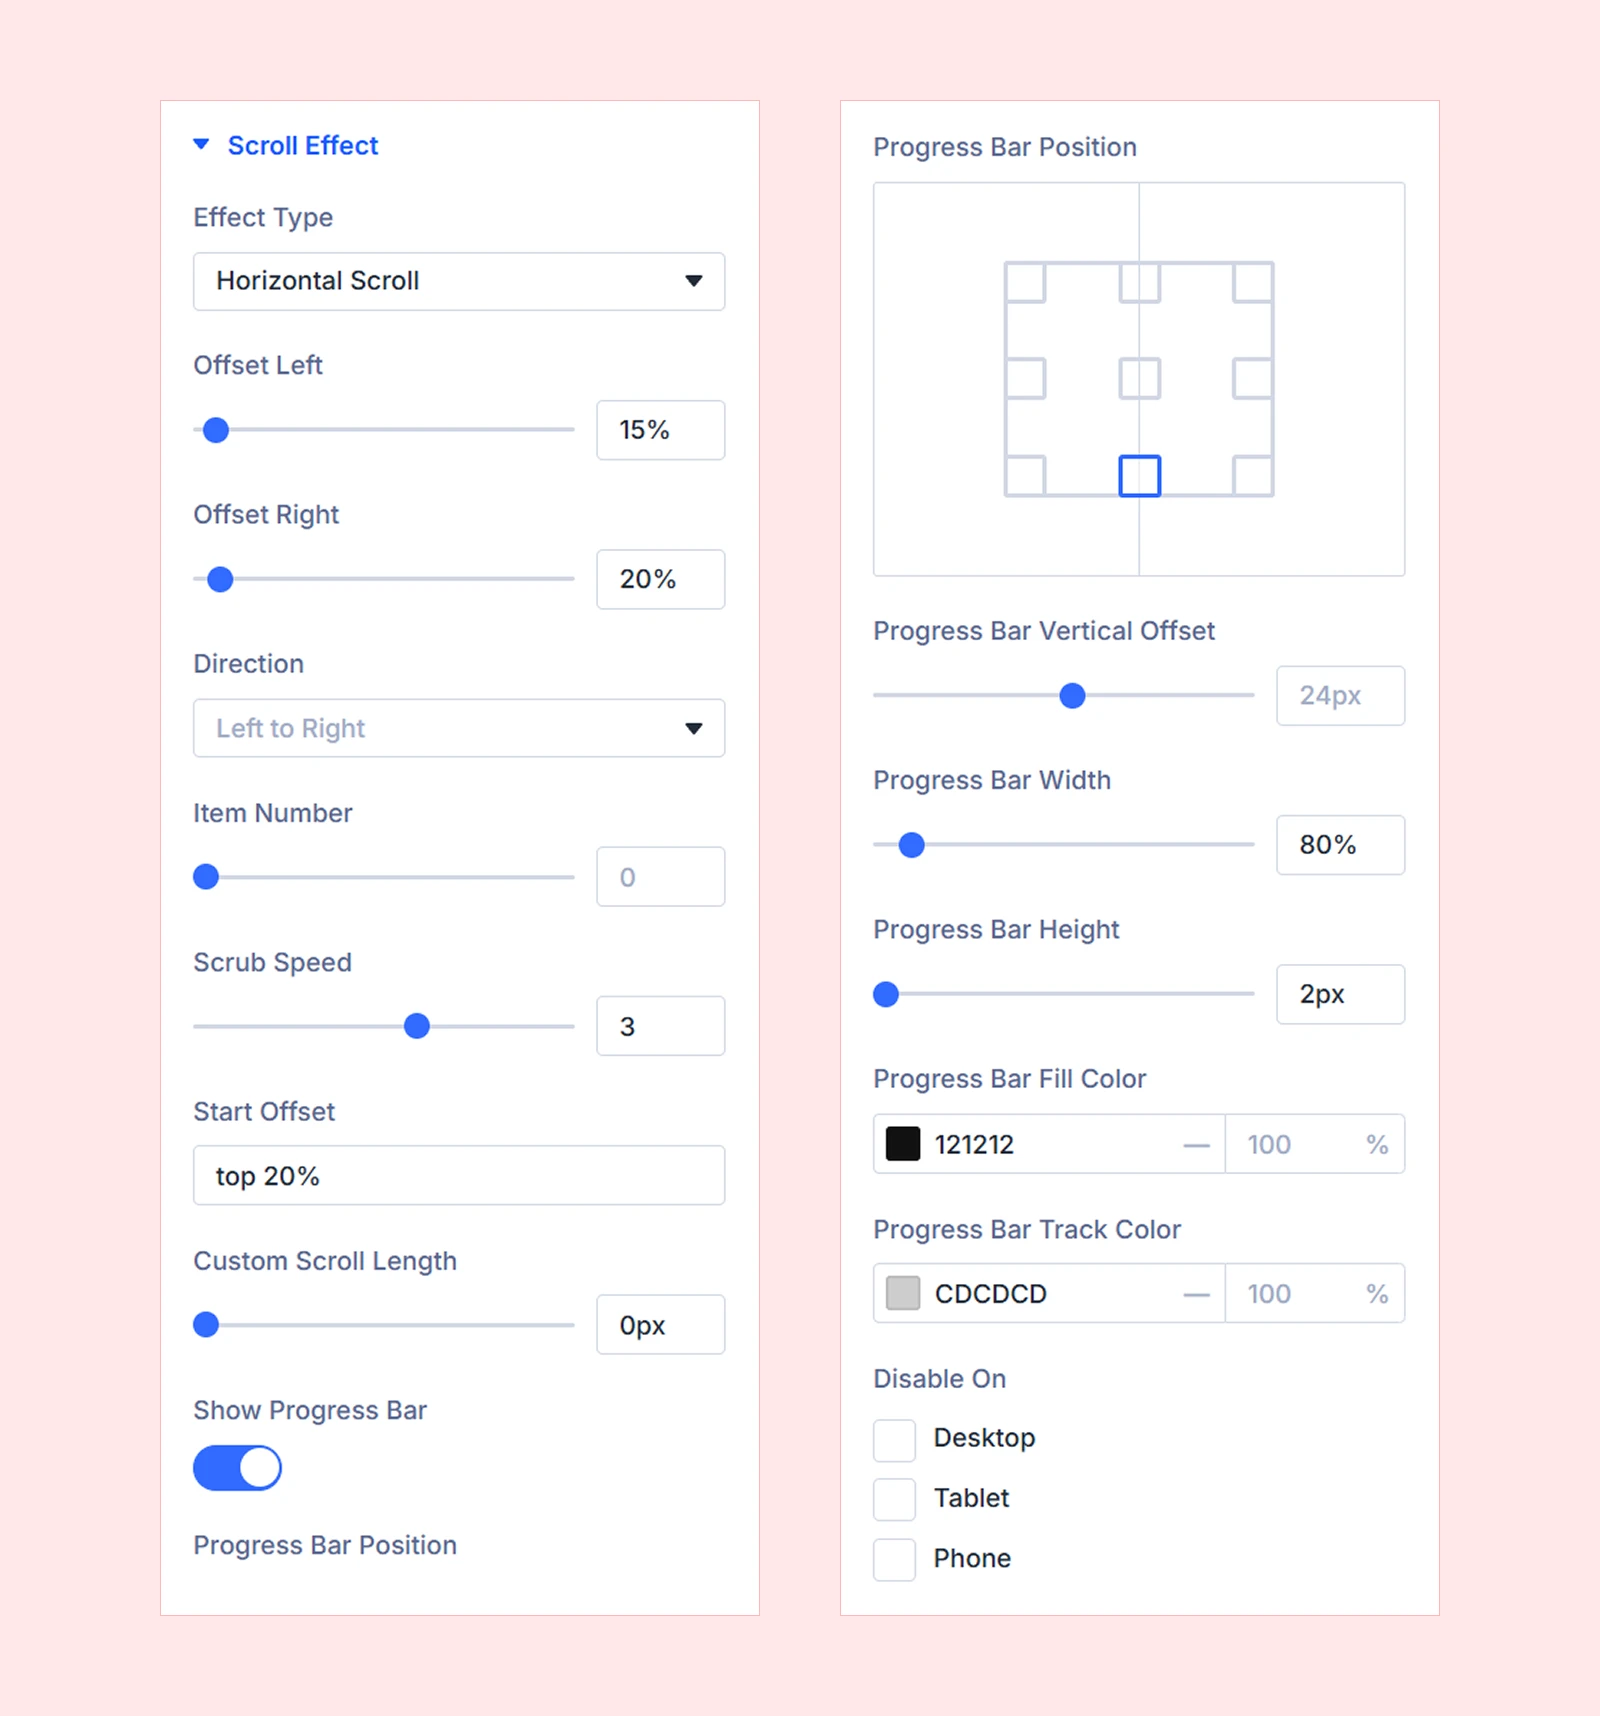
Step 4: Configure the Scroll Animation
To create a result similar to our demo design, configure the following settings that you will find after selecting Horizontal Scroll.
- Offset Left: 15%
- Offset Right: 20%
- Scrub Speed: 3
- Start Offset: Top 20%
- Show Progress Bar: Enable it, which will bring the following settings:
- Progress Bar Position: Bottom center
- Progress Bar Width: 80%
- Progress Bar Fill Color: 121212
- Progress Bar Track Color: cdcdcd
Step 5: Preview the Section
Save the page and preview it on the front end. Your content should now scroll horizontally as visitors move down the page.
Note: Besides the extension, you can also add horizontal scrolling effects using DiviMotion’s Scroll Trigger interactions. To learn more, check out the Scroll Trigger Interaction doc.
Method 2: Add Horizontal Motion with Divi’s Built-in Settings
Divi 5 includes a Scroll Effects feature that lets you move elements horizontally as users scroll down the page. While it creates a horizontal motion effect, it is not a true horizontal scrolling layout. Instead, it adds a simple side-to-side movement to make your design more dynamic.
Here is how to apply it step by step:
Step 1: Select the Element
Open your page with the Divi Visual Builder. Select the section, row, column, or module where you want to add the horizontal effect.
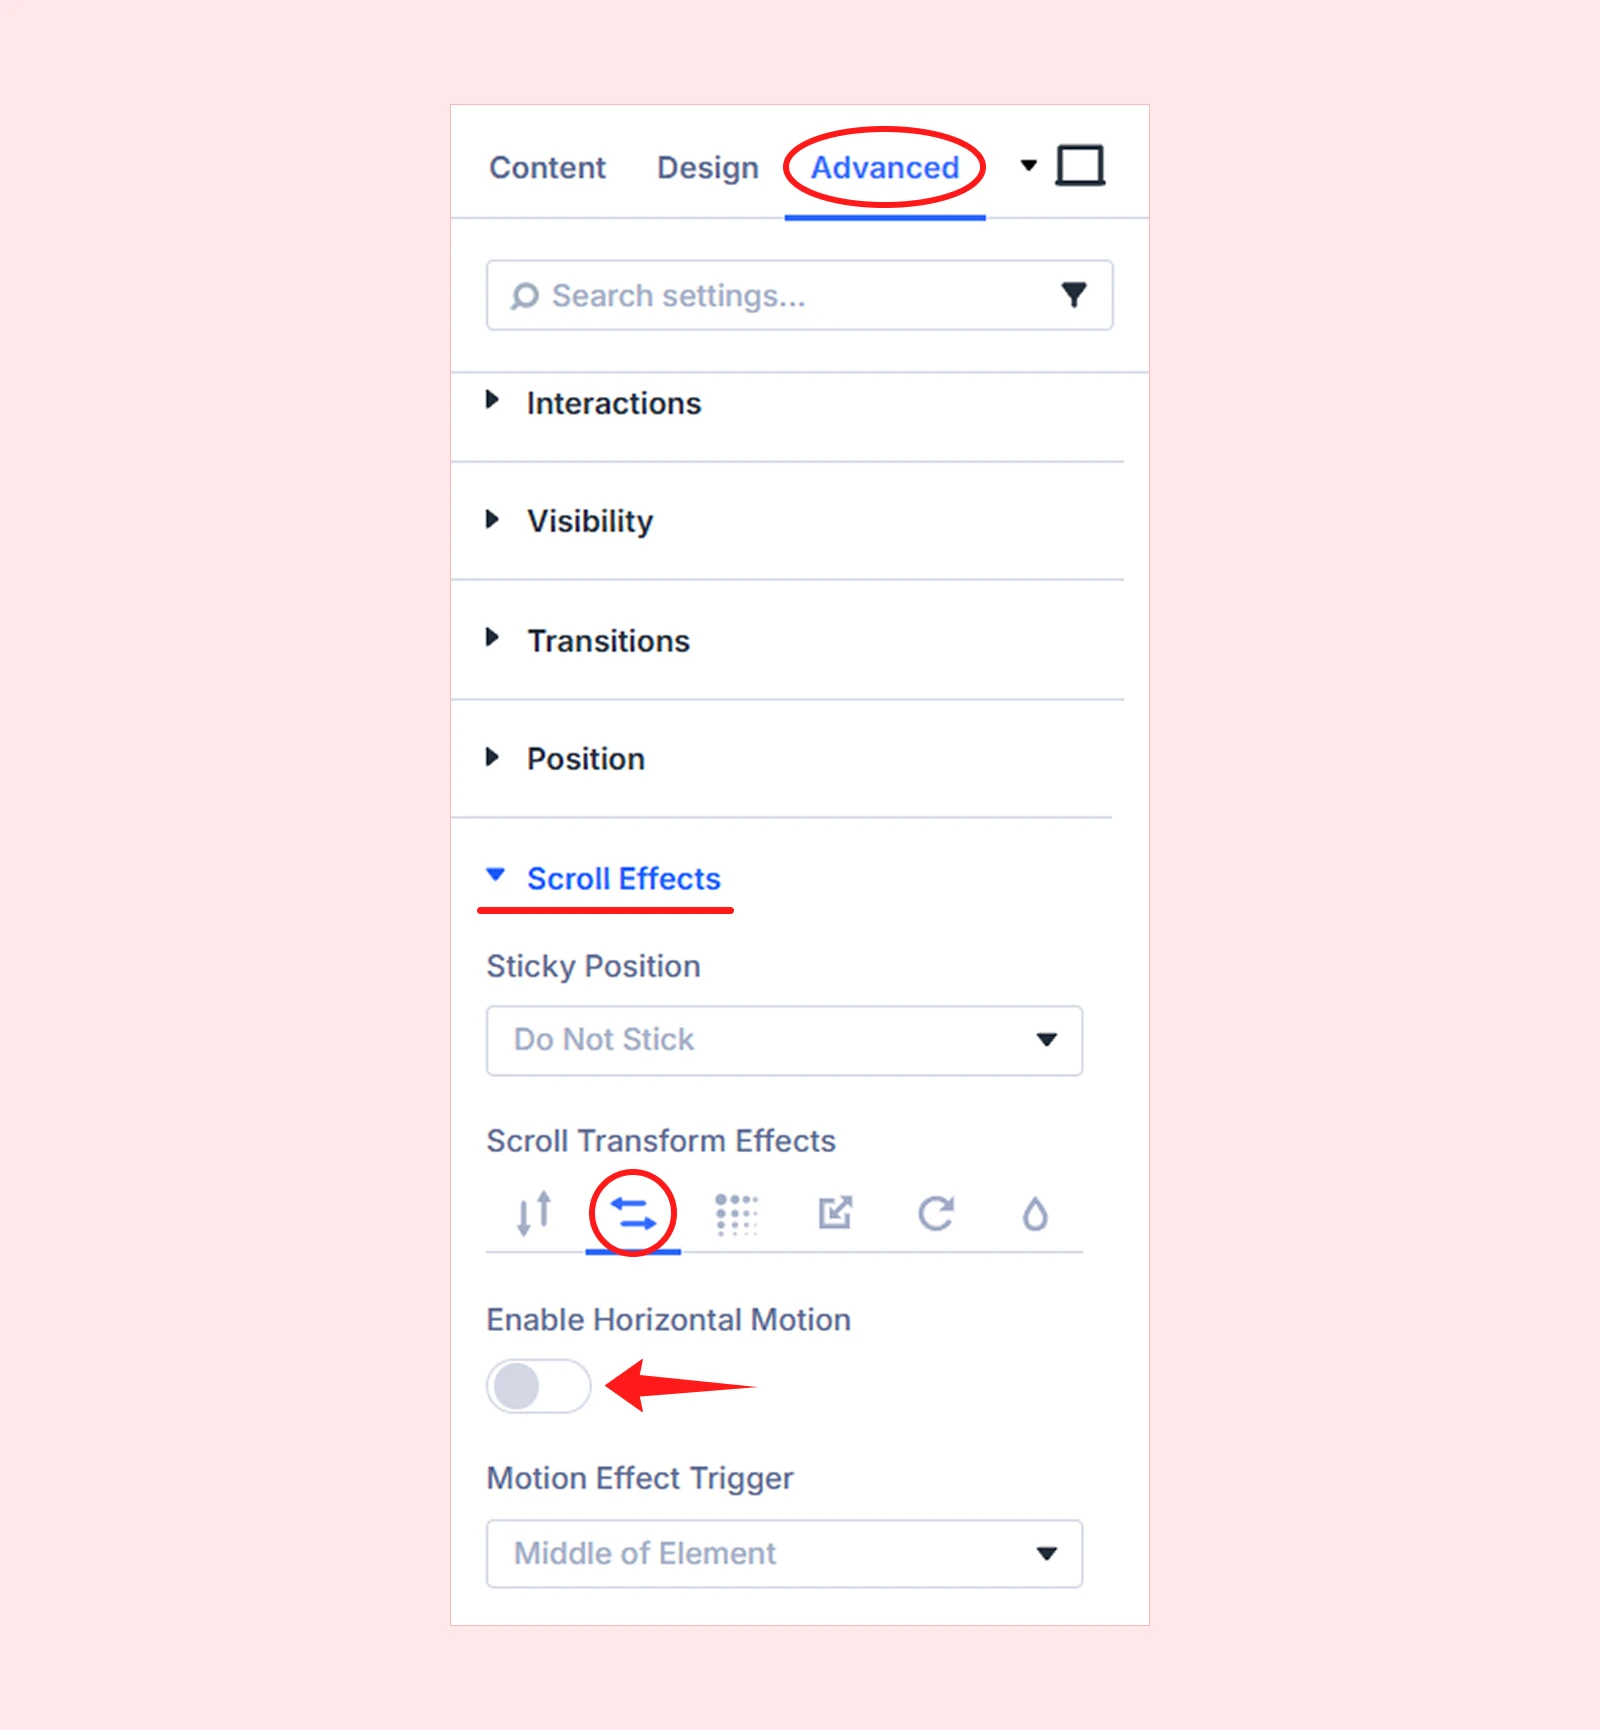
Step 2: Open Scroll Effects and Enable Horizontal Motion
- Go to Advanced > Scroll Effects
- Click on Horizontal Motion option
- Then enable Horizontal Motion
Step 3: Set Horizontal Motion Values
After enabling Horizontal Motion, adjust the offset and viewport controls.
- Starting Offset: Position when the element enters the viewport
- Mid Offset: Position when the element reaches the middle
- Ending Offset: Position when the element leaves the viewport
- Viewport controls: Decide when the animation starts, reaches the middle, and ends
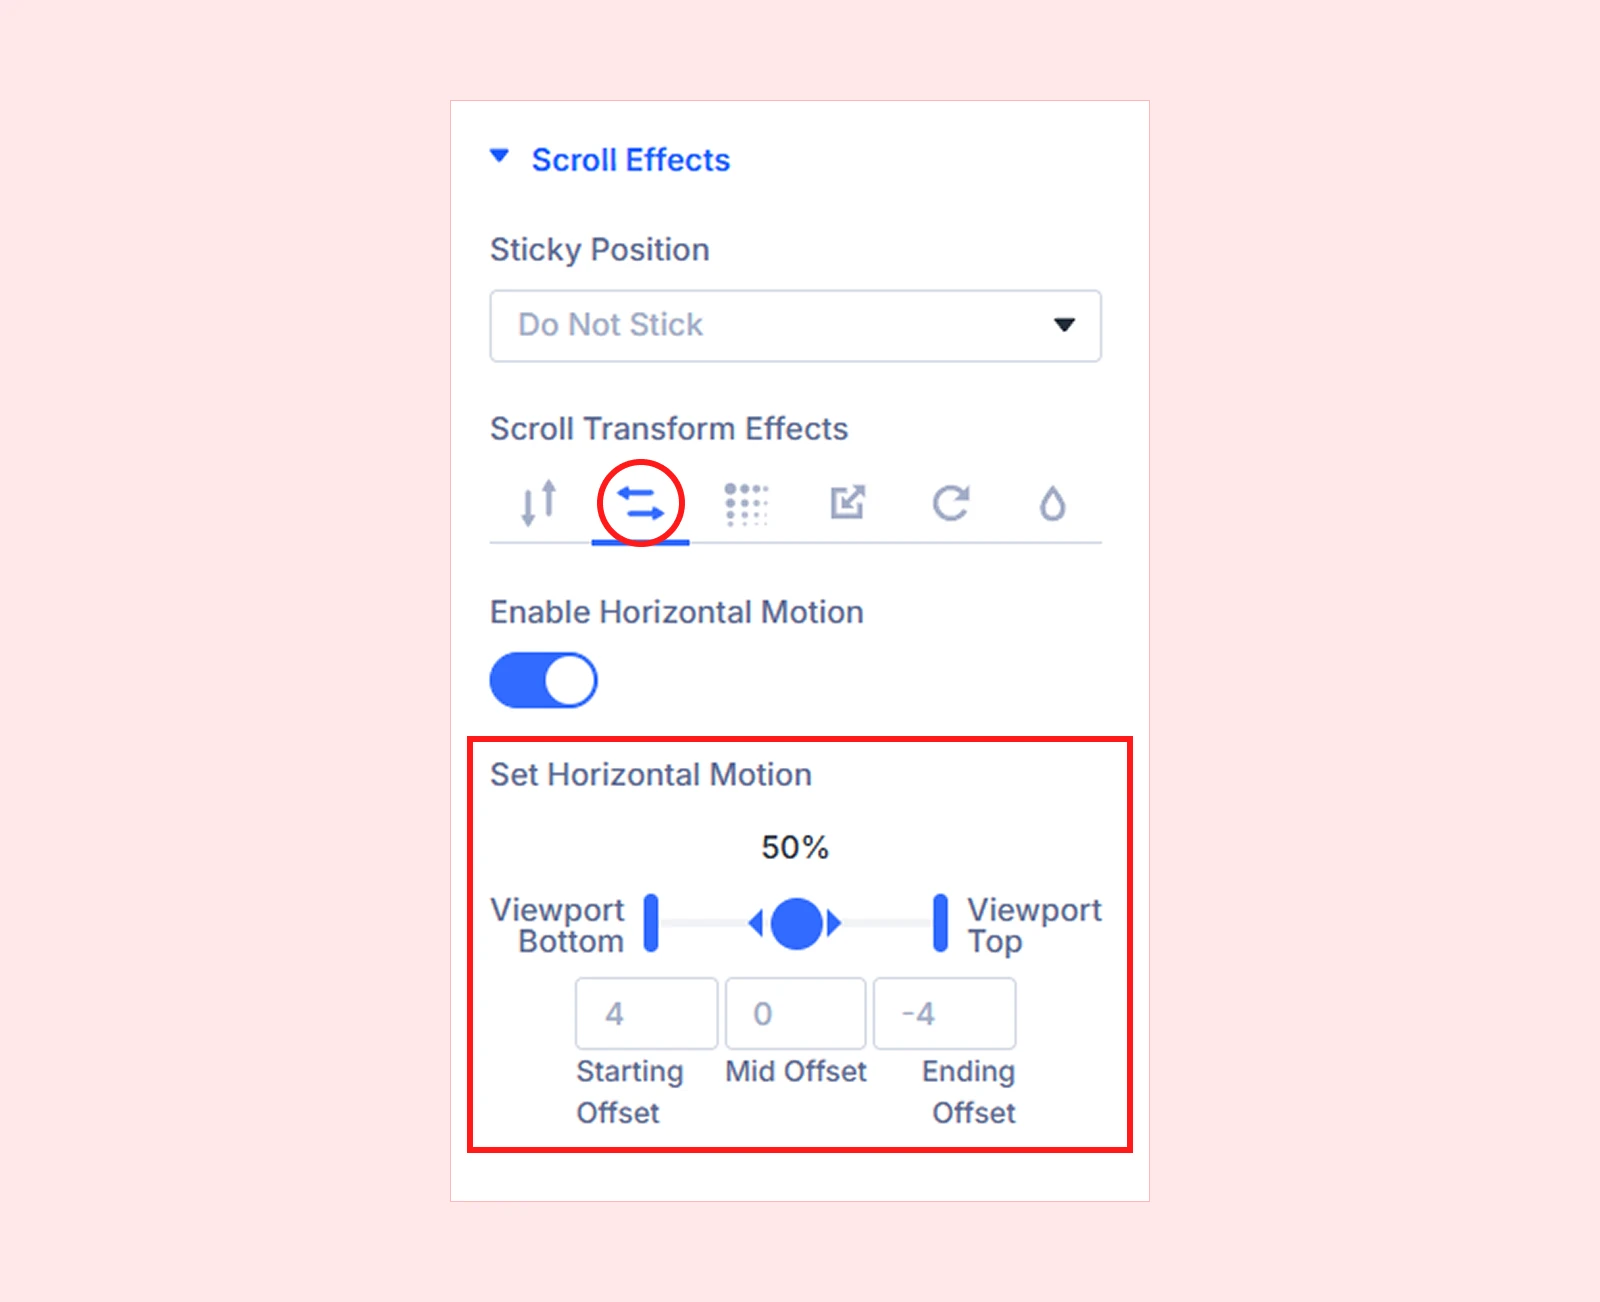
You can drag the sliders or enter values manually to control the movement.
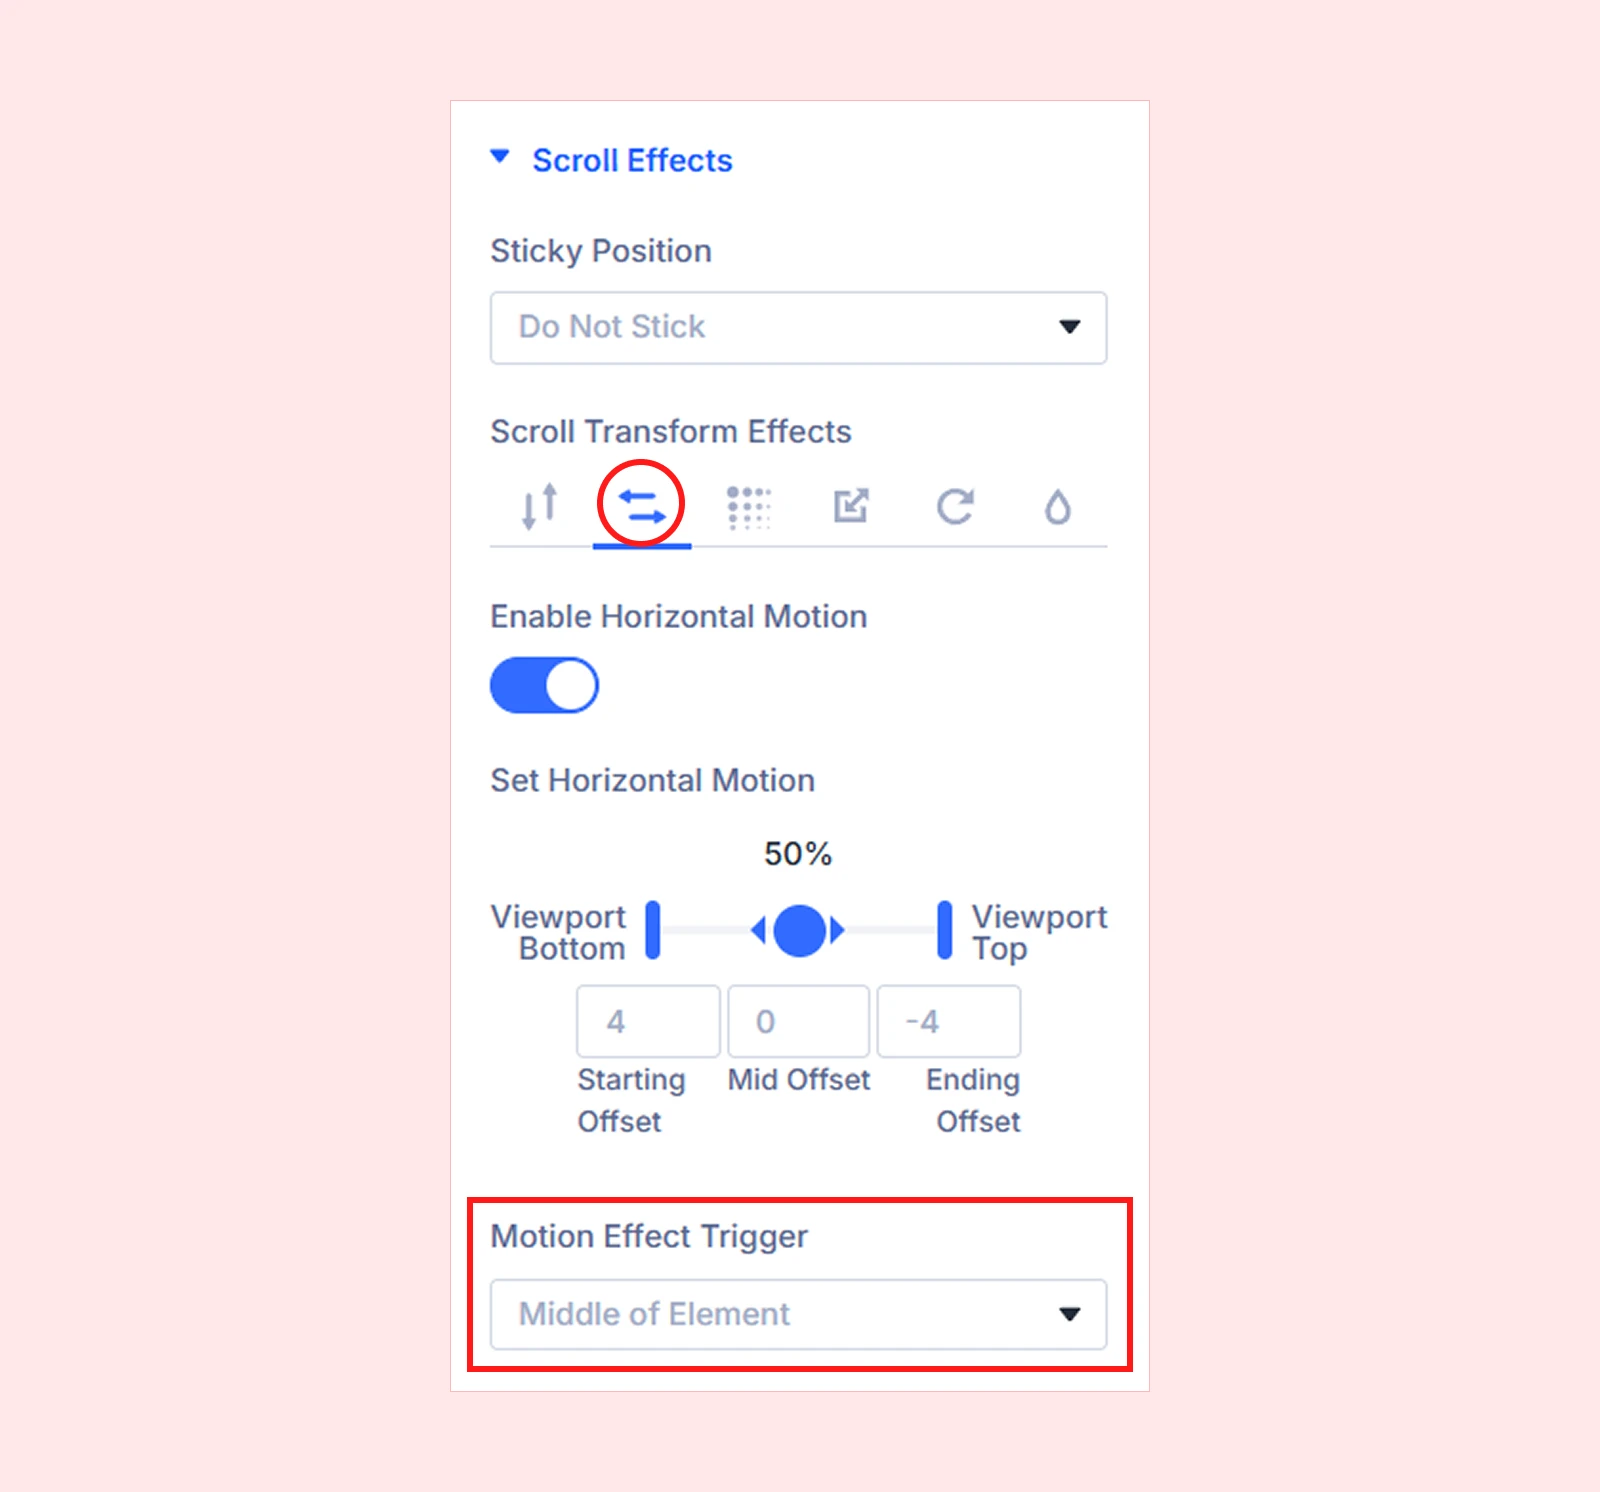
Step 4: Set the Motion Effect Trigger
Next, choose the Motion Effect Trigger. This setting controls which part of the element activates the scroll motion. And available options are:
- Middle of Element
- Top of Element
- Bottom of Element
Step 5: Preview and Save
Save the page and preview it on the front end.
Final Thoughts: Which Method to Follow?
If you only need a simple left or right movement, Divi’s built-in Horizontal Motion setting is enough. It’s quick, easy, and works well for basic parallax-style effects.
But if you want a real horizontal scrolling section with smoother movement, pinned content, progress control, and scroll-based animation, you will need a WordPress animation plugin DiviMotion.
So, start with your design goal first. Use Divi’s built-in settings for simple motion, and use DiviMotion when you need more advanced horizontal scroll effects.
Also, if you are interested in adding different scroll effects in Divi besides horizontal scroll, you can check our guide on: how to add scrolling effects to divi website and how to add vertical scrolling effect in Divi.



0 Comments