


You can add vertical scrolling effects in Divi in two ways: use Divi’s built-in Vertical Motion setting, or use the DiviMotion plugin.
Divi’s default option lets you move a section, row, column, or module upward or downward as visitors scroll through the page. The process is simple, and so is the result.
DiviMotion gives you complete control over how the animation starts, ends, and responds to scrolling. You can create smooth vertical movement, scroll-linked reveals, pinned sections, staggered content, and more.
In this guide, we will show you how to add vertical scrolling effects to a Divi website using both DiviMotion and Divi’s built-in settings.
Our Created Vertical Scrolling Effect Preview

Required Setup
Before starting, make sure you have the following:
- The latest version of Divi 5 is installed
- DiviMotion installed and activated (For Method 1)
Method 1: Create Vertical Scrolling Effects with DiviMotion
DiviMotion provides two flexible ways to add vertical scrolling effects in Divi:
- Use DiviMotion’s ready-made section layouts
- Build the vertical scrolling effect from scratch
We will cover both approaches step by step.
Approach 1: Create a Vertical Scrolling Effect using Pre-designed Layouts
DiviMotion includes many pre-designed layouts for creating vertical scrolling effects. You can download a template, import it into the Divi Visual Builder, and replace the demo content with your own.
Here is how to do it:
Step 1: Download a Template
- Visit the DiviMotion Vertical Scroll Animation Examples page.
- Choose the template you prefer and click the Download button.

Step 2: Import the Template into Divi
- Open your page with the Divi Visual Builder.
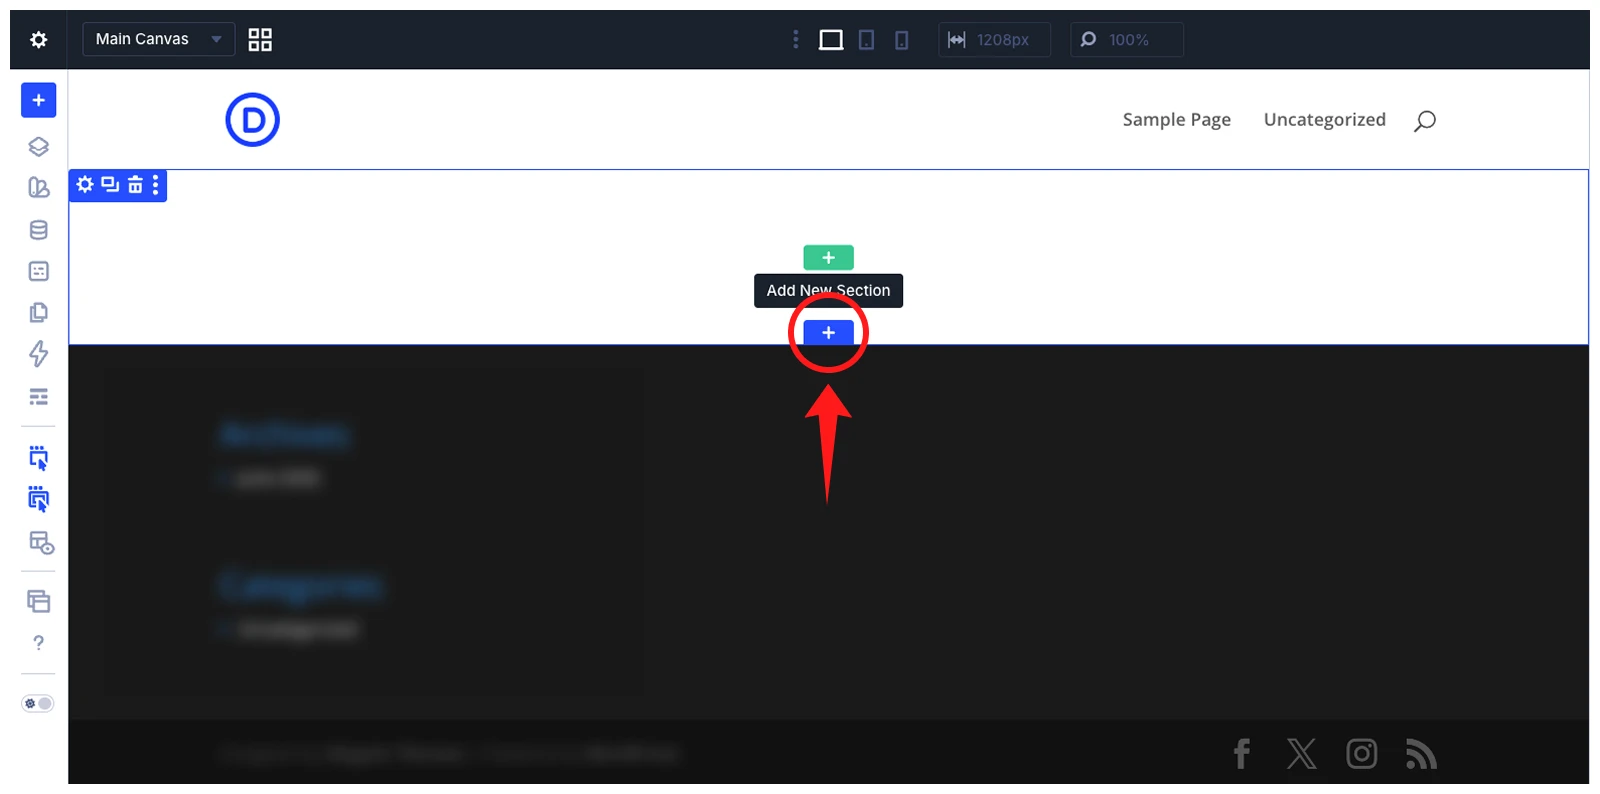
- Click the + icon and select Add from Library.
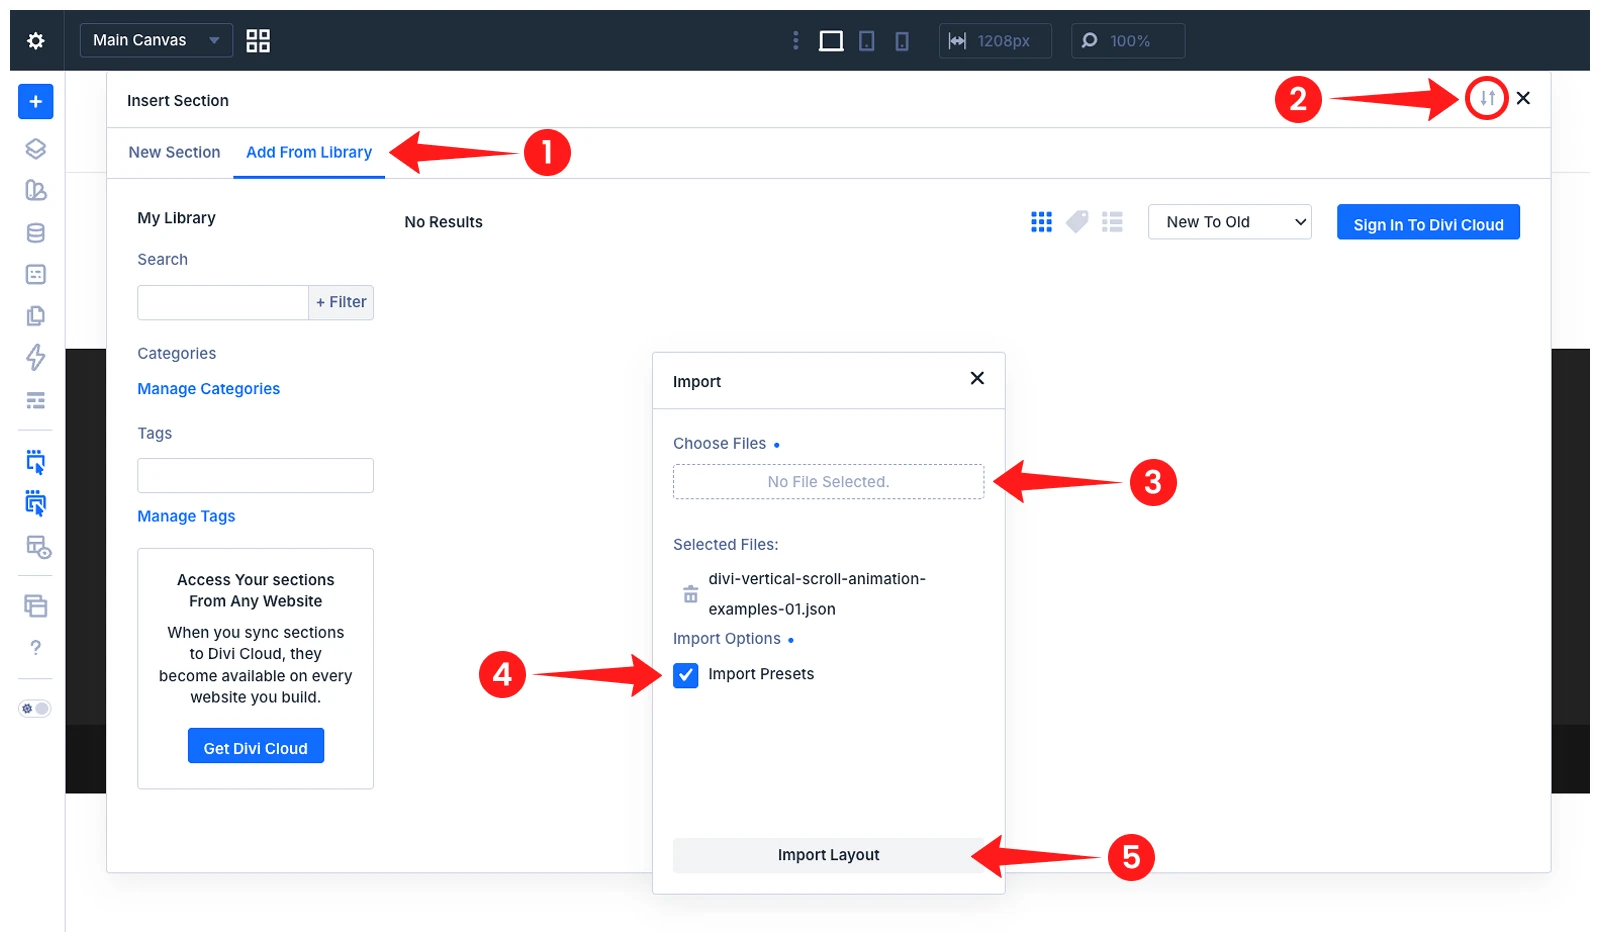
- Click Import, choose the downloaded layout file, and check Import Presets.
- Click Import Layout.
- Once imported, select the layout from the library and click Use This Section.
Note: You can also import the section layout into the Divi Library. After importing it, you can use the layout on any page through Add from Library.
Step 3: Customize the content
Replace the demo content with your own images, titles, descriptions, button text, links, and other elements.
Step 4: Adjust the scroll settings
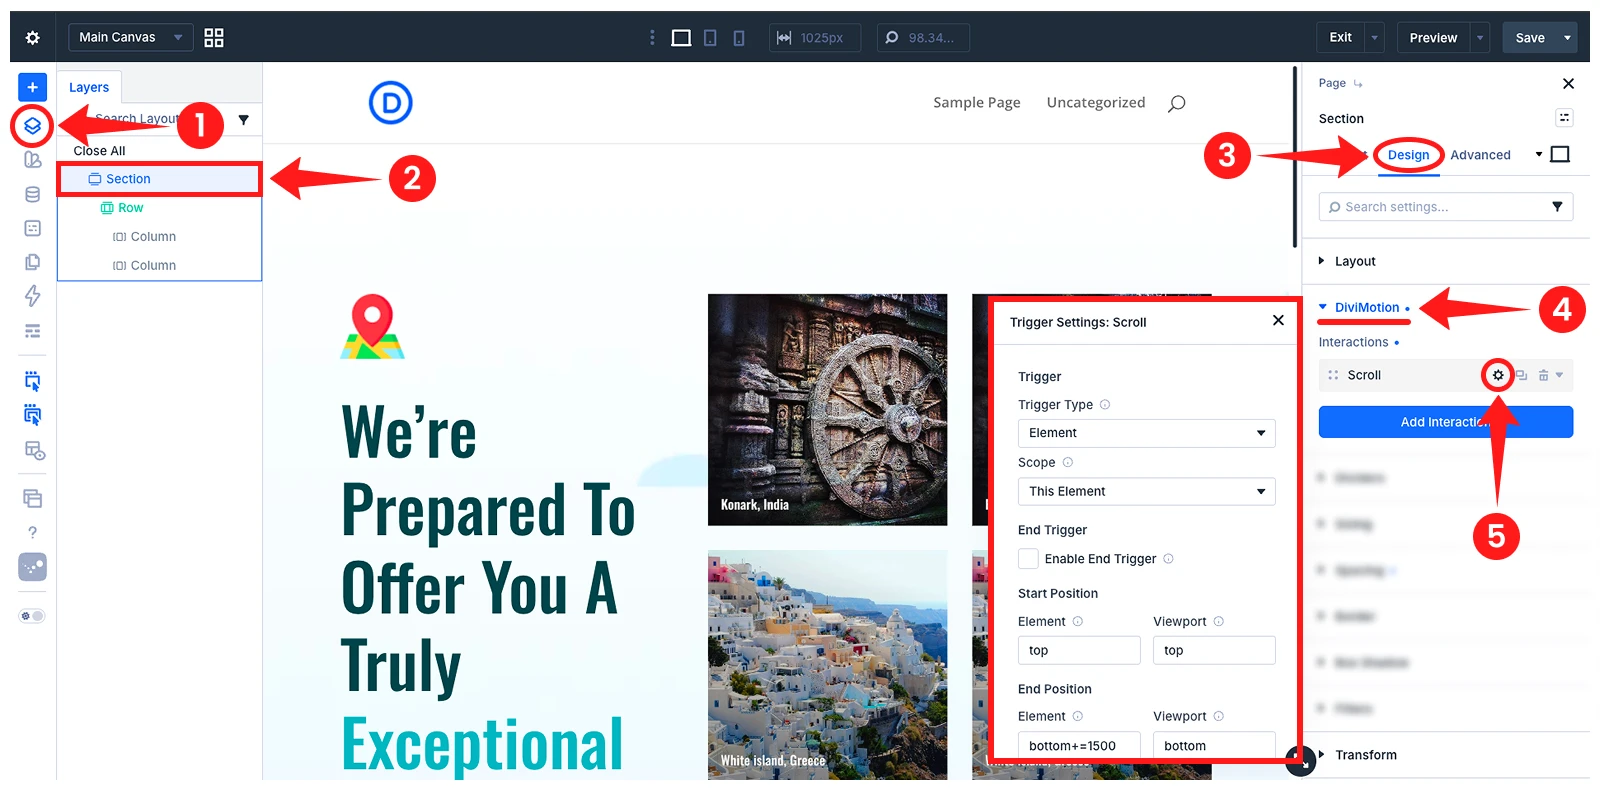
To customize the vertical scroll settings, select the section, row, column or module where the animation is applied. In our example, the animation is applied to the section.
Go to Design > DiviMotion > Scroll, then adjust the vertical scroll behavior and animation actions based on your design needs.
Step 5: Preview and Save the changes
After adjusting the content and scroll behavior, save the page and preview it on the front end.
Approach 2: Create a Vertical Scrolling Effect in Divi from Scratch
Now, we will recreate the same vertical scrolling effect from scratch. This will help you understand how DiviMotion works and how to create your own custom vertical scrolling effects.
First, we will explain the layout structure so you can understand how it is built and where the animations are applied.
Step 1: Understand the Section Layout and Animation Structure
Before adding the vertical scrolling effect, let’s understand the section structure of our demo design:
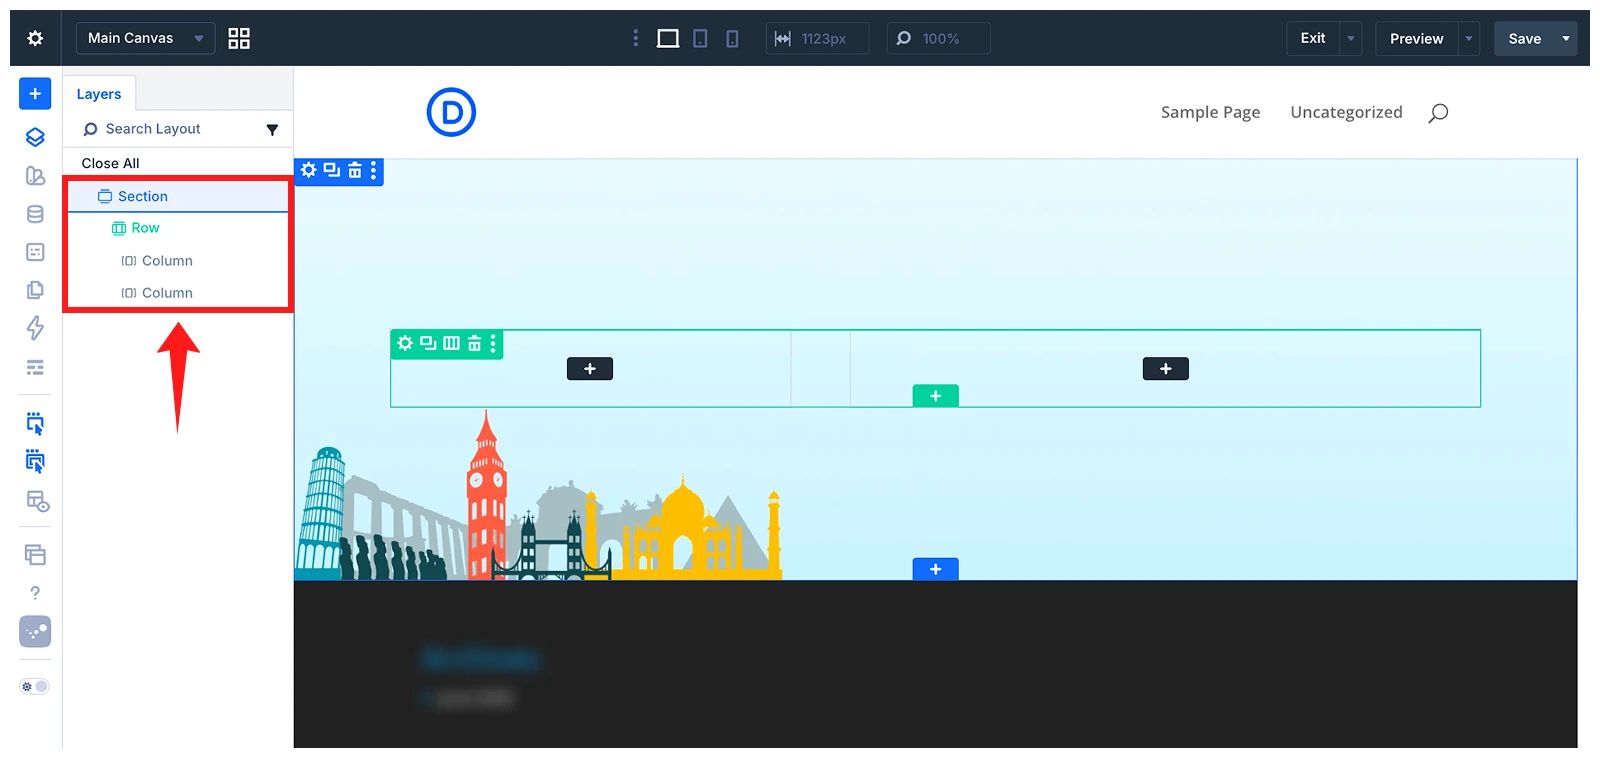
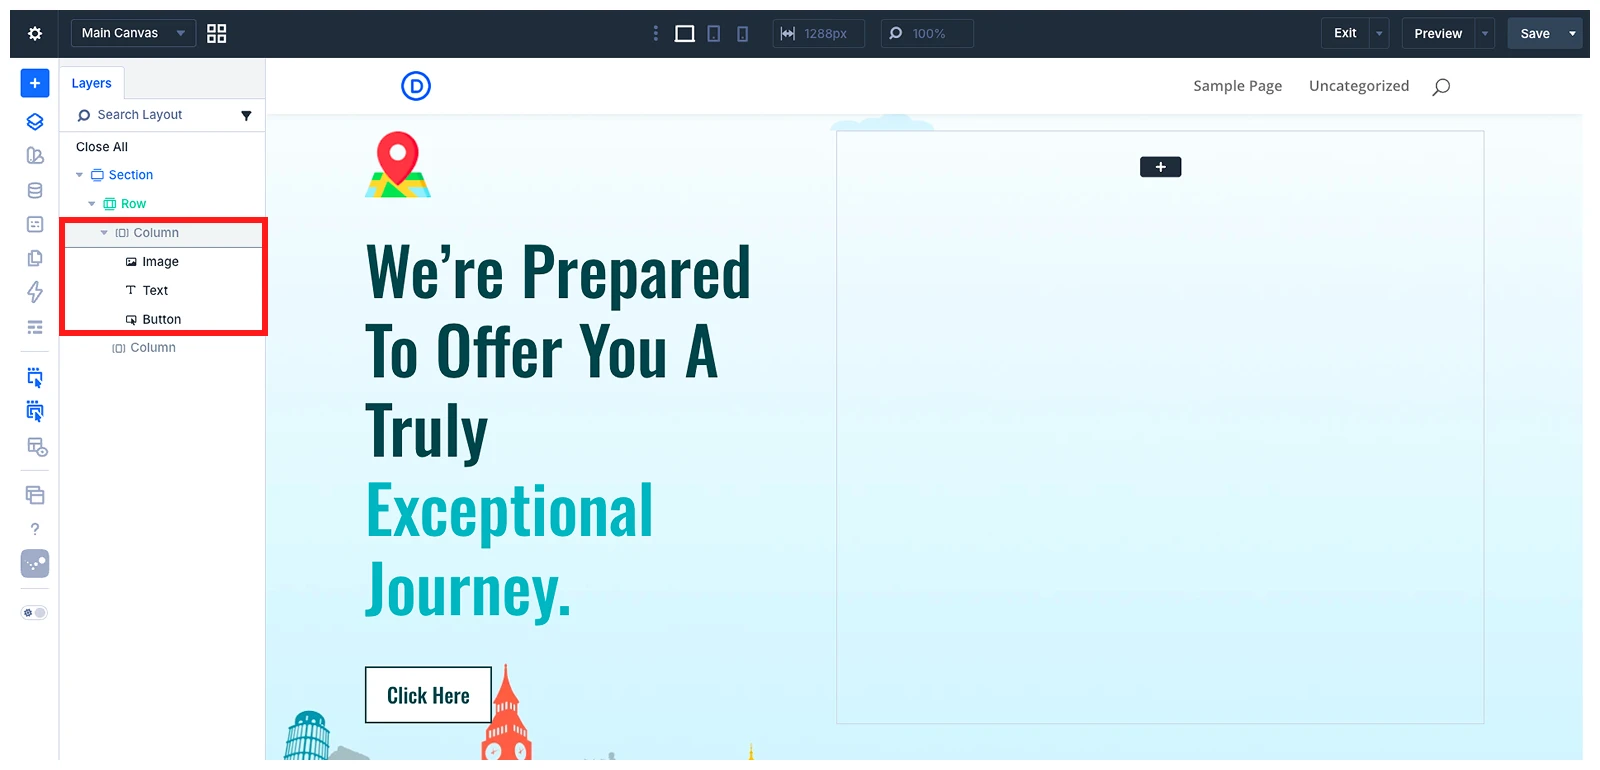
- The section contains one row with two columns.
- The first column includes an Image, Text, and Button module for the main content.
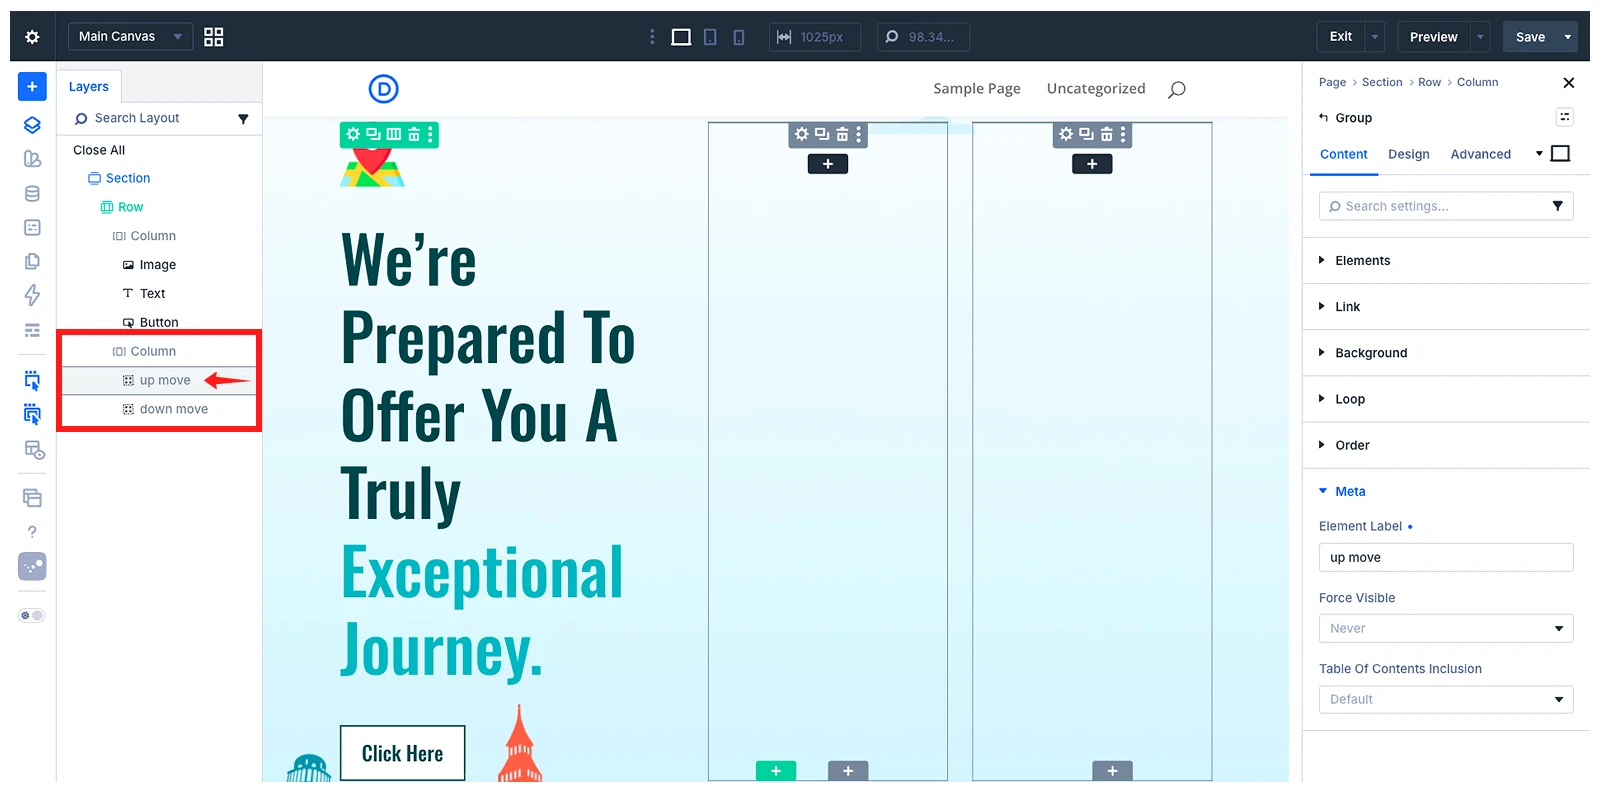
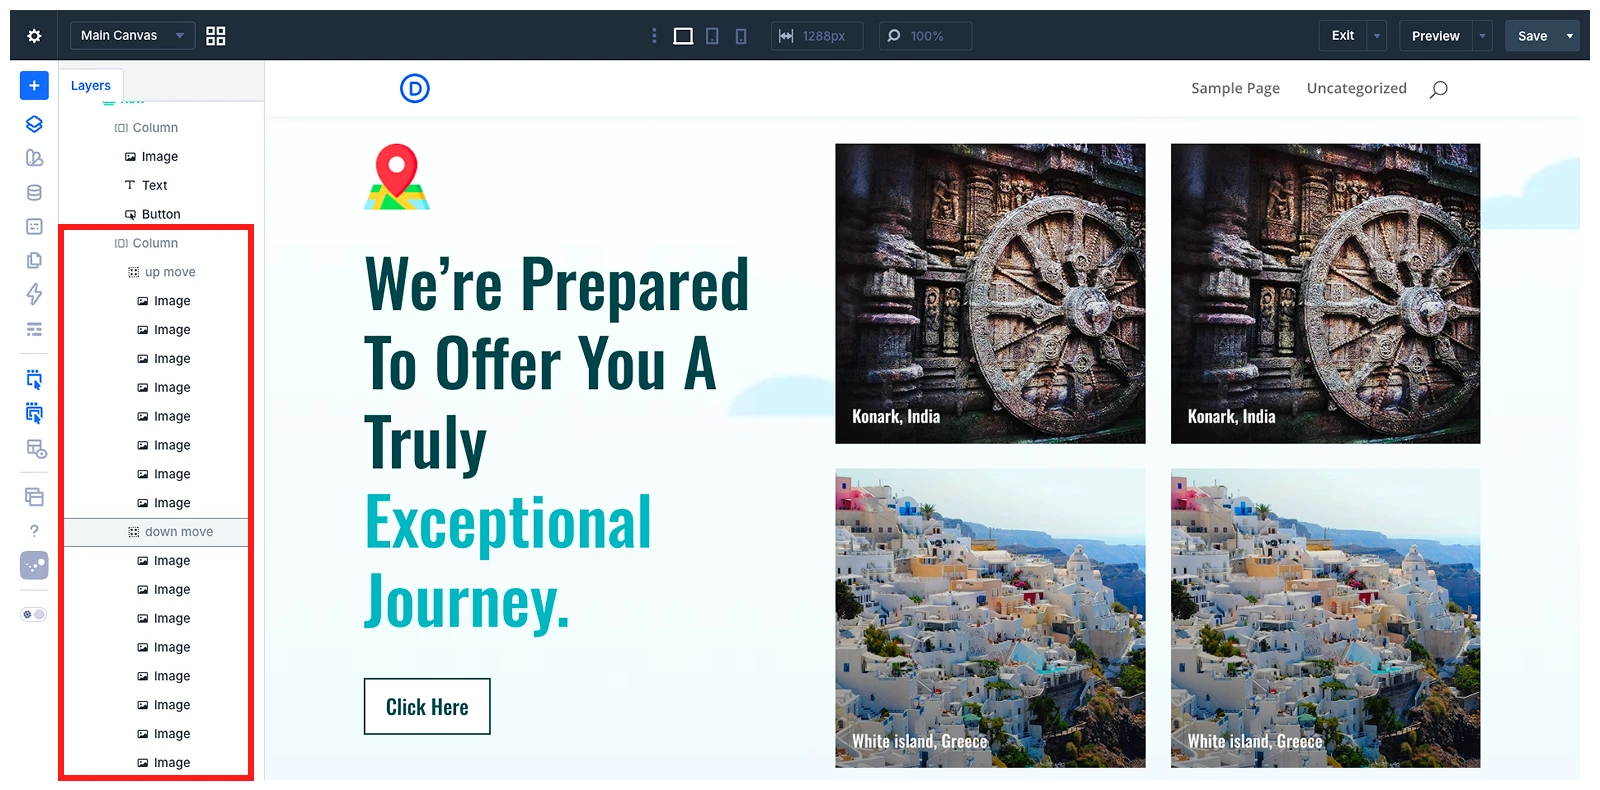
- The second column contains two Group modules. Each Group contains 9 Image modules arranged vertically.
Step 2: Build the Layout and Add the Content
Add the Section and Row
- Open your page using the Divi Visual Builder
- Add a regular section and set a section background
- Insert a two-column row
- Adjust the spacing
Set Up the First Column
- Add an Image module
- Add a Text module
- Add a Button module
- Replace all placeholder content (Text, Image, Button Link) with your own
Create Group Modules in the Second Column
- Add two Group modules in the second column
- To display them side by side, open the second column settings, navigate to Design > Layout > Layout Style, set it to Flex, and choose Row as the Layout direction.
- Open each Group module and go to Content tab > Meta > Element Label.
- Rename them Move Up and Move Down for easy identification
Add Images to Each Group
- Insert Image modules inside each Group module
- Duplicate image modules to save time
- Replace each image with your own
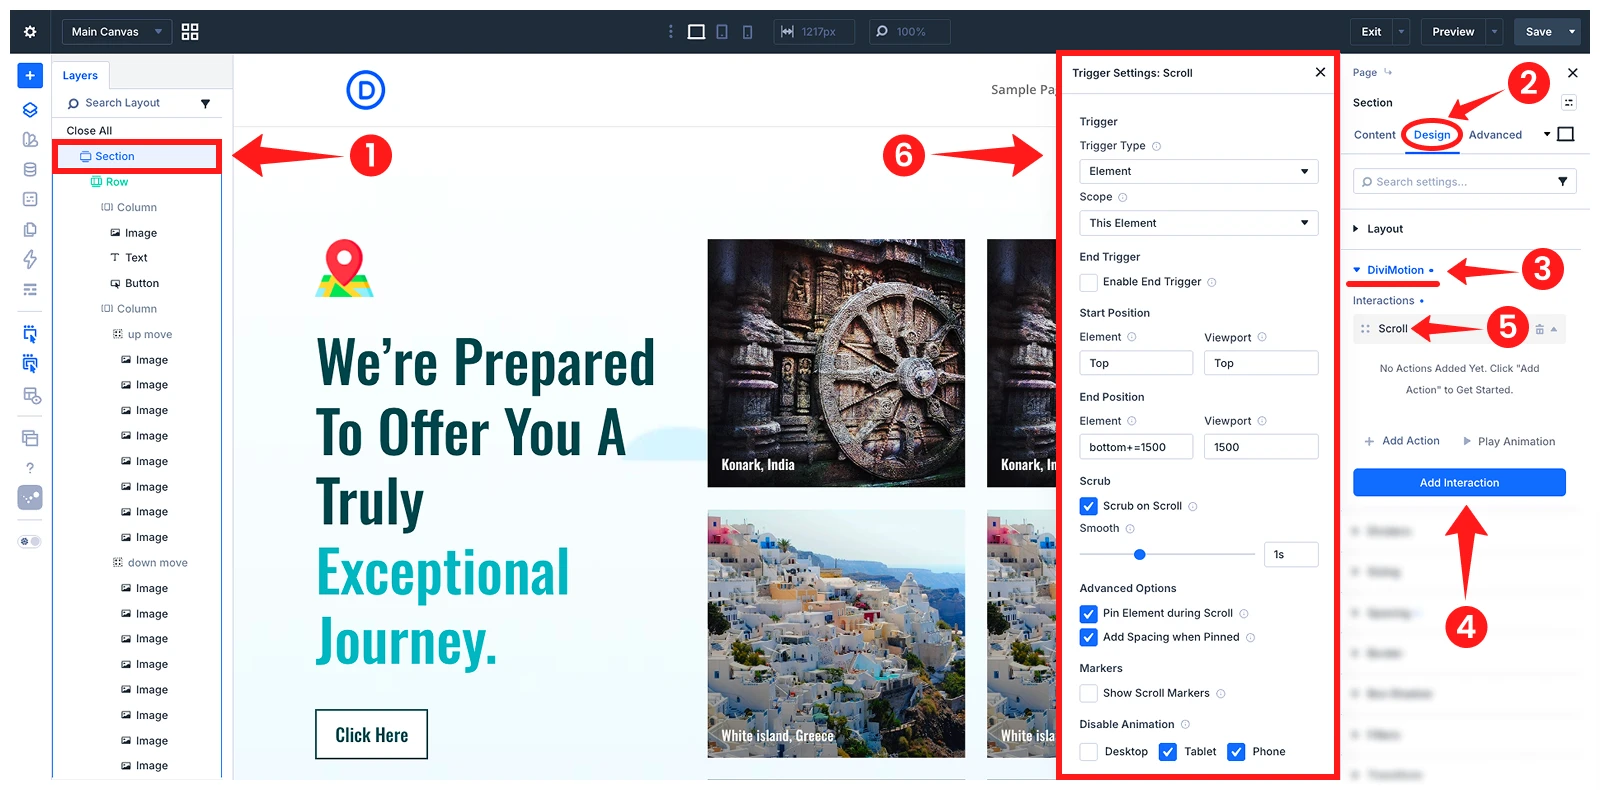
Step 3: Add the Scroll Interaction
- Open Section Settings to select the entire section.
- Go to Design > DiviMotion > Add Interaction.
- Choose On Scroll as the interaction.
- Open Trigger Settings and configure the following options:
- Start Position:
- Element: Top
- Viewport: Top
- End Position:
- Element: bottom+=1500
- Viewport: bottom
- Scrub:
- Scrub on Scroll: Check this
- Smooth: 1 sec
- Advanced Options:
- Pin Element during Scroll: Check
- Disable Animation: On Tablet and Phone
- Start Position:
Step 4: Add the Animation Actions
Now, we will add separate actions for the Move Up and Move Down Group modules.
Add the Move Up Action
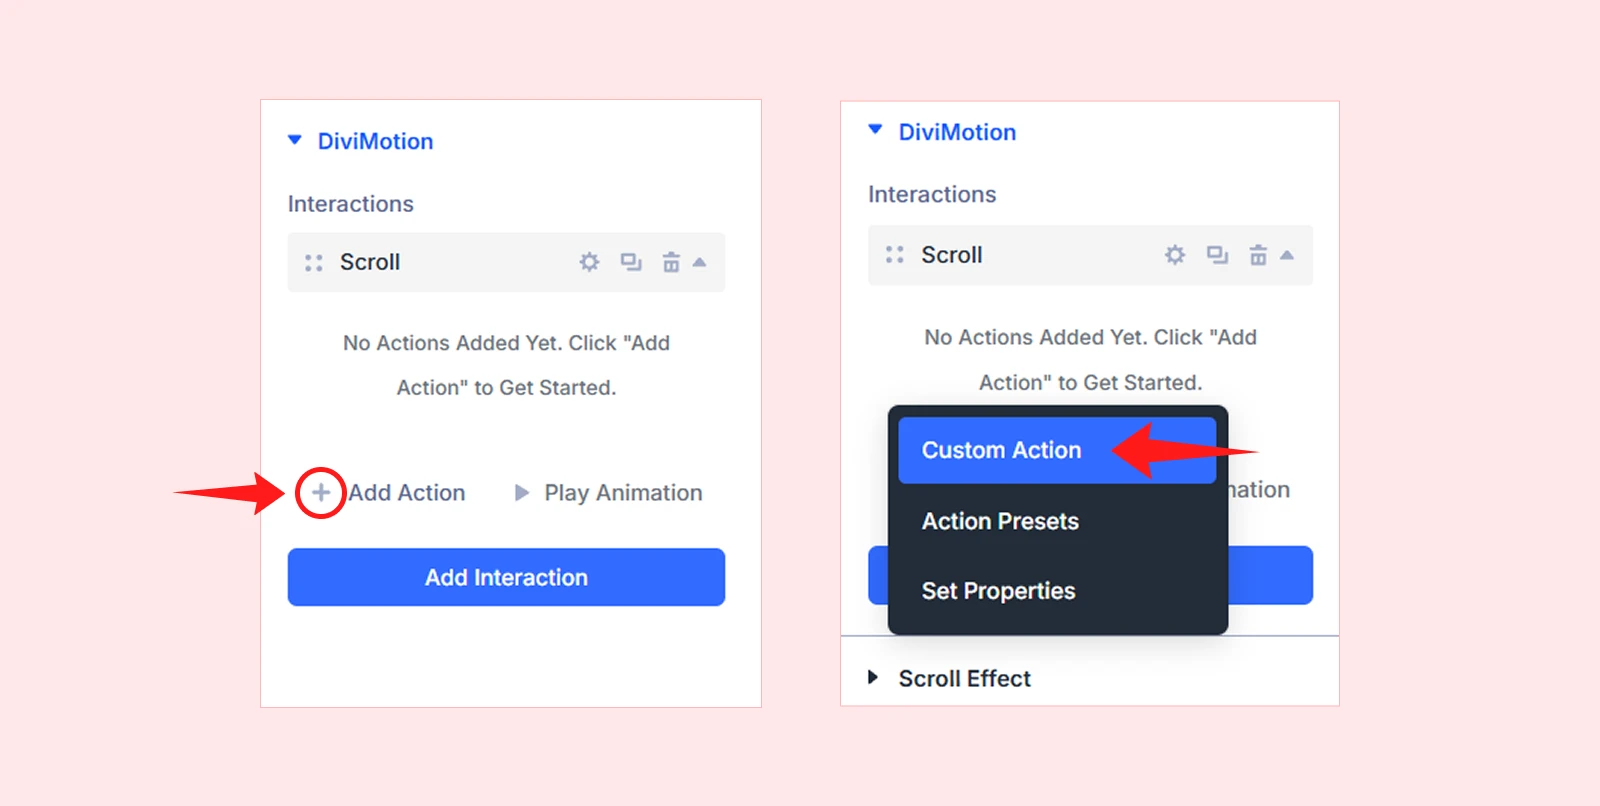
- Click Add Action under the Scroll interaction.
- Choose Custom Action.
- Open Action Targets and configure the following settings:
- Target Type: Element by ID
- Select Target Element: Group (up move)
- Scope: Inherit from interaction (This Element)
- Action Name: Move up
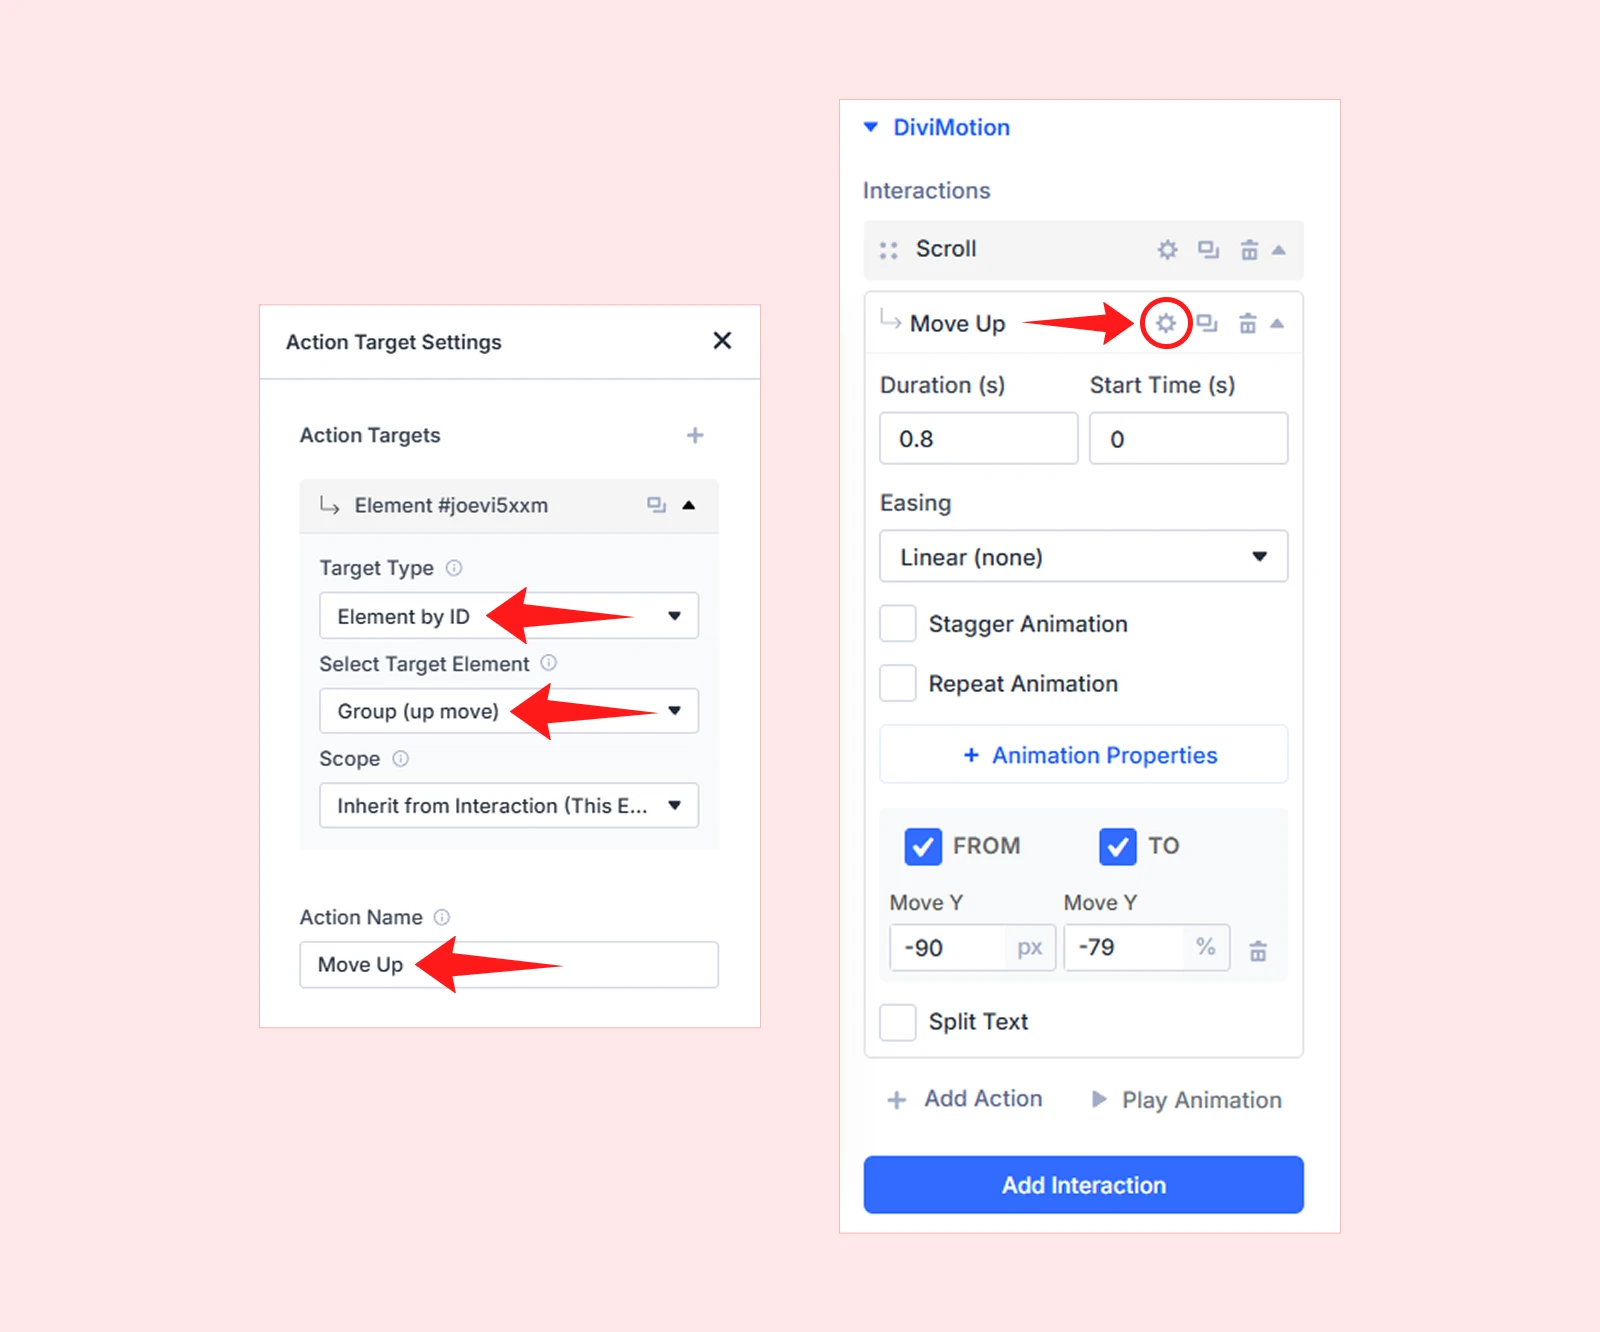
- Configure the animation settings:
- Duration: 0.8 seconds
- Start Time: 0 seconds
- Easing: Linear (None)
- Animation Properties: Enable Move Y
- Enable From and To
- Set the following Move Y values:
- From: -90px
- To: -79%
Add the Move Down Action
- Click Add Action below the Move Up action.
- Choose Custom Action.
- Open Action Targets and configure the following settings:
- Target Type: Element by ID
- Select Target Element: Group (Move Down)
- Scope: Inherit From Interaction (This Element)
- Action Name: Move Down
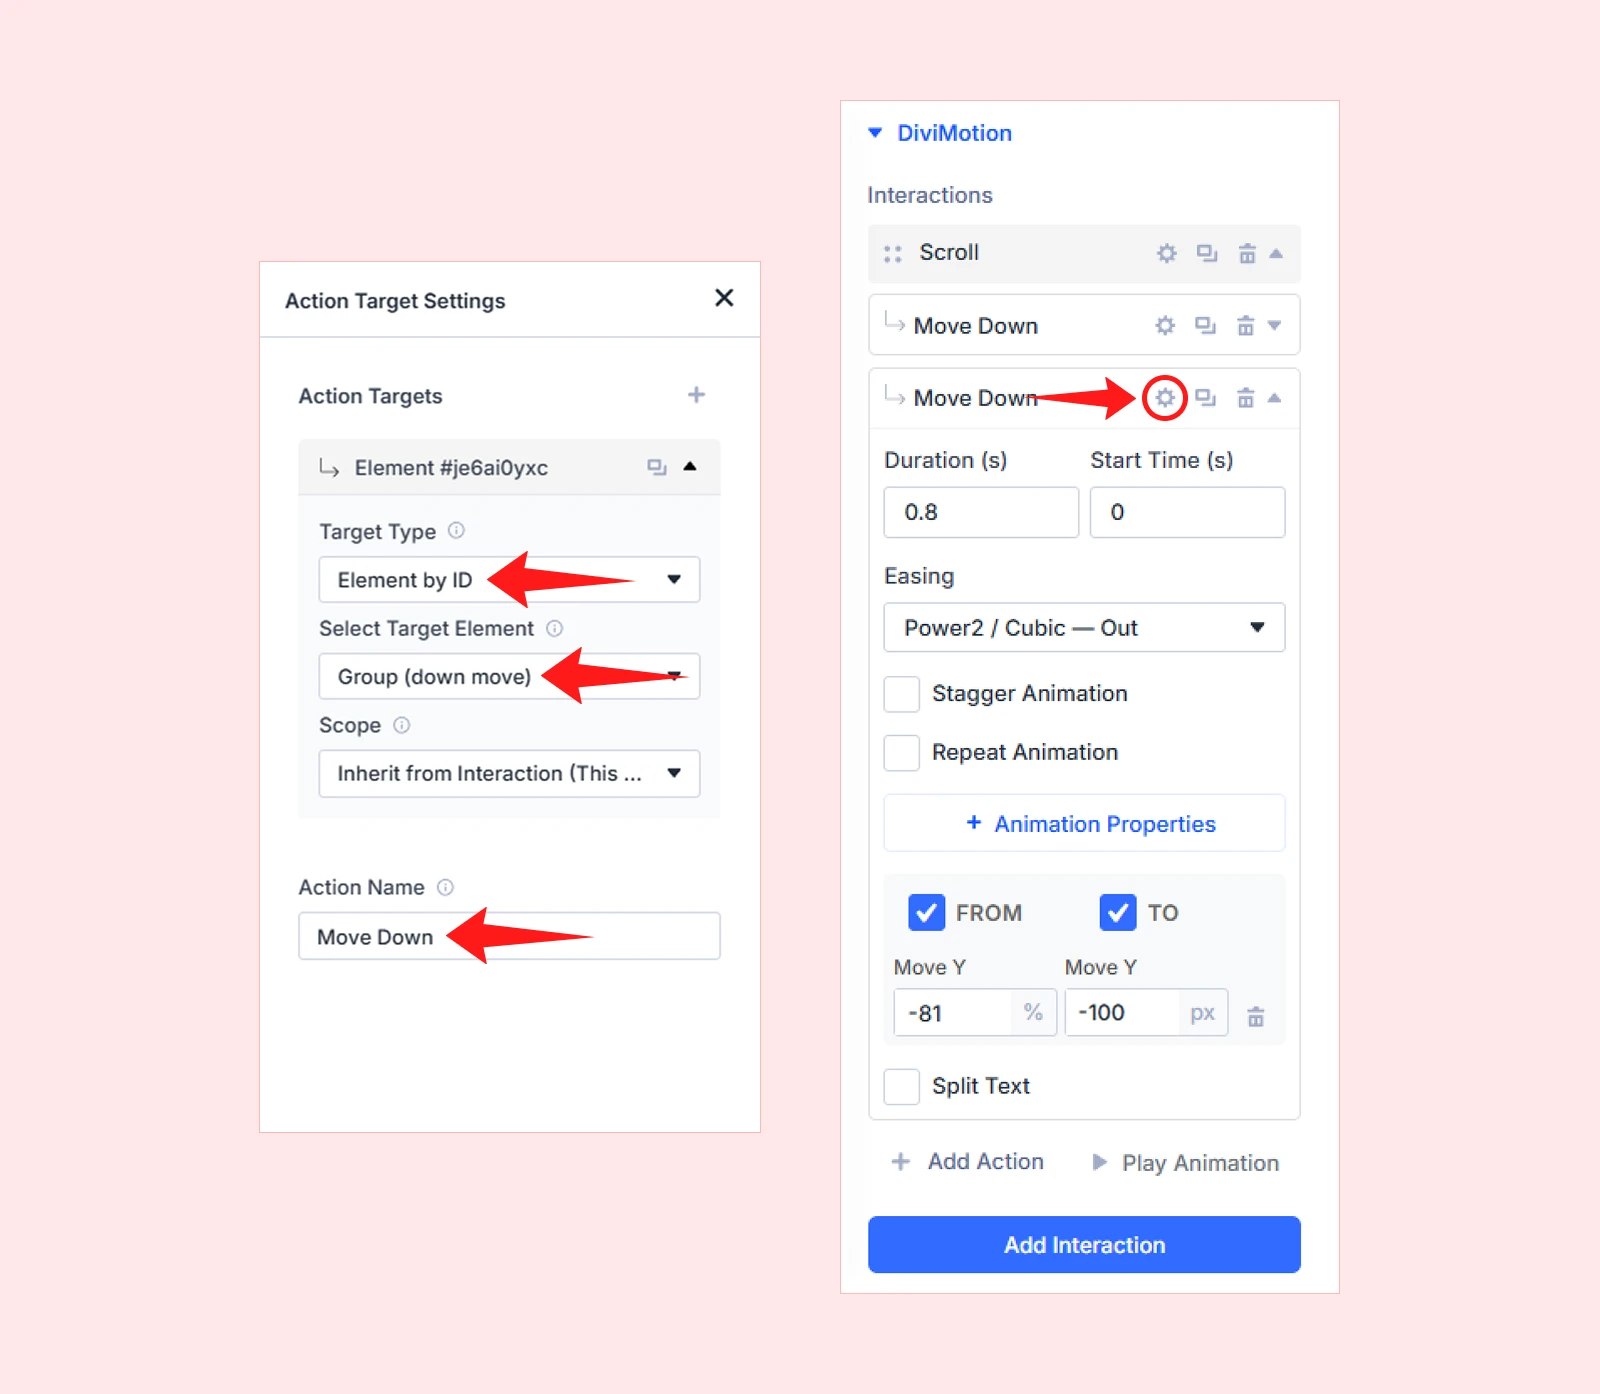
- Configure the animation settings:
- Duration: 0.8 seconds
- Start Time: 0 seconds
- Easing: Linear (None)
- Animation Properties: Enable Move Y
- Enable From and To
- Set the following Move Y values:
- From: -81%
- To: -100px
Set the Section Properties
- Click Add Action to create another action.
- Choose Set Properties.
- Enable Height and Overflow, then enter the following values:
- Height: 100vh
- Overflow: Hidden
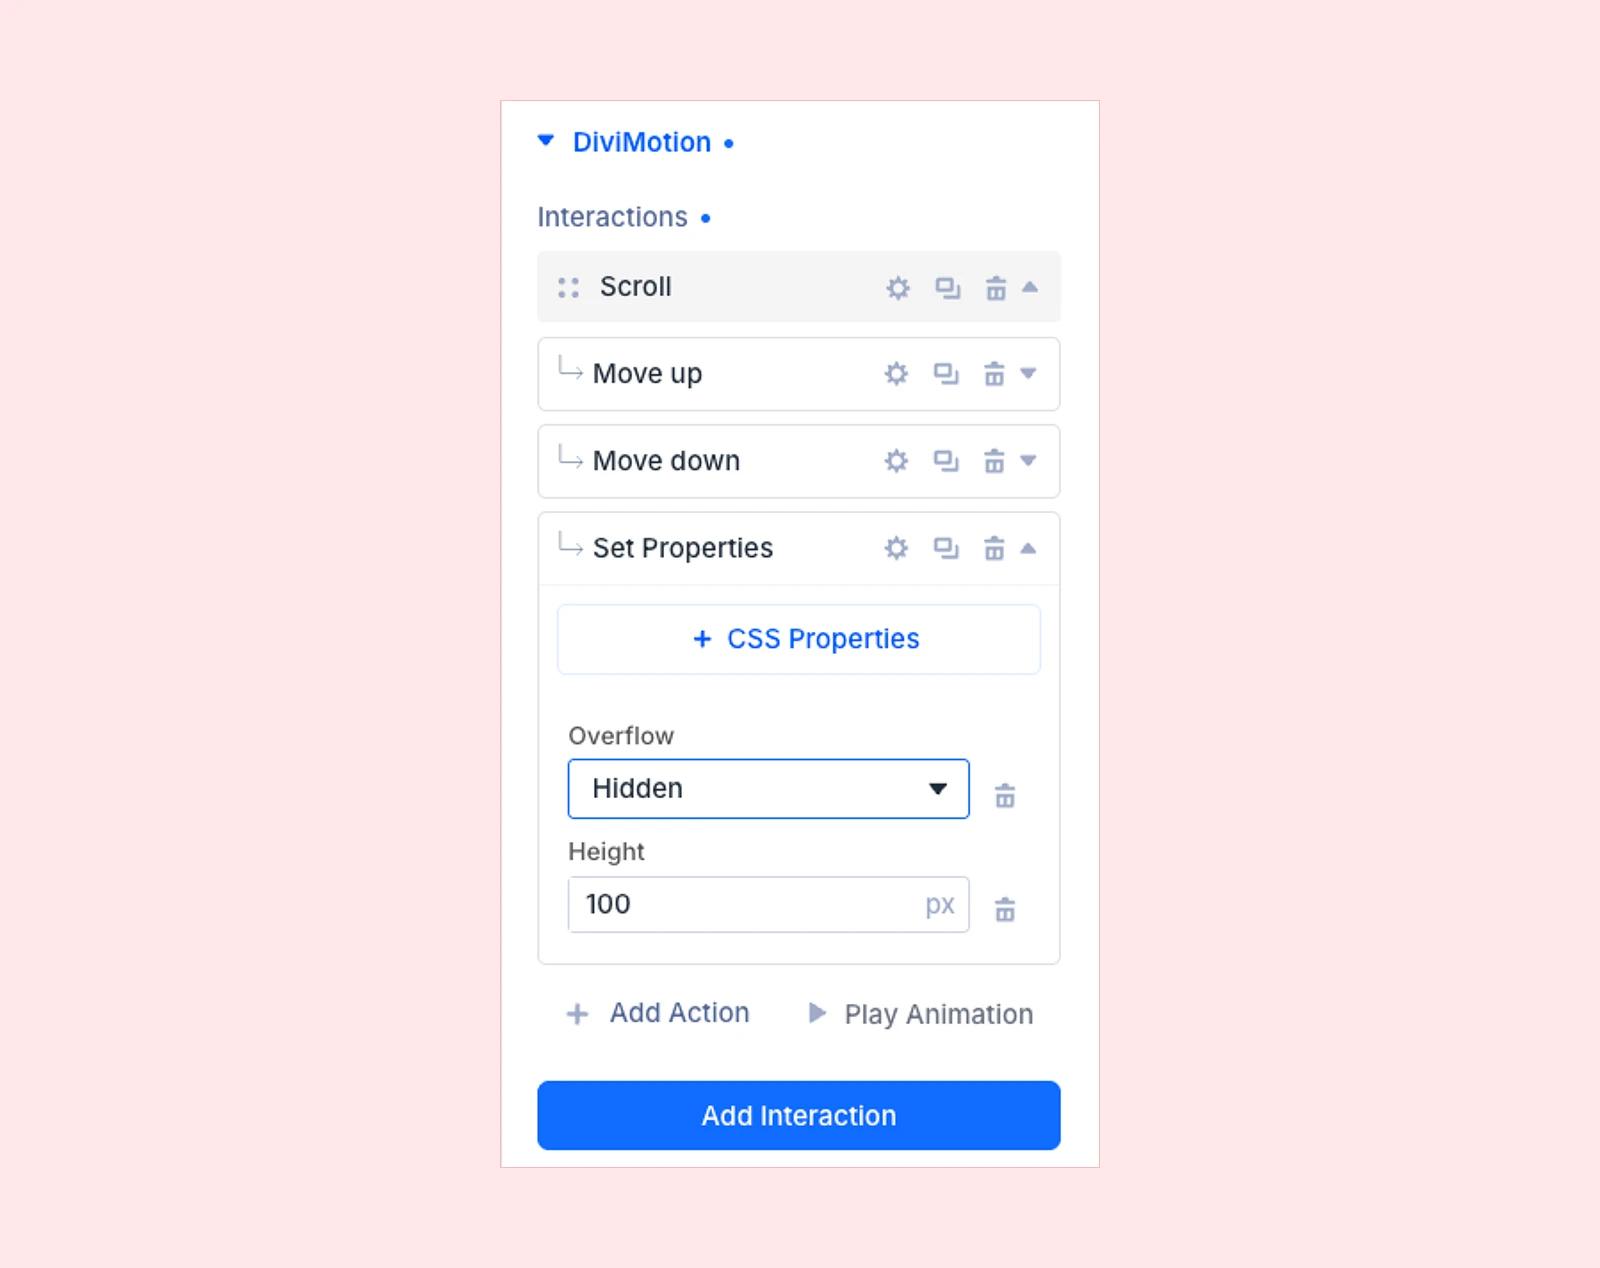
After setting up everything, save and publish the page. And that’s it. Our Vertical Scrolling effect is now ready and match
Step 5: Save and Preview
After configuring the interaction, animation actions, and section properties, save and publish the page.
Preview the page on the front end and scroll through the section to test the effect. The Move Up group should move upward, while the Move Down group should move downward.
Your vertical scrolling effect should now match the imported layout if you added the same values as we did.
Method 2: Add Vertical Motion with Divi’s Built-In Settings
Divi 5 includes a scroll transformation effect that lets you move elements vertically when the user scrolls. It creates a basic vertical effect which is suitable for creating Parallax effect and other basic motions.
However, it is not advanced enough to create a complete vertical scrolling layout like the one we created earlier. If you want to explore other built-in motion options besides Vertical Motion, read our detailed guide on how to add scrolling effects to a Divi website.
Here is how to apply a vertical scrolling effect using Divi’s built-in options:
Step 1: Select the Element
Open your page with the Divi Visual Builder. Select the section, row, column, or module where you want to add the vertical effect.
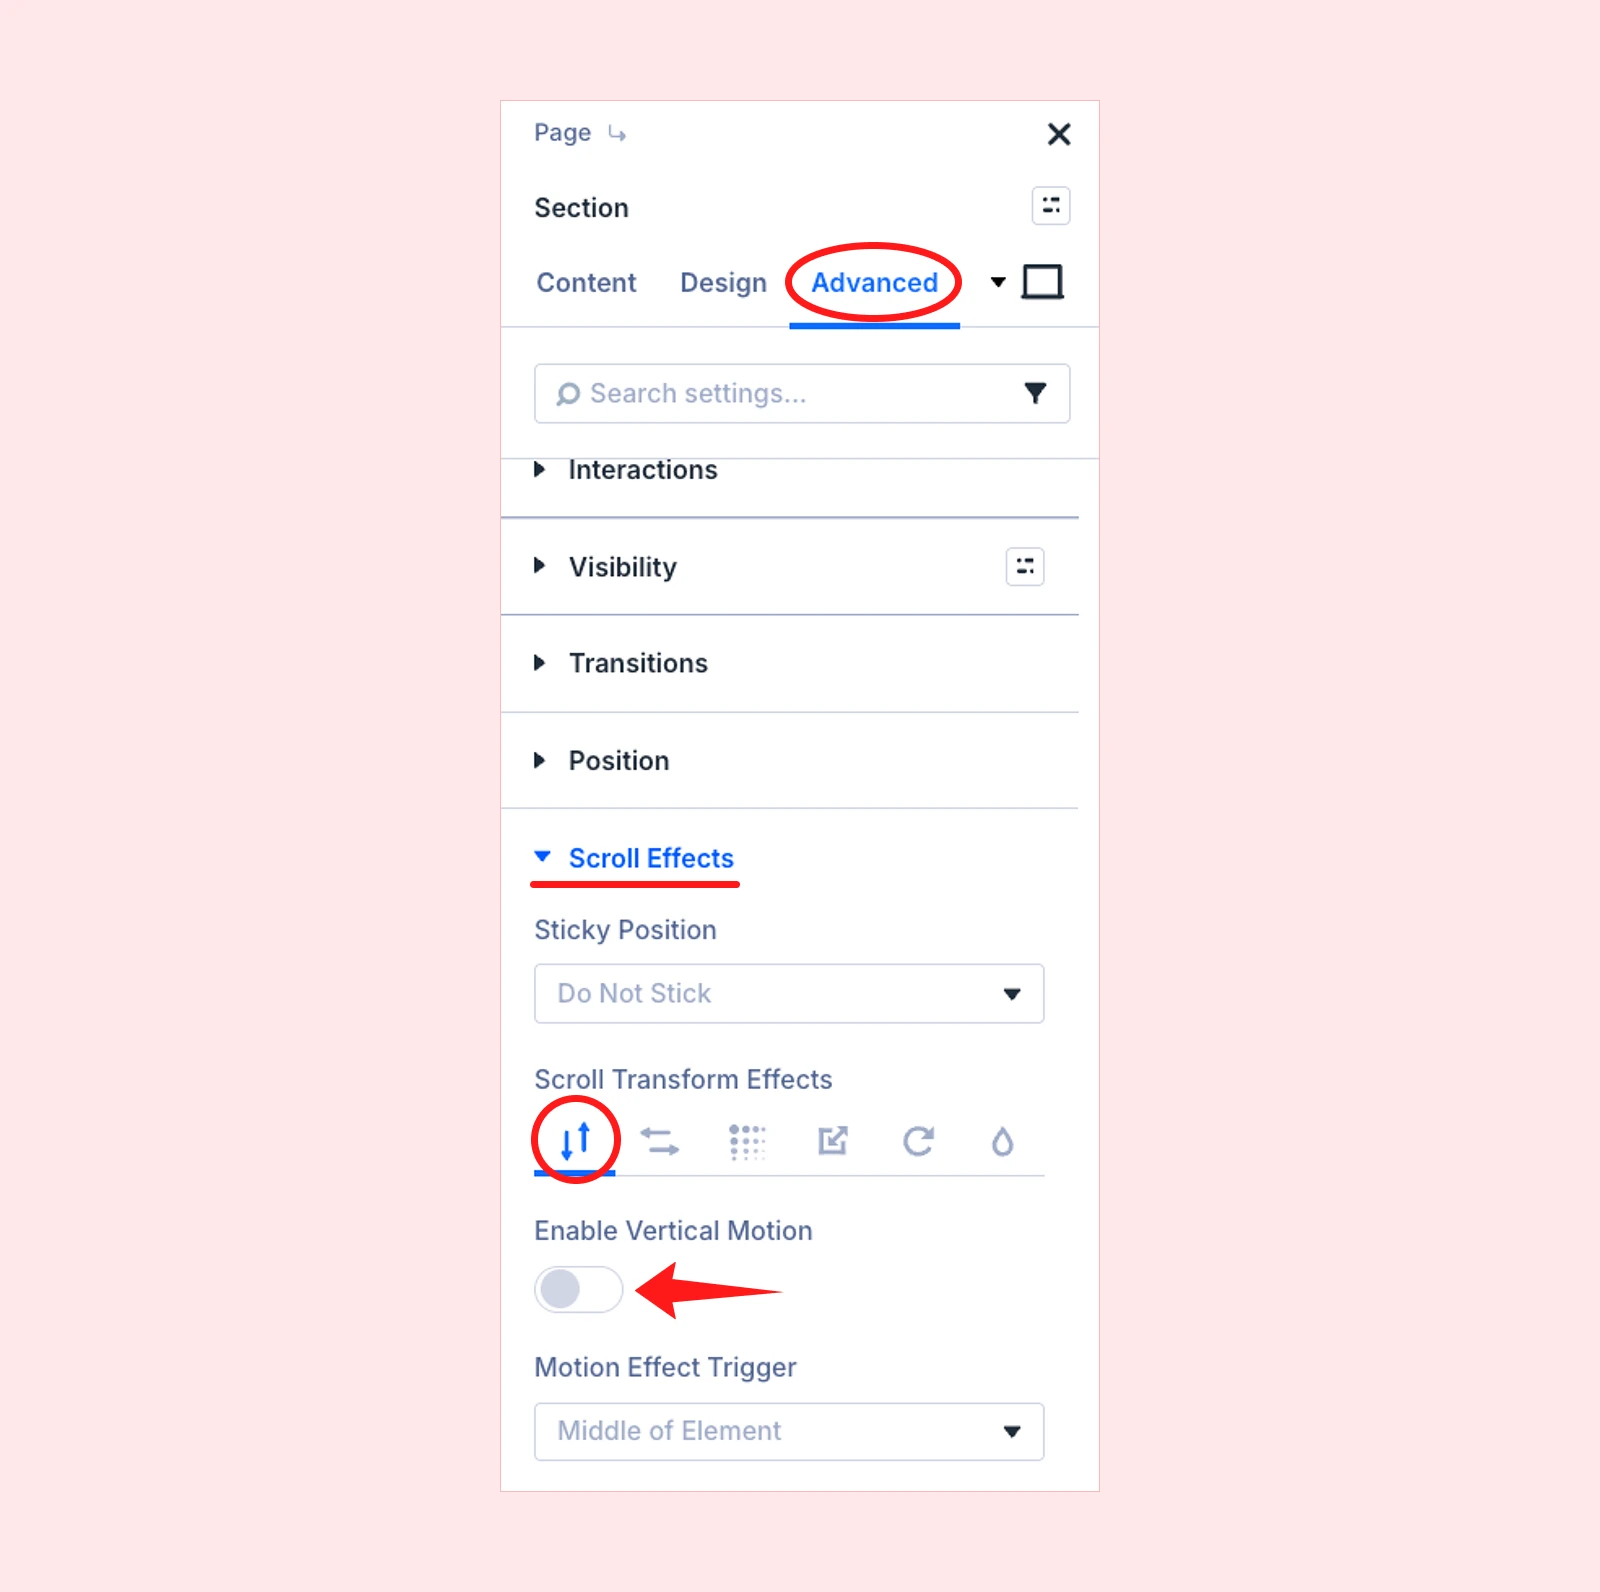
Step 2: Open Scroll Effects and Enable Vertical Motion
- Go to Advanced > Scroll Effects
- Select Vertical Motion from the Scroll Transform Effects
- Then Enable Vertical Motion
Step 3: Setup Vertical Motion Values
After enabling Vertical Motion, adjust the offset and viewport controls.
- Starting Offset: Position when the element enters the viewport
- Mid Offset: Position when the element reaches the middle
- Ending Offset: Position when the element leaves the viewport
- Viewport controls: Decide when the animation starts, reaches the middle, and ends
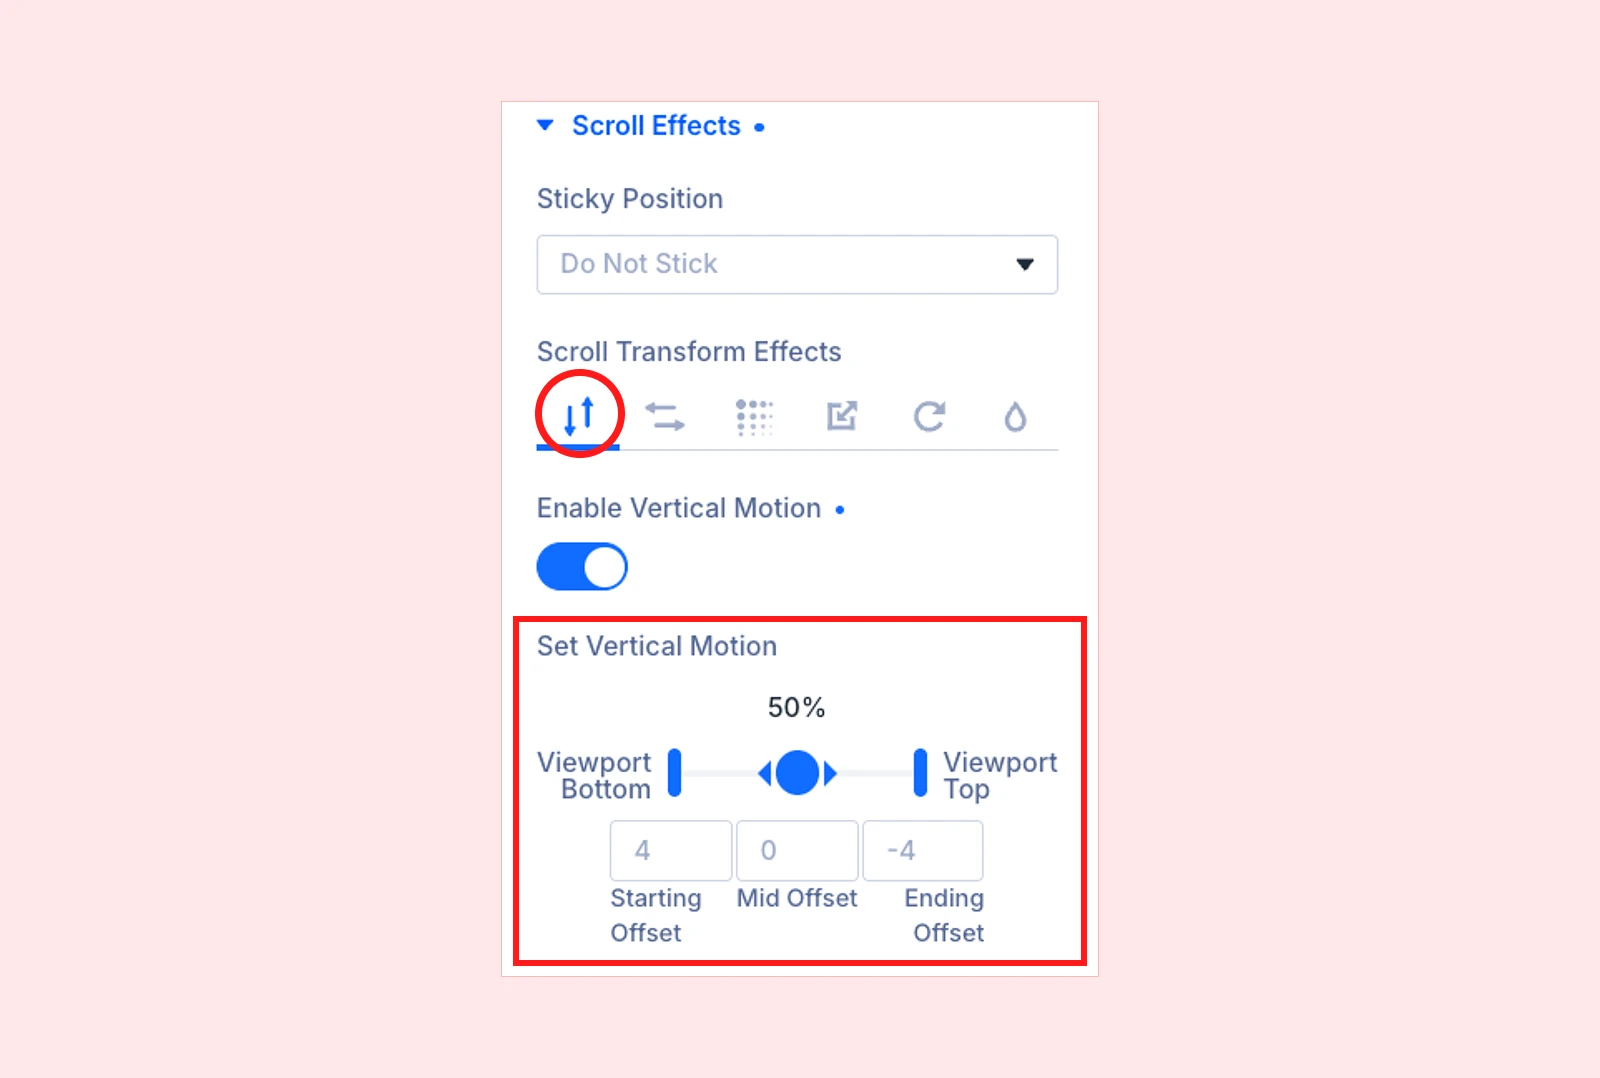
You can drag the sliders or enter values manually to control the movement.
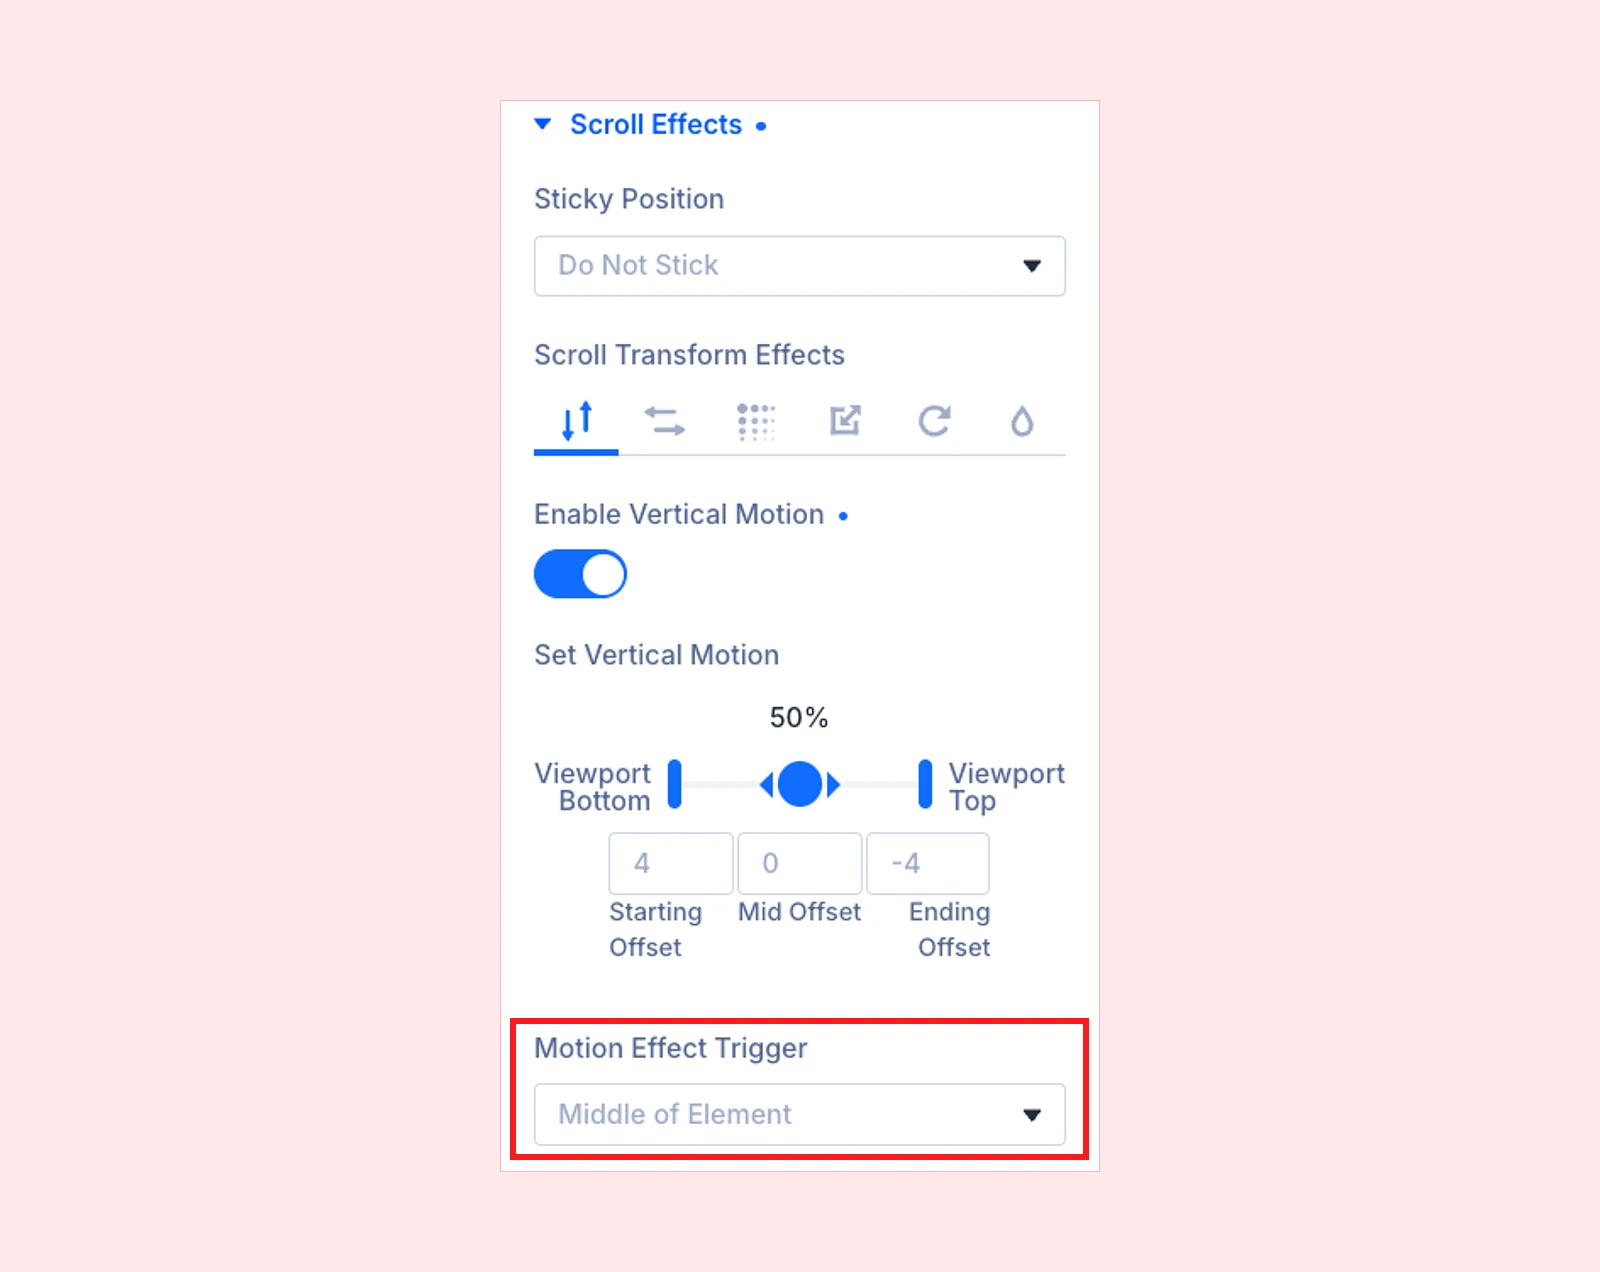
Step 4: Set the Motion Effect Trigger
Next, choose the Motion Effect Trigger. This setting controls which part of the element activates the scroll motion. And available options are:
- Middle of Element
- Top of Element
- Bottom of Element
Step 5: Preview and Save
Save the page and preview it on the front end. Your content should now show a vertical scrolling effect as visitors move down the page.
Final Thoughts: Which Method to Follow?
If you only want to move an element slightly upward or downward while visitors scroll, Divi’s built-in Vertical Motion setting is enough. It is quick to configure and works well for basic parallax effects, floating images, and subtle movement.
However, Divi’s default option is limited when you need a complete vertical scrolling layout with multiple moving elements, opposite directions, pinned sections, custom targets, and precise control over the animation.
For those advanced effects, DiviMotion is the better choice. You can start with a pre-designed layout for a faster setup or create the interaction from scratch to match your exact design.
If you also want to create side-to-side movement or full horizontal scrolling sections, check our guide on how to add horizontal scrolling effects to a Divi website.



0 Comments