
Loading
Divi Motion Logo
  • Home
  • Features
    • Horizontal Scrolling Text
    • Animated Process Flow
    • Particle Text
    • Header Scroll
    • Elastic Cards
    • Gravity Box
    • Scroll Video
    • DrawSVG
    • Card Stack
    • Card Deck
    • Horizontal Scroll
    • Preloader
  • Examples
    • Scroll Animations
      • Horizontal Scrolling Text Animation
      • Scroll Video Animation
      • DrawSVG Animation
      • Horizontal Scroll Animation
      • Vertical Scroll Animation
      • Pinned Elements Animation
      • Scroll Stack Animaiton
      • Split Text Animation
      • Stagger Animation
      • Card Stack Animation
      • Card Deck Animation
    • Click Animations
    • Hover Animations
    • Page Load Animations
      • On Load Animation Example
      • Page Load Animation Example
    • Gravity Box Animation
    • Elastic Cards Animation
    • Animated Process Flow Animation
    • Particle Text Effect Animation
  • Pricing
  • Resources
    • Documentation
    • Video Tutorial
    • Changelog
    • Roadmap
    • Community
    • Contact & Support
Login

Getting Started

6
  • Introduction to DiviMotion
  • Installing & Activating DiviMotion
  • Dashboard Overview
  • Interface Overview
  • Create Your First Animation
  • DiviMotion Glossary

Interactions

5
  • Overview
  • Scroll Trigger Interaction
  • Click Trigger Interaction
  • Hover Trigger Interaction
  • Page Load Trigger Interaction

Actions

4
  • Overview
  • Custom Action Overview
  • Action Presets Overview
  • CSS Properties Overview

Extensions

6
  • Scroll Header
  • Card Deck
  • Card Stack
  • Horizontal Scroll
  • Animation Timeline
  • Preloader

Modules

7
  • Horizontal Scrolling Text Overview
  • Animated Process Flow Overview
  • Particle Text Overview
  • Scroll Video Overview
  • Gravity Box Overview
  • Elastic Cards Overview
  • DrawSVG Overview
View Categories
  • Home
  • Docs
  • Getting Started

Create Your First Animation

Before diving into specific animation types, it's important to understand how DiviMotion works.

DiviMotion uses a simple three-step model to create any animation:

When → What → How = Interaction → Action → Properties

Every animation, whether scroll-triggered, hover-based, click-activated, or load-based, follows the same three-step workflow.

This guide explains how these three components work together so you can confidently create any animation type.

Here's how you'll apply this three-step model when creating any animation:

Accessing DiviMotion Controls

  • Open your page in the Divi Visual Builder
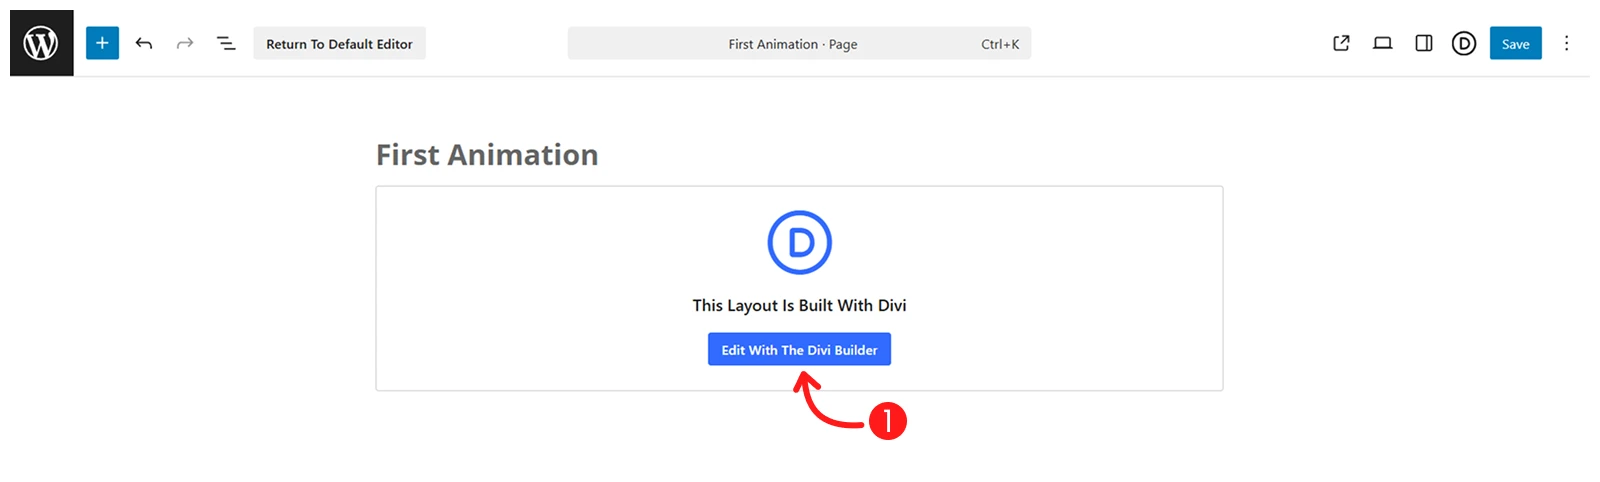
  • Click the settings icon on any section, row, column, or module
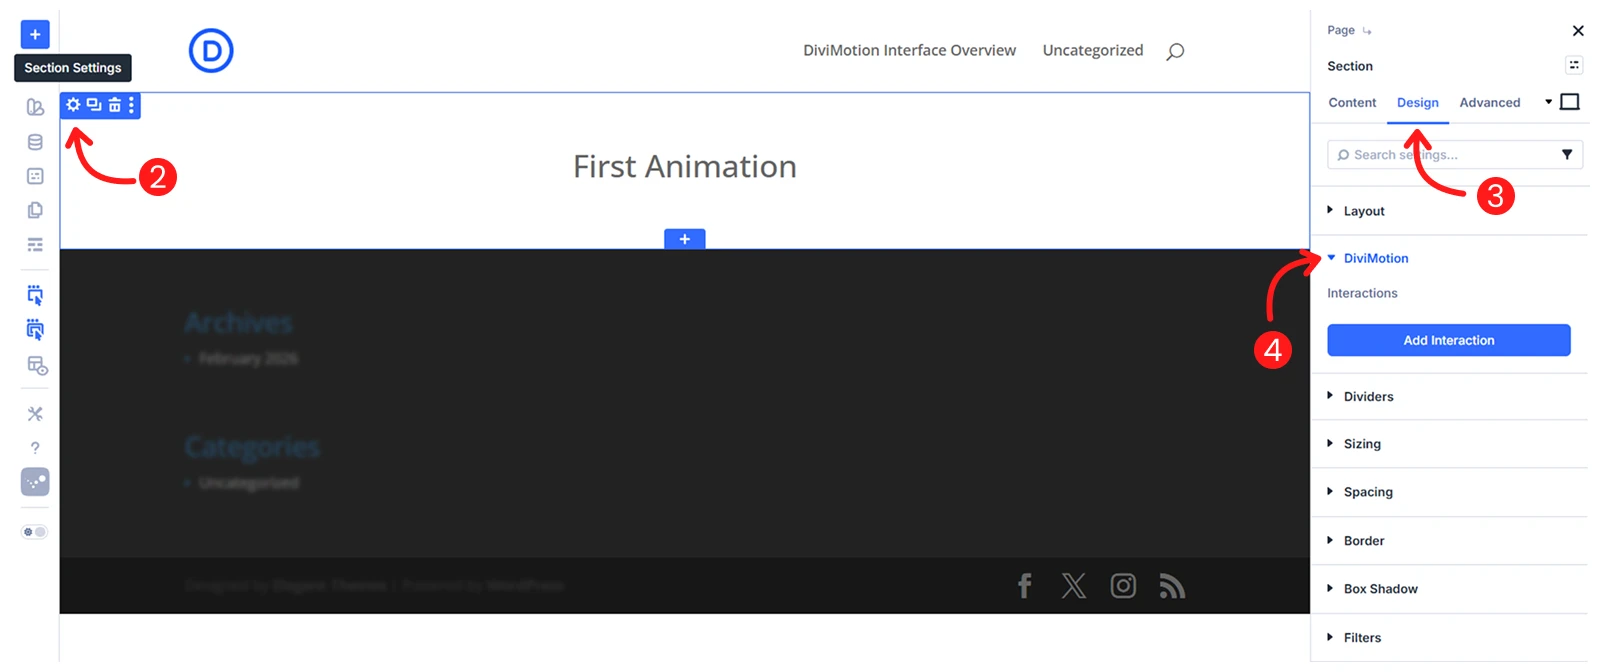
  • Switch to the Design tab
  • Scroll down to the DiviMotion section and expand it

Step 1: Add an Interaction (When)

The first step is telling DiviMotion when the animation should happen.

To add an interaction:

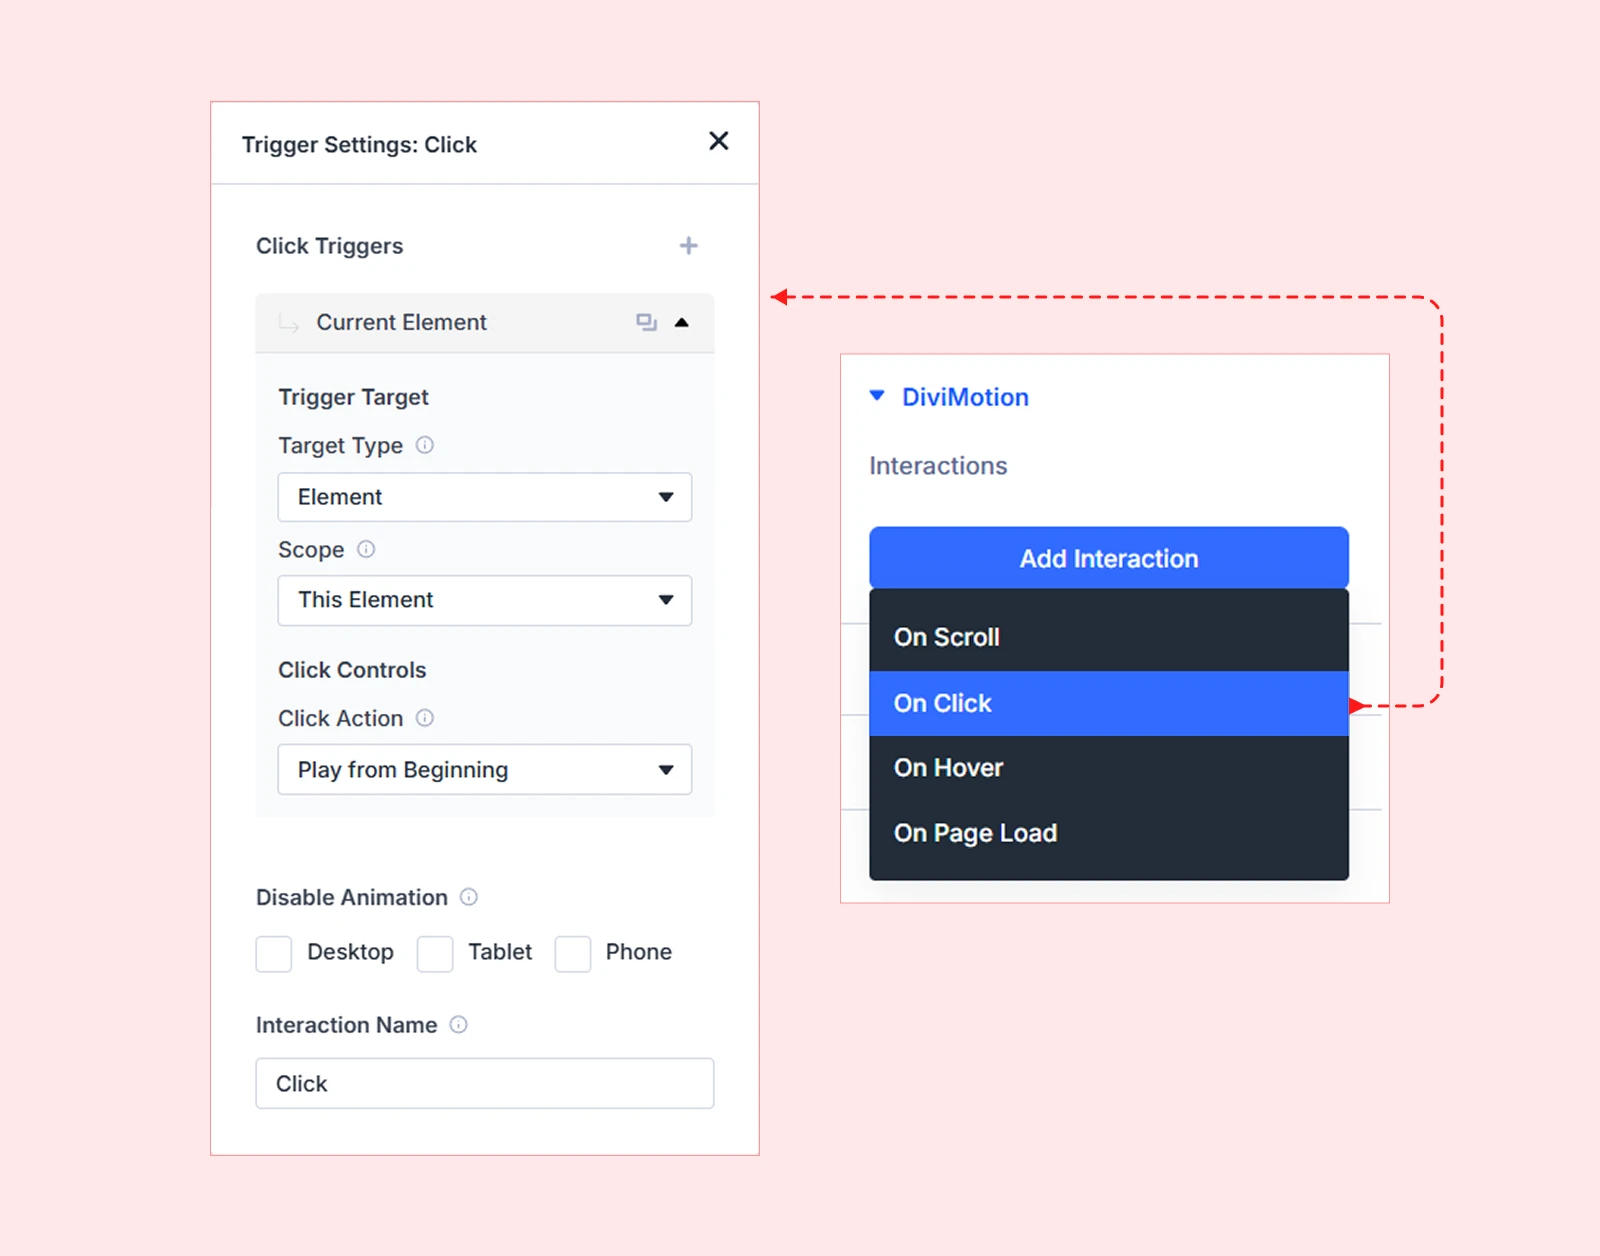
  • Click + Add Interaction
  • Choose your trigger type (Scroll, Hover, Click, or Load)
  • Configure trigger-specific settings
Note: Each interaction can contain multiple actions for creating complex sequences. Not sure which trigger to use? Review the Interaction Overview Guide after completing this workflow overview.

Step 2: Add an Action (What)

Now you'll tell DiviMotion what should happen when the interaction is triggered.

To add an action:

  • Inside the interaction card, click + Add Action
  • Choose Preset (predefined animations), Custom (build from scratch), or Set Properties (change element states like visibility, position, or styling)
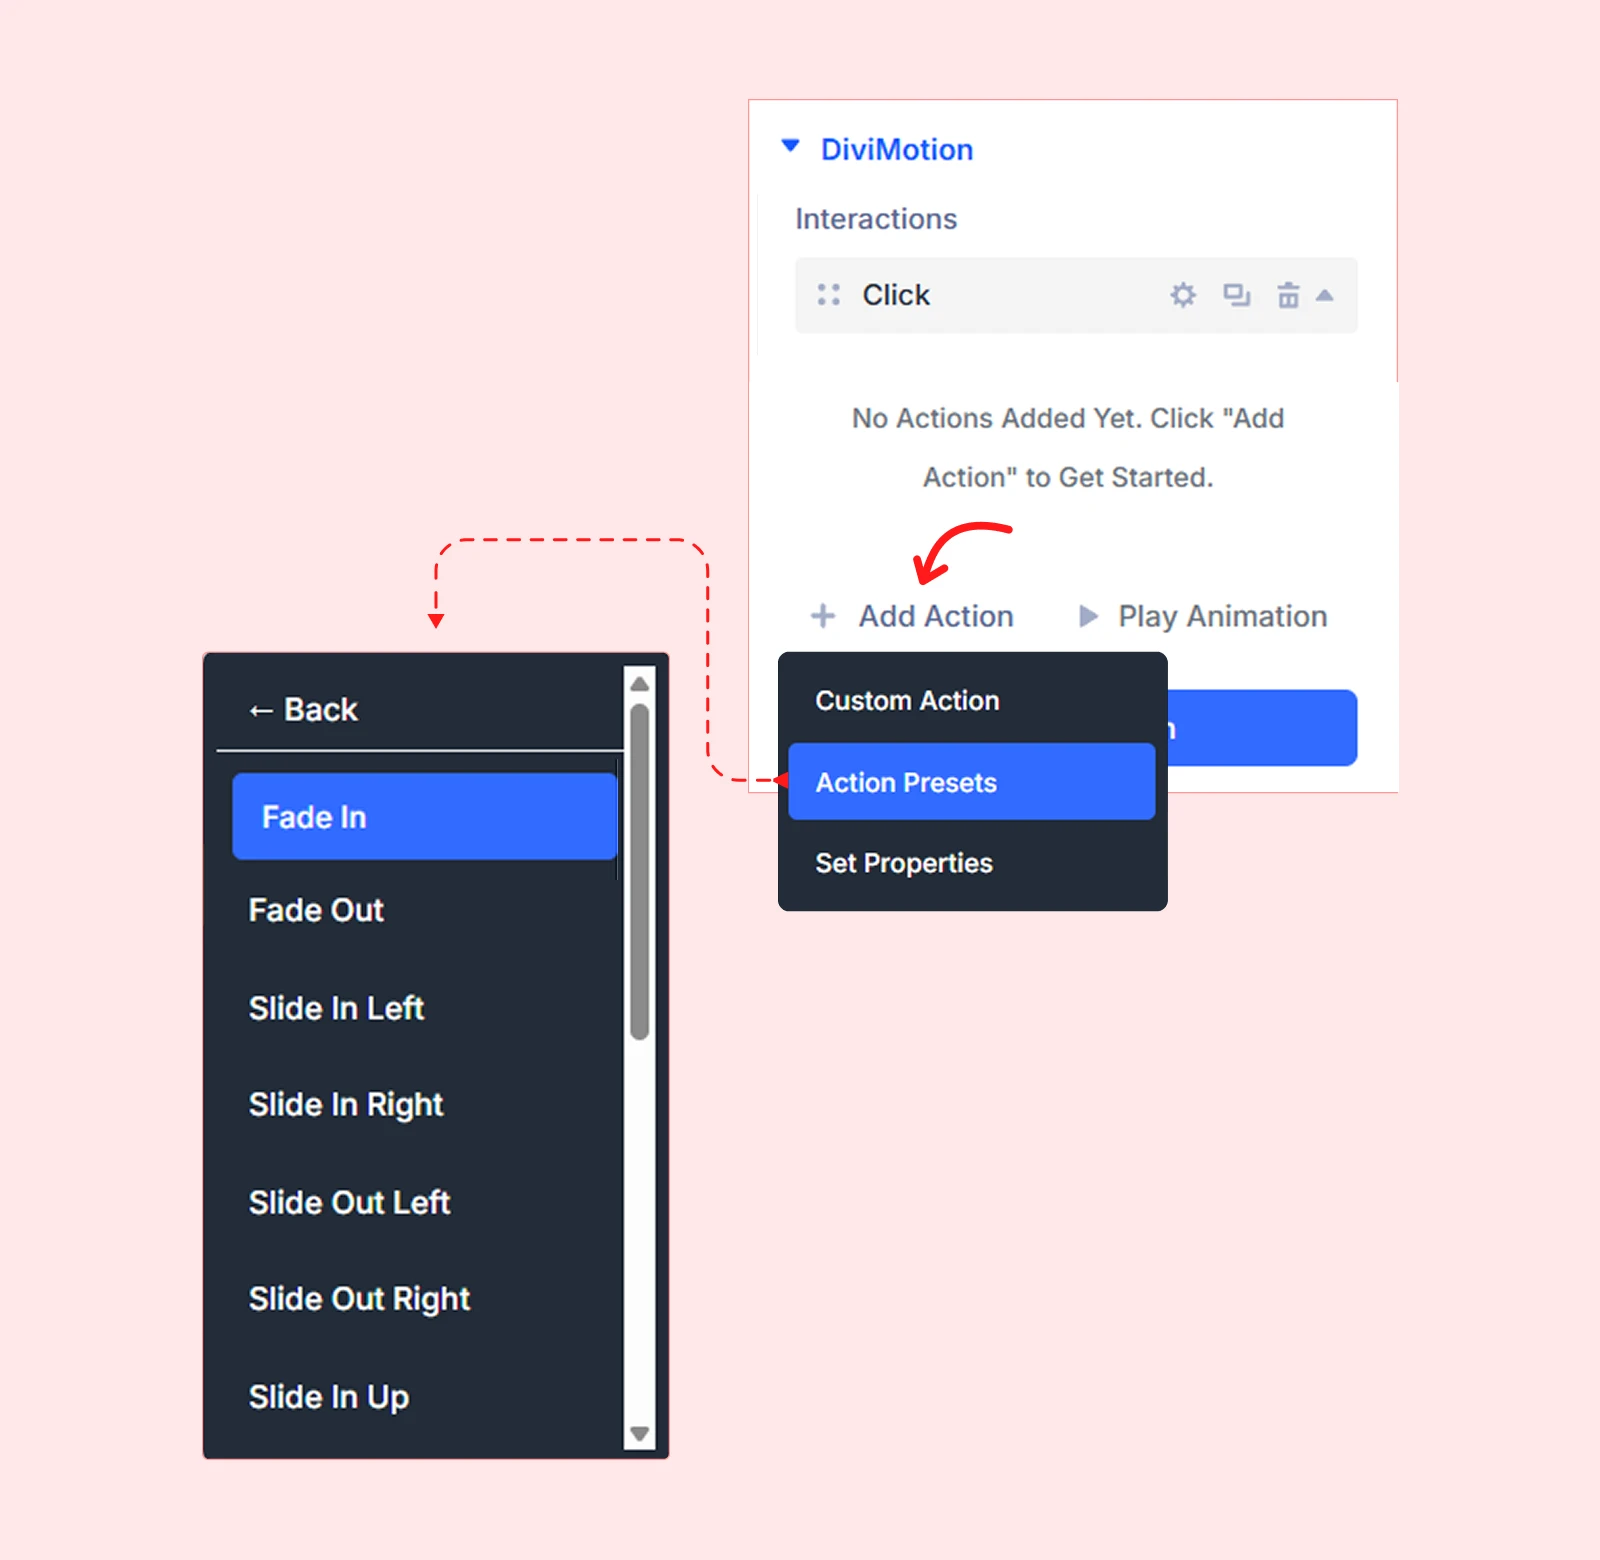
  • Configure action settings (target, duration, delay, easing)
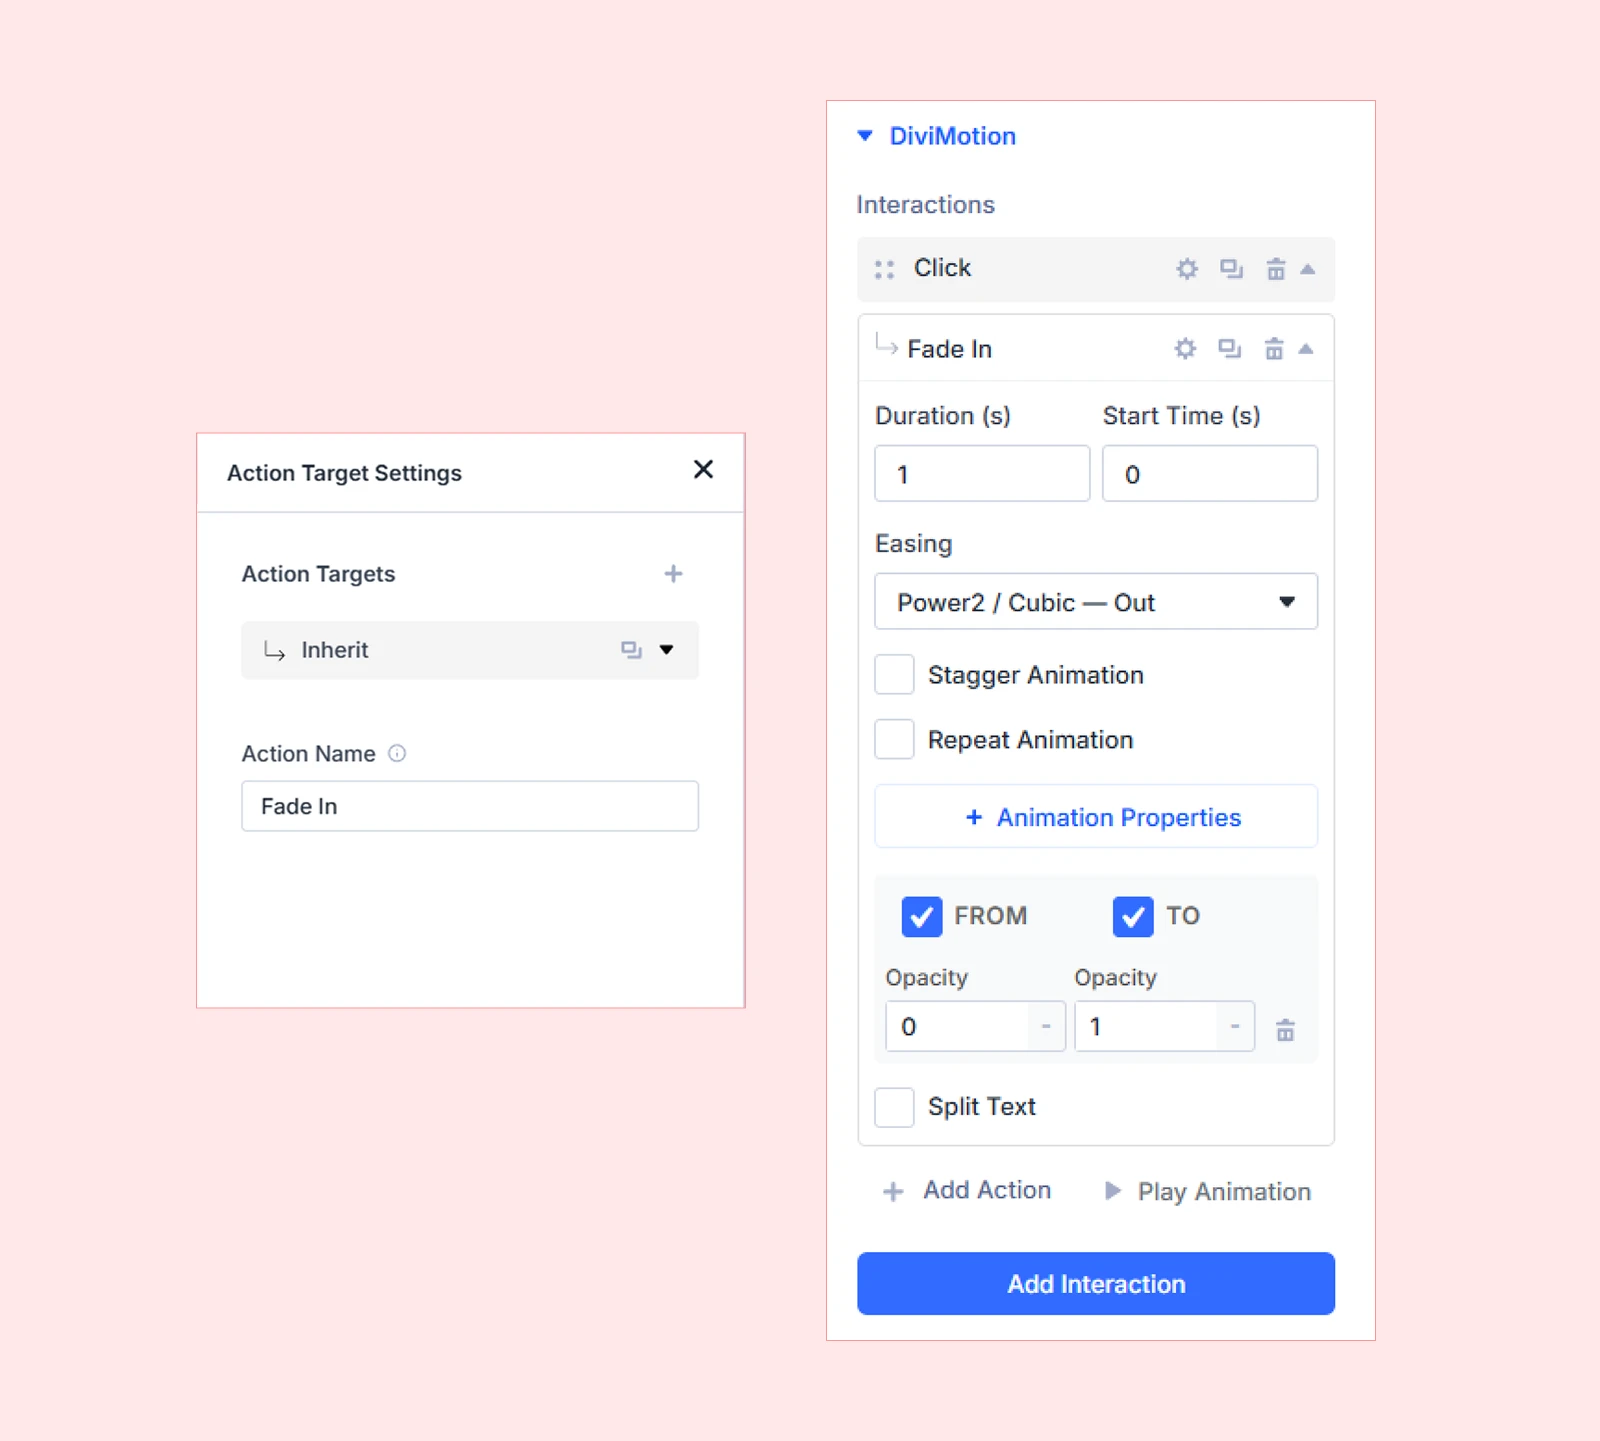
Note: You can add multiple actions under each interaction for multi-step animations. To learn more about preset vs. custom actions, check the Actions Overview Guide after understanding this workflow.

Step 3: Set Properties (How)

Now you define how your element changes during the animation.

For Preset actions, DiviMotion automatically sets up animation properties with optimized default values. You can customize these if needed.

For Custom actions, you'll manually add and configure each animation property.

To add or customize properties:

  • Expand Animation Properties under the action
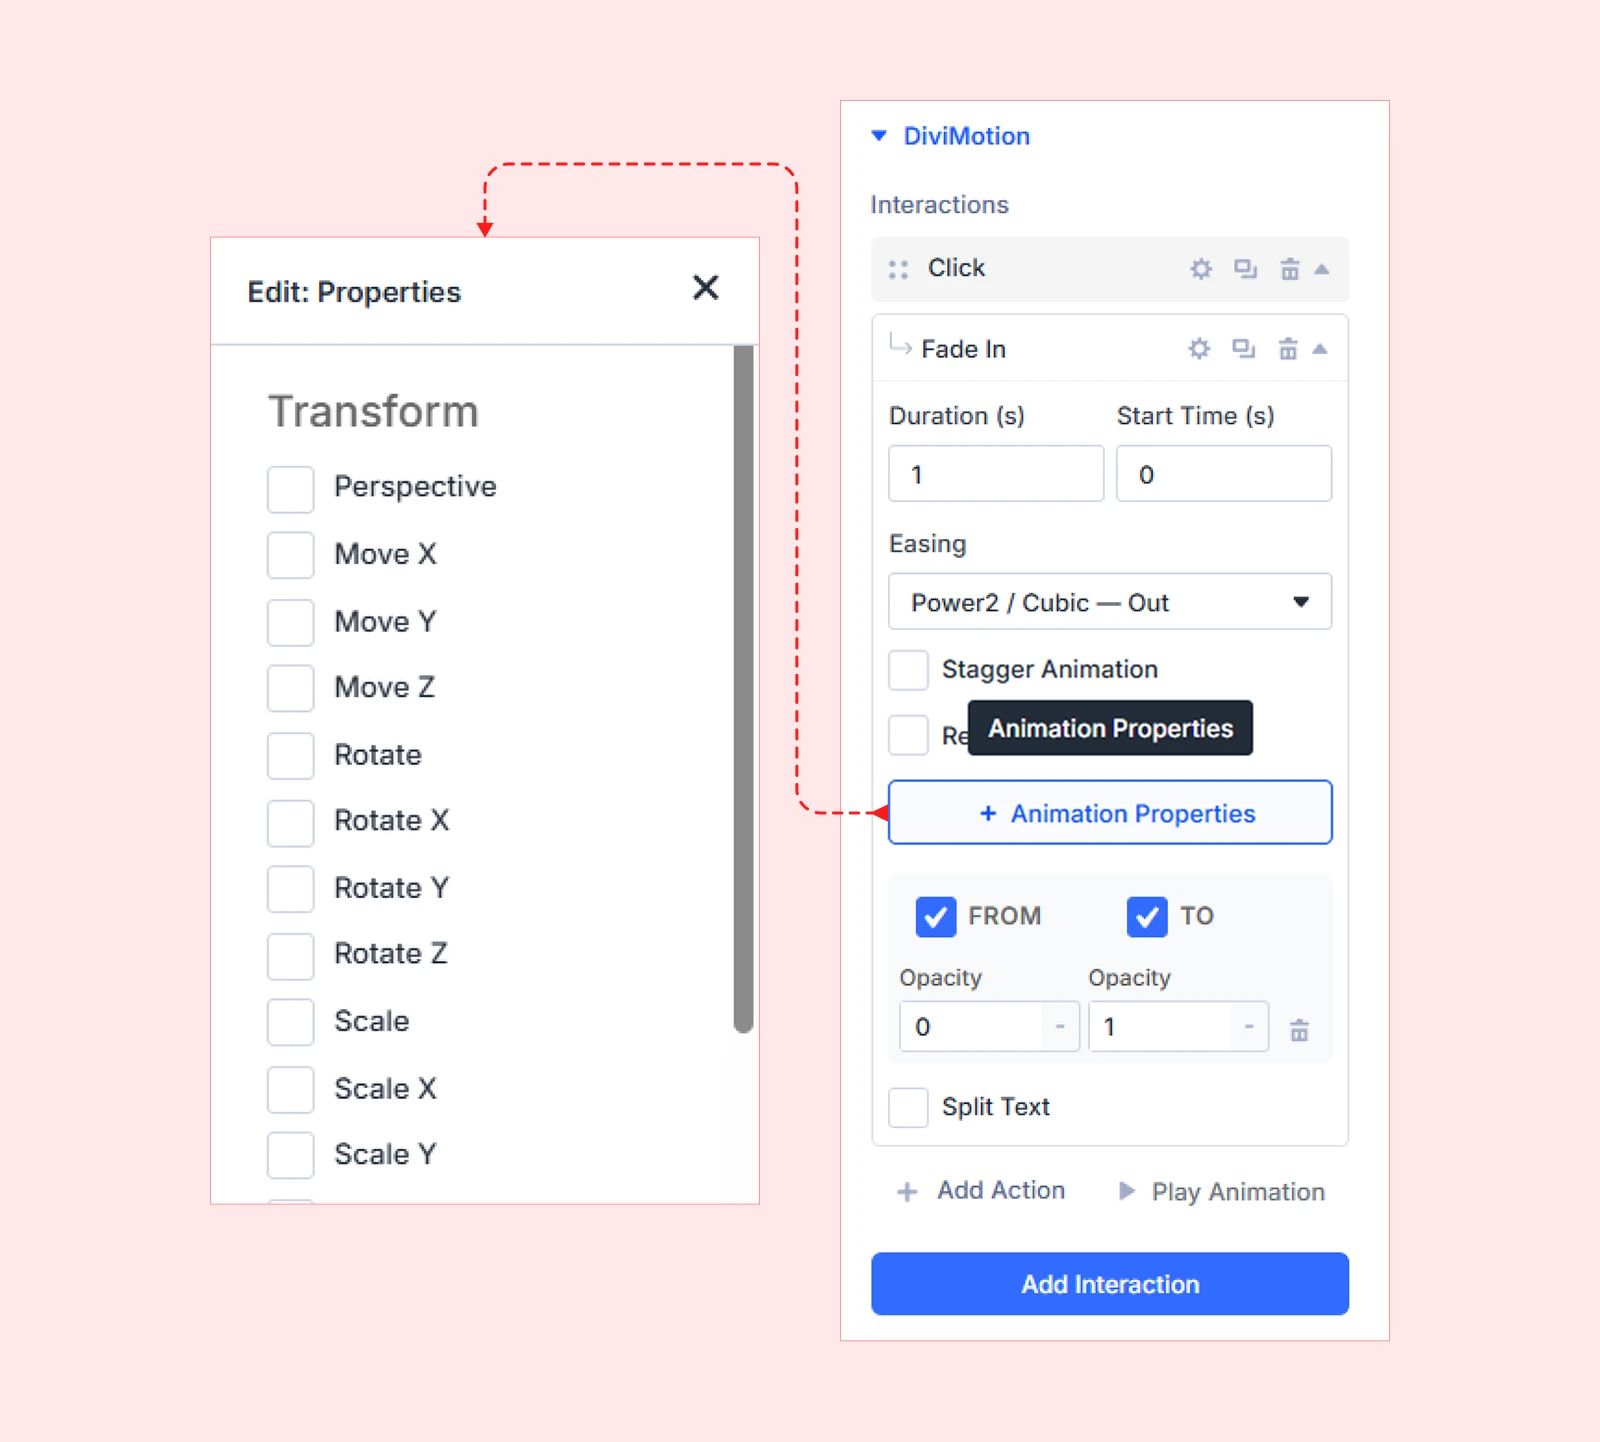
  • Adjust property values like Opacity, Position (X, Y), Scale, Rotation, and more
  • (Optional) Add CSS Properties like z-index or overflow for advanced layout control
Note: To learn about each available property in depth, check the Animation Properties Guide and CSS Properties Overview.

Preview Your Animation

Click Play Animation (next to the “+ Add Action” button) to preview your animation directly inside the Visual Builder — no saving, reloading, or publishing required.

Make adjustments, hit play again, and repeat until your animation looks just right.

What's Next?

Now that you understand the core workflow. Pick an animation type and dive into the detailed guide!

Updated on August 12, 2026

What are your Feelings

  • Happy
  • Normal
  • Sad

Share This Article :

  • Facebook
  • X
  • LinkedIn
  • Pinterest
Interface OverviewDiviMotion Glossary

Submit a Comment Cancel reply

Your email address will not be published. Required fields are marked *

DiviMerc Logo

Make Divi Websites Move

  • Follow
  • Follow
  • Follow
  • Follow
  • Follow

Divi is a registered trademark of Elegant Themes, Inc. This website is not affiliated with nor endorsed by Elegant Themes.

Company

  • About

  • WordPress SEO Service

  • Contact

  • Community

Products

  • DiviFlash

  • DiviMerc

  • DiviGear

  • RioVizual

  • RioForms

Resources

  • Documentation

  • Video Tutorial

  • Changelog

  • Roadmap

Legal

  • Terms of Service

  • Privacy Policy

  • Refund Policy

DiviMerc Footer Logo

2

© 2026 DiviMotion. A WPRio creation, in SEO partnership with VizibleSEO. All rights reserved.